MerlinsBeard
New member
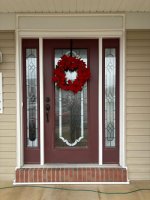
For this year my main project was to create a lighted garland that I could display around the front door. Here are some of the details in case others may want to duplicate the project.
For the garland I used Balsam Hill fraser fir garland 2-pack where both lengths were 10 feet long. They come in a box that you have to fluff out but the quality looks great. They do go on sale about this time, so act now if you're interested.
For lights, I bought 70 5mm Warm White SoftTwinkle TM LED Christmas Lights, 4" Spacing, Balled Set from Christmas lights etc.
For the PVC, I used mostly 3/4" PVC for the frame and 1/2" PVC around the brick to try to get a bottom 3/4" PVC to help counterbalance the weight of the garland. To keep the frame in place, I use white pool noodles to compress the foam against the ceiling above the door of the overhang. I used 8" green zip ties to attach the garland spine around the 3/4" PVC frame.
Here is a rough outline of the steps I did.
1. Unpack the garland and fluff out the shape. The garland has little bendable ends that you can use to hook two garland pieces together.
2. For each garland, I used two 70 bulb strands of the soft twinkle lights. I tested the strands before starting to weave them into the garland.
In the middle of the BH garland, there is a little metal spiral that is used for support, and in the middle of the soft twinkle lights, there is a little connector that separates the two 35 light sides. I zip-tied each light strand around that connector to the metal spiral in the middle of the garland. Then I weaved one light strand into the garland, turned off the lights and observed where the garland was dark. Then I used the 2nd light strand and weaved it in and around the dark parts until I had the twinkle lights spaced reasonably even. I made sure to have the two male plugs on one end, and the female plugs on the other end. Then I zip tied the light strands to the ends of the garland to keep things roughly in place.
Then I repeated the process for the 2nd garland and plugged them together. The orientation shouldn't matter since there are bendable "hooks" on either side. Then in the middle between the two garlands, you can connect the male ends of second garland's lights to the first garland.
3. Designing and assembling the PVC frame.
For this, since the garland is relatively heavy, I wanted to try to have a counter force by constructing a frame that has resistance to toppling over. To do this, I used the brick step that juts out from the front door. I used 3/4" PVC for the major part of the frame, and 1/2" for the tight corners around the brick as 3/4" extended too far for the horizontal PVC to sit flush against the brick.
To cut the PVC to size, I used hose clamps to help get an even cut and a hacksaw to start the cut. Since the hose clamps have the screw that gets in the way, what I did was start the cut with the hacksaw, then switch to a PVC pipe cutter to finish the cut. I used the "DEWILL Ratchet-type Pipe and PVC Cutter, One-hand Fast Pipe Cutting Tool, for Cutting 1-5/8 inch PVC" from Amazon.
After I cut the pipe, I used a pipe reamer and a metal file to clean up any uneven cuts. I used the RIDGID 29983 Model 223S 1/4" to 1-1/4" Inner/Outer Copper and Stainless Steel Tubing and Pipe Reamer. I like to bevel the outer edge as well since it makes insertion a little easier. When cutting the vertical pieces, I wanted to have the same length so using the pipe reamer followed by the metal file is a simple way to make small adjustments to the pipe length.
I needed to use 4x 10' 3/4" PVC pipe sections, and 1x 10" 1/2" PVC pipe for little connections. Then for the fittings I used
2x 3/4" PVC tees for the top part of the PVC frame to connect the horizontal portion above the door.
2x 3/4" to 1/2" 90 degree elbows at the bottom of the brick
2x 1/2" - 1/2" 90 degree elbow where one side can insert into a PVC fitting, and the other side can receive PVC pipe. This wraps around the top part of the brick step to go vertical again.
2x 1/2" 3-way PVC fitting to have a little more stability on the concrete floor.
2x 1/2" to 3/4" 90 degree elbows to connect the stabilizer 3/4" PVC bar in front of the brick steps.
To assemble, I used a rubber mallet to connect the PVC fittings and pipe to each other and had no issues.
-4. Anchoring the PVC frame with vinyl siding clips and zip ties.
This turned out to be a bad idea for a couple of reasons. First, the PVC is too flexible so when you try to zip tie the two sides against each other, the PVC flexes and doesn't anchor very well. If you tighten zip ties too much on one side, you inevitably create looseness on the other side.
5. Insert a wood dowel into the top 3/4" PVC for extra strength. With all the flexing I observed, I decided to cut a 3/4" wood dowel to just the right length and insert it between the two top 3/4" PVC tee fittings. It provides more resistance to flexing that would make the frame more unstable.
-6. Attempting to zip tie the garland to the PVC frame at the front door. This was impractical as I could not thread the zip tie around the garland spine 1 handed and support the weight of it in my arms.
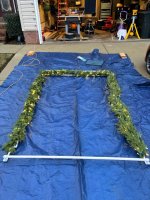
7. Remove the top and sides of the frame and put it on the garage floor and zip tie the garland to the frame.
This worked out great since there's no gravity to deal with. I used 8" green zip ties, using 6 on top and 6 on the sides for a total of 18, roughly evenly spaced. You can tell where to zip tie if you lift the frame with the garland and you can see where the garland tries to slide away from the frame.
8. Insert the PVC frame with the garland attached into the bottom assembly of the frame.
This was a little awkward and I needed a 2nd person to help. I can lift it vertically to carry it, but getting it in place required going a little bit horizontal. The person with the longer arms should carry the sides and the shorter arms can carry the top bar.
9. Stabilize the PVC frame.
Once I had the garland and frame all put together, I realized that the slip fit 90 degree elbows at the bottom were rotating due to the weight of the top garland. To rectify this issue, I used a ladder to temporarily support the frame and made little PVC pipe with pool noodle feet so that I could try to pressure fit the foam feet against the ceiling. To make the foam feet, I cut 3" lengths of pool noodle then used a 3/4" hole saw in the center of a solid white pool noodle to create a circular incision. Since the hole saw length was 2", I made a 2" length incision into a 3" long pool noodle.
To remove the foam core, I used a pair of hemostat forceps to kind of dig into the incision, clamp down on the foam core, and very gently pull until the core piece came out. It mostly came out in one piece, but sometimes I'd have to dig deeper.
Once finished, I had to lean out the top of the PVC frame to rubber mallet the top ceiling piece into the 3/4" PVC tee fitting. Then I put the foam noodle foot on top and compressed it against the ceiling and made sure the PVC frame was form fitted in place again.
10. Enjoy.
I do have to say that I even impressed myself with how good it looks.
I will say that the PVC frame isn't bulletproof. It wouldn't take too much for wind to catch it just right and have it still stay up. To this end, I'm looking at putting a couple of PVC clips to help anchor the top to the wood. I have this on order SDTC Tech 12-Pack U-Shaped PVC Water Pipe Clamps Fit for 25mm OD, Compatible with 3/4" ID PVC Pipe and plan to see if I can make it more solidly stay in place.

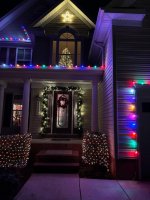
And here is year 2 of my house christmas lights adventure with the garland on display.

And here is a quick clip of the garland with the soft twinkle in action.
For the garland I used Balsam Hill fraser fir garland 2-pack where both lengths were 10 feet long. They come in a box that you have to fluff out but the quality looks great. They do go on sale about this time, so act now if you're interested.
For lights, I bought 70 5mm Warm White SoftTwinkle TM LED Christmas Lights, 4" Spacing, Balled Set from Christmas lights etc.
For the PVC, I used mostly 3/4" PVC for the frame and 1/2" PVC around the brick to try to get a bottom 3/4" PVC to help counterbalance the weight of the garland. To keep the frame in place, I use white pool noodles to compress the foam against the ceiling above the door of the overhang. I used 8" green zip ties to attach the garland spine around the 3/4" PVC frame.
Here is a rough outline of the steps I did.
1. Unpack the garland and fluff out the shape. The garland has little bendable ends that you can use to hook two garland pieces together.
2. For each garland, I used two 70 bulb strands of the soft twinkle lights. I tested the strands before starting to weave them into the garland.
In the middle of the BH garland, there is a little metal spiral that is used for support, and in the middle of the soft twinkle lights, there is a little connector that separates the two 35 light sides. I zip-tied each light strand around that connector to the metal spiral in the middle of the garland. Then I weaved one light strand into the garland, turned off the lights and observed where the garland was dark. Then I used the 2nd light strand and weaved it in and around the dark parts until I had the twinkle lights spaced reasonably even. I made sure to have the two male plugs on one end, and the female plugs on the other end. Then I zip tied the light strands to the ends of the garland to keep things roughly in place.
Then I repeated the process for the 2nd garland and plugged them together. The orientation shouldn't matter since there are bendable "hooks" on either side. Then in the middle between the two garlands, you can connect the male ends of second garland's lights to the first garland.
3. Designing and assembling the PVC frame.
For this, since the garland is relatively heavy, I wanted to try to have a counter force by constructing a frame that has resistance to toppling over. To do this, I used the brick step that juts out from the front door. I used 3/4" PVC for the major part of the frame, and 1/2" for the tight corners around the brick as 3/4" extended too far for the horizontal PVC to sit flush against the brick.
To cut the PVC to size, I used hose clamps to help get an even cut and a hacksaw to start the cut. Since the hose clamps have the screw that gets in the way, what I did was start the cut with the hacksaw, then switch to a PVC pipe cutter to finish the cut. I used the "DEWILL Ratchet-type Pipe and PVC Cutter, One-hand Fast Pipe Cutting Tool, for Cutting 1-5/8 inch PVC" from Amazon.
After I cut the pipe, I used a pipe reamer and a metal file to clean up any uneven cuts. I used the RIDGID 29983 Model 223S 1/4" to 1-1/4" Inner/Outer Copper and Stainless Steel Tubing and Pipe Reamer. I like to bevel the outer edge as well since it makes insertion a little easier. When cutting the vertical pieces, I wanted to have the same length so using the pipe reamer followed by the metal file is a simple way to make small adjustments to the pipe length.
I needed to use 4x 10' 3/4" PVC pipe sections, and 1x 10" 1/2" PVC pipe for little connections. Then for the fittings I used
2x 3/4" PVC tees for the top part of the PVC frame to connect the horizontal portion above the door.
2x 3/4" to 1/2" 90 degree elbows at the bottom of the brick
2x 1/2" - 1/2" 90 degree elbow where one side can insert into a PVC fitting, and the other side can receive PVC pipe. This wraps around the top part of the brick step to go vertical again.
2x 1/2" 3-way PVC fitting to have a little more stability on the concrete floor.
2x 1/2" to 3/4" 90 degree elbows to connect the stabilizer 3/4" PVC bar in front of the brick steps.
To assemble, I used a rubber mallet to connect the PVC fittings and pipe to each other and had no issues.
-4. Anchoring the PVC frame with vinyl siding clips and zip ties.
This turned out to be a bad idea for a couple of reasons. First, the PVC is too flexible so when you try to zip tie the two sides against each other, the PVC flexes and doesn't anchor very well. If you tighten zip ties too much on one side, you inevitably create looseness on the other side.
5. Insert a wood dowel into the top 3/4" PVC for extra strength. With all the flexing I observed, I decided to cut a 3/4" wood dowel to just the right length and insert it between the two top 3/4" PVC tee fittings. It provides more resistance to flexing that would make the frame more unstable.
-6. Attempting to zip tie the garland to the PVC frame at the front door. This was impractical as I could not thread the zip tie around the garland spine 1 handed and support the weight of it in my arms.
7. Remove the top and sides of the frame and put it on the garage floor and zip tie the garland to the frame.
This worked out great since there's no gravity to deal with. I used 8" green zip ties, using 6 on top and 6 on the sides for a total of 18, roughly evenly spaced. You can tell where to zip tie if you lift the frame with the garland and you can see where the garland tries to slide away from the frame.
8. Insert the PVC frame with the garland attached into the bottom assembly of the frame.
This was a little awkward and I needed a 2nd person to help. I can lift it vertically to carry it, but getting it in place required going a little bit horizontal. The person with the longer arms should carry the sides and the shorter arms can carry the top bar.
9. Stabilize the PVC frame.
Once I had the garland and frame all put together, I realized that the slip fit 90 degree elbows at the bottom were rotating due to the weight of the top garland. To rectify this issue, I used a ladder to temporarily support the frame and made little PVC pipe with pool noodle feet so that I could try to pressure fit the foam feet against the ceiling. To make the foam feet, I cut 3" lengths of pool noodle then used a 3/4" hole saw in the center of a solid white pool noodle to create a circular incision. Since the hole saw length was 2", I made a 2" length incision into a 3" long pool noodle.
To remove the foam core, I used a pair of hemostat forceps to kind of dig into the incision, clamp down on the foam core, and very gently pull until the core piece came out. It mostly came out in one piece, but sometimes I'd have to dig deeper.
Once finished, I had to lean out the top of the PVC frame to rubber mallet the top ceiling piece into the 3/4" PVC tee fitting. Then I put the foam noodle foot on top and compressed it against the ceiling and made sure the PVC frame was form fitted in place again.
10. Enjoy.
I do have to say that I even impressed myself with how good it looks.
I will say that the PVC frame isn't bulletproof. It wouldn't take too much for wind to catch it just right and have it still stay up. To this end, I'm looking at putting a couple of PVC clips to help anchor the top to the wood. I have this on order SDTC Tech 12-Pack U-Shaped PVC Water Pipe Clamps Fit for 25mm OD, Compatible with 3/4" ID PVC Pipe and plan to see if I can make it more solidly stay in place.
And here is year 2 of my house christmas lights adventure with the garland on display.
And here is a quick clip of the garland with the soft twinkle in action.
Last edited: