Alternate Enclosures
This is a non-inclusive list of alternate enclosure for the various hardware used on DIYC. The traditional CG type enclosures can be found here.
Vinyl Fence Post "Brick"


In XmasInGalt's own words:


I used a vinyl fence post cut to size and installed a Renard 16 (picture shows my 2010 modification that included an on-board 12V source and Ren-W). It takes some extra work but I really like the 'brick' solution.
To create the Renard 16 'bricks', I used a 4plex wall plate and traced the openings on the PVC. I used a Dremel to cut the openings. Took a little practice to learn how to cut the holes without the Dremel going crazy in any direction. I think I'll go the router on my next batch and see if it is easier than the Dremel. As far a weatherproofing goes, I didn't need to worry about that with these units as I use them under the eves of the house.
Following up on the idea to have the plugs face down to provide some measure of protection from the rain, I quickly cut another piece of PVC fencing to create legs for the case. I'm going to glue the two pieces together and run silicone along the seam. I may even glue a piece on each end to box in the bottom of the enclosure. The pics show the two pieces together and a view from the bottom where I traced the cut-outs for the plugs.
Read more about this design here.
This enclosure is designed for the Renard 16 but the Renard SS series of controllers (Ren SS8, 16, and 24) should also fit using 5" posts.
PVC Tube - tweist


In tweist's own words:
Due to the amount of rain we had in Southern California last Christmas season, (and yes it does rain in California), I needed a new cheap enclosure to keep my SSR’s dry.
Well one thing lead to another and I came up with a stand-alone 8 or 16 channel wireless REN type controller that fits into a 4” drain pipe PVC tube. I originally tried to fit it into a 3” drain pipe, but with all the wires, it was just to tight. I created two circuit boards that piggyback on each other, to save space, and made the SSR board, (16 channel), so you could cut it in half and use it as an 8 channel configuration, (great for my arches). I put RJ45 connectors on both the controller board and on the SSR board to enable the SSR’s to be used as a standard SSR unit. If I decide I want to use the 8 or 16 channel SSR in the tube but without the wireless processor, I can run 2 or 4 cat 5 cables from my REN64 into the tube and it just plugs right in. That makes this design a lot more flexible to adapt to other controllers. It will work with the Grinch, REN64, or wireless processor controllers. And if the controllers are located in one place, the SSR tubes can still be located out in the elements and not have a problem. Kurt, one of my neighbors, and I have calculated after making a couple for a 16 channel wireless units, the enclosure will cost us about $3.50 to make. And the really nice part is, all of the parts for the enclosure are readily available at your local hardware store.
We tied off the power cords in the bottom cap for strain relief’s, and we will be filling the bottom with sealer to make it water proof. Oh and as for the extreme temp problems some area’s have, I’m thinking that the PVC will insulate a little bit and with the small transformer on all the time and the heat for the 5VDC reg. that should keep the inside of the tube warm and the circuits nice and dry. After all the testing, the units work great and it is a nice fit in the tube. We can now paint the tubes any color we want and even cover them with leaves to make them blend in if need be. One other thought we are going to try, we are going to attach a small steel rod to the side of the unit and then sink that into the yard with the bottom of the unit 4 to 6 inchs off the ground. It will keep it out of the puddles or ponds that way when it does rain.
Read more about this design here.
Xmus Tube


In BillAd's own words:

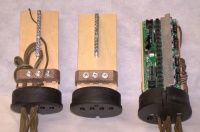
Here are a few pictures of the enclosure that I am using to contain my 16 channel XMUS boards. The first shows a completed tube on a simple stand made from 1/4 inch threaded rod. The remaining pictures attempt to show the basic construction approach.
Cost is low and construction is quite simple. The following are the parts and dimensions that I used:
- - 8 1/2 inch piece of 4 inch plastic drain pipe
- - 4 inch plastic end cap
- - 1 wood disk made from 1 1/2 inch pine (two pieces of 3/4 inch pine glued together) cut to fit inside the pvc pipe. (I turned mine on a lathe to make a slight lip on the bottom. However a jig saw should also work well enough)
- - 1/2 inch piece of plywood 3 1/4 by 7 3/4
- - 1/2 of a piece of grounding bar to secure the ground wires
- - Small block of wood to clamp down the cords
- - A few nuts and bolts
- - Black paint
(note the last picture shows a wired board. In this picture only 8 of the 16 channels are wired although the slots are drilled for the remaining 8 wires and there is plenty of room for all to fit)
This enclosure is designed for the Renard 16.