Fox Cub Documentation
Fox Cub Documentation
Please see the standard Disclaimers
A more general overview of Fox Cub can be found in the Fox Cub Overview


Boards
FoxCub16
FoxCub16 is a 16 channel Renard compatible controller:
- Schematic: FoxCub16Schematic.pdf
- Bill Of Materials: FoxCub16BOM.pdf
- PCB (Order from OSHPark):
- PCB (Single Layer / Home Brew):
- PCB FoxCub16PCBRevB.pdf
- Silk Screen: FoxCub16SilkScreenRevB.pdf
- Jumper Wires: FoxCub16JumperWires.pdf
Note: This design is 110V. To operate on 220-240V will require board / component changes. This design uses high voltages. You are responsible for your own safety, make sure you know what you're doing or use a qualified electrician. USE AT YOUR OWN RISK.
FCSquealer
Converts serial output over USB from the computer to the RS485 required for the FoxCub16. FCSquealer is opto isolated.:
- Schematic: FCSquealerSchematic.pdf
- Bill Of Materials: FCSquealerBOM.pdf
- PCB (Order from OSHPark):
- PCB (Single Layer / Home Brew):
- PCB: FCSquealerPCB.pdf
- Silk Screen: FCSquealerSilkScreen.pdf
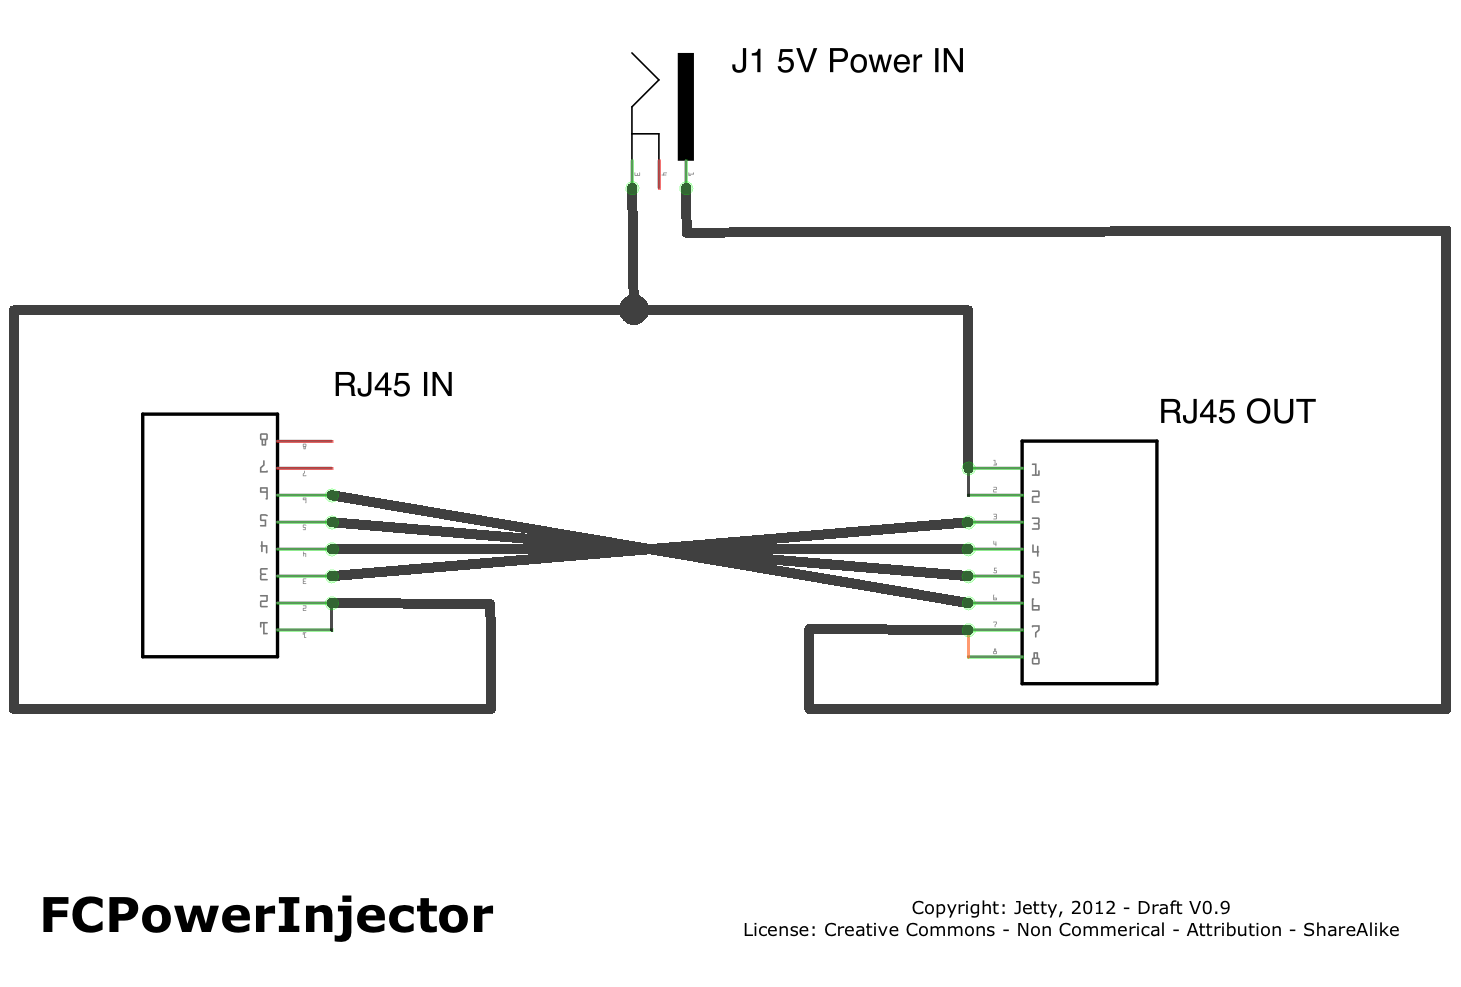
FCPowerInjector
Supplies 5V power to the system:
- Schematic: FCPowerInjectorSchematic.png
- Bill Of Materials: FCPowerInjectorBOM.pdf
No board required. Construction: Cat 5E, 2 x RJ45, DC Power connector, heat shrink and electrical tape.
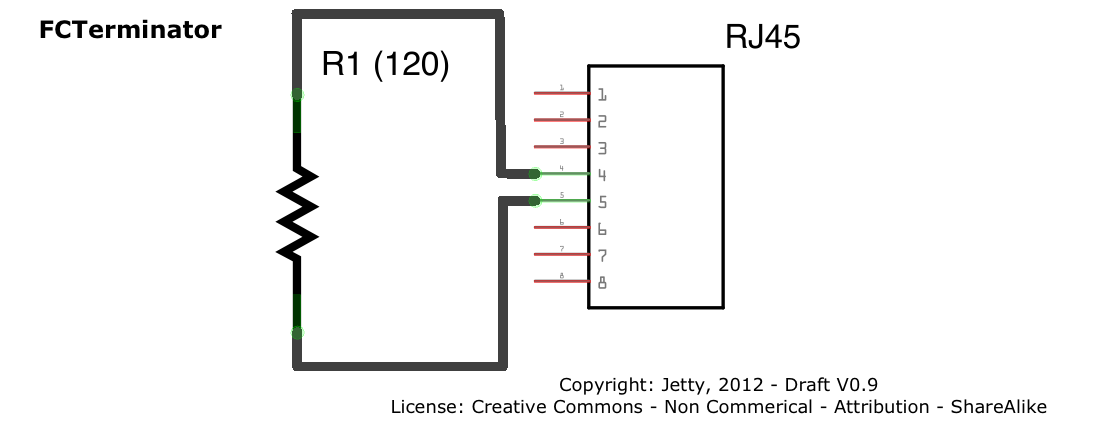
FCTerminator
Terminates an RS485 run:
- Schematic: FCTerminatorSchematic.png
- Bill Of Materials: FCTerminatorBOM.pdf
No board required. Construction, RJ45, Cat 5E, resistor and sugru or silicone.
FCRepeater
4 Channel RS485 repeater, useful for decentralized or very large displays:
- Schematic: FCRepeaterSchematic.pdf
- Bill Of Materials: FCRepeaterBOM.pdf
Note: Design untested.
Software
Installing
Regular Arduinos come with a bootloader preinstalled, the bootloader is software that allows you to upload Arduino sketches to an Arduino. Because this is a blank minimalistic Arduino, you'll need to upload a bootloader to the chip before you install the chip on the FoxCub16. This only has to be done once. After you have installed the bootloader, you install software via the 6 pin programming header on the Fox Cub 16.
Bootloader
There are a number of ways to install a bootloader. The easiest way, if you have an Arduino on hand is this method: Burning the Bootloader
Additional information on burning boot loaders: Bootloader Development
Firmware
The latest firmware can be found on github: https://github.com/jetty840/FoxCub16Firmware
The firmware is installed using a standard FTDI or USB2Serial programmer (you can use the same one that you use on the FCSquealer). Set the board type to Duemilanove with ATMega328. Ensure that you disconnect the "Run Jumper" to enter programming mode on the board, and that you put the jumper back in place after you've disconnected the programmer and deploy it in the field.
Setup
Config Button
The config button allows for in field setup and testing via one button, without requirement separate testing / operation firmware.
There are 4 types of press:
- Press (hold for about 0.25 - 1 second)
- Short Press (hold for 5 seconds)
- Medium Press (hold for 10 seconds)
- Long Press (hold for 15 seconds)
- When holding, all channels will flash at the 5, 10 and 15 second intervals to tell you which press is active.
So for example, to enter the testing mode, you need a Short Press, so you hold until you see the first flash (about 5 seconds), then release and you've entered testing mode, then you press to cycle through the various tests.
If you wanted to config the starting address, then you need a Medium Press, so you hold and wait for 2 flashes (about 10 seconds), then release and you've entered address setting mode.
By default after power on, you're in the Renard Listening State, this is your regular operation mode.
Test Mode
Short Press, followed by Press to cycle through all of the test modes. The modes are: All Channels On -> All Channels Dimming -> Channel Sequencing -> Larsen Scanner -> Zero Cross
On the final press, it returns to the Renard Listening State, and all lights go off, waiting for Renard data.
Zero Cross alternates between the outside 2 channels when a zero cross signal is detected every second. If there is no power, or a problem with the circuit, the outside 2 channels are static.
Renard Starting Address Mode
Medium Press to enter the mode, followed by a Press to increment to the next bank of 16 addresses.
Starting address is indicated on the channels 1-8 as binary. MSB is channel 1. So for example, a channel starting address of 17 would be indicated as OOOXOOOX where O is off, and X is on.
Valid starting addresses start from channel 1 and are in blocks of 16, for example, 1, 17, 33, 49, 65 etc. are all valid. When address 241 is reached, the address cycles back to 1. For addresses larger than 241, minor code changes will be required.
After the address has been chosen, a Medium Press will store the new address and return to regular operation. A Short Press will cancel your changes and not store them.
Baud Rate Mode
Long Press to enter the mode, followed by a Press to increment to the next Baud Rate.
Baud Rate is indicated on channels 1-8 as binary. MSB is channel 1. So for example, a baud rate of 2400 baud, would be indicated as OOOOOOXO where O is off and X is on.
1 = 1200 2 = 2400 3 = 4800 4 = 9600 5 = 14400 6 = 19200 7 = 28800 8 = 38400 9 = 57600 10 = 115200
After the baud rate has been chosen, a Medium Press will store the new baud rate and return to regular operation. A Short Press will cancel your changes and not store them.
Please follow the Renard guidelines for baud rates for the number of channels required:

Current Draw
FCSquealer
- Quiescent, no connection to any FoxCub16's: 60mA
- Connection to 1 or more FoxCub16's, RS485 active: 92mA
FoxCub16
- No attached SSR's, all channels off: 32mA
- No attached SSR's, all channels full on: 74mA
- 4 x SSR Neons, all channels off: 148mA
- 4 x SSR Neons, all channels full on: 162mA
Overview
Assuming 24AWG Cat 5E cable and 0.577A power transmission, considering that in Renard power is transferred over 2 conductors for GND and 5V, we can carry conservatively 1.154A over Cat 5E. This gives 1 FCSquealer and 6 Fox Cub16's (96 Channels) before requiring additional power. Another FCPowerInjector will give an additional 96 Channels.
Termination
Each FoxCub16 has an RS485 Input and Output socket. If the Output socket is empty, a FCTerminator should be placed in it.
SSR Selection
Will drive AC or DC 4-Port SSR's at 50/60Hz. If you are driving DC SSR's, you can omit the AC components from FoxCub16. SSRNeon is recommend if you are home etching: SSRneon
Troubleshooting
- Unable to upload software. Check JP1 is removed from board
- Board doesn't respond to controller serial data. Check JP1 is in place on board, check baud rates match, check led is flashing on Arduino FTDI / USB2Serial, check RS485 In / Out are connected
- Board is erratic. Check FCTerminator is in place at the end of the run.
- Light strings flicker whilst dimming. Check FoxCub16 is plugged into a 110V power socket and the Neon is on indicating that the zero crossing data is received. Also check the Zero Crossing test mode.
Credits
This design pays homage to the wonderful work by the designers / contributors to Renard / SSRneon and this site.