Creating and Running a Schedule: Difference between revisions
Jump to navigation
Jump to search
No edit summary |
No edit summary |
||
| (3 intermediate revisions by one other user not shown) | |||
| Line 1: | Line 1: | ||
====Introduction==== | |||
---- | |||
Schedules are used to automatically run specific playlists at desired times and days during a week. | |||
====To Create a Show Schedule:==== | |||
---- | |||
[[File:HLS_Schedule_ShowSchedule.png|350px|thumb|Figure 9-18]] | |||
*Click ''Output -> Create/Modify Show Schedule'' (see Figure 9-18). | |||
*Left-click on a blank space for the day you wish to schedule. | |||
<br clear=all> | |||
[[File:HLS_Schedule_ShowEvent.png|350px|thumb|Figure 9-19]] | |||
*The Show Event window will open (see Figure 9-19). | |||
*''Select Playlist'' and choose desired playlist from list and click ok. | |||
<br clear=all> | |||
[[File:HLS_Schedule_SelectTime.png|350px|thumb|Figure 9-20]] | |||
*Click Select Start/End Time (see Figure 9-20). | |||
*Select any additional options, then click ok. | |||
*When your schedule is complete, click OK. | |||
<br clear=all> | |||
====To Copy/Paste:==== | |||
---- | |||
[[File:HLS_Schedule_ShowScheduleCopy.png|350px|thumb|Figure 9-21]] | |||
*To copy a configured show from one day to another, right click on the cell you wish to copy. | |||
*The selected cell will turn "yellow". | |||
*Right-click in the new cell that you want to copy the show into. | |||
*The copied show will now be in the new cell. | |||
<br clear=all> | |||
====To Delete/Modify:==== | |||
---- | |||
*Left-click on the cell with the schedule you wish to delete or modify. | |||
*This opens the Show Event window (see Figure 9-19). From here, you can make any changes you need. | |||
*To Delete from that selected cell, check the ''Delete from Show'' button and click ok. | |||
====To Run a Scheduled Show:==== | |||
---- | |||
[[File:HLS_Schedule_PlayShowSchedule.png|350px|thumb|Figure 9-22]] | |||
*Click ''Output -> Play Show Schedule''. | |||
*Select the playlist you wish to play. | |||
*Ensure ''Play per Scheduled Show'' radio button is selected. | |||
<br clear=all> | |||
<noinclude> | |||
{| class="wikitable" | |||
! colspan="3"| [[HLS User Manual and Reference Guide]] | |||
|- | |||
! align="center"|Previous Page | |||
! align="center"|Current Chapter | |||
! align="center"|Next Page | |||
|- | |||
| align="center" | [[Working with Playlists]] | |||
| align="center" | [[HLS User Manual and Reference Guide#Sequence_Output | Chapter 9: Sequence Output]] | |||
| align="center" | [[HLS User Manual and Reference Guide#Advanced_Features | Chapter 10: Advanced Features]] | |||
|} | |||
<br /> | |||
[[Category:HLS User Manual]] | |||
</noinclude> | |||
Latest revision as of 04:45, 24 March 2013
Introduction
Schedules are used to automatically run specific playlists at desired times and days during a week.
To Create a Show Schedule:
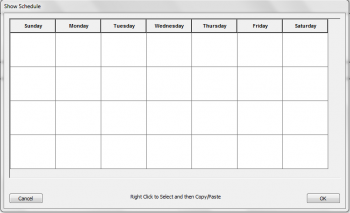
- Click Output -> Create/Modify Show Schedule (see Figure 9-18).
- Left-click on a blank space for the day you wish to schedule.
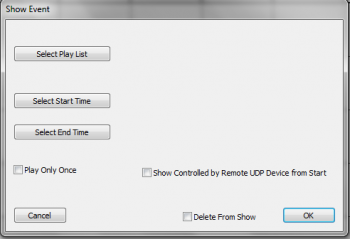
- The Show Event window will open (see Figure 9-19).
- Select Playlist and choose desired playlist from list and click ok.
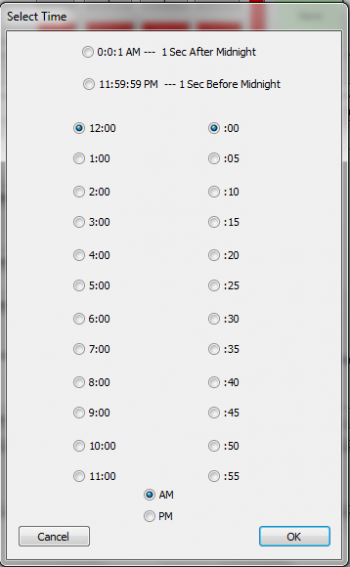
- Click Select Start/End Time (see Figure 9-20).
- Select any additional options, then click ok.
- When your schedule is complete, click OK.
To Copy/Paste:
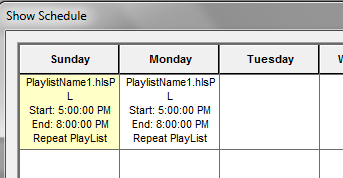
- To copy a configured show from one day to another, right click on the cell you wish to copy.
- The selected cell will turn "yellow".
- Right-click in the new cell that you want to copy the show into.
- The copied show will now be in the new cell.
To Delete/Modify:
- Left-click on the cell with the schedule you wish to delete or modify.
- This opens the Show Event window (see Figure 9-19). From here, you can make any changes you need.
- To Delete from that selected cell, check the Delete from Show button and click ok.
To Run a Scheduled Show:
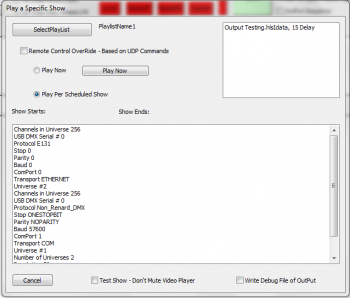
- Click Output -> Play Show Schedule.
- Select the playlist you wish to play.
- Ensure Play per Scheduled Show radio button is selected.
| HLS User Manual and Reference Guide | ||
|---|---|---|
| Previous Page | Current Chapter | Next Page |
| Working with Playlists | Chapter 9: Sequence Output | Chapter 10: Advanced Features |