Renard 64XC Construction: Difference between revisions
| Line 39: | Line 39: | ||
|- | |- | ||
| | | | ||
* Install the eight (8) 680 ohm | * Install the eight (8) 680 ohm resistors RX-RX. Make sure that the resistors have a value of 680 ohms [blue/gray/brown/gold]. | ||
|| [[Image:Renard 64XC R10-13 R20-23 Install.jpg | 200px]] | || [[Image:Renard 64XC R10-13 R20-23 Install.jpg | 200px]] | ||
|- | |- | ||
| Line 56: | Line 56: | ||
|- | |- | ||
|<center>'''INSTALLATION NOTE:''' </center> | |<center>'''INSTALLATION NOTE:''' </center> | ||
<blockquote>The next few items are all very close to the same height. If in doubt which one is right, compare the components and change the order as appropriate. The order here follows the pictures and the specific components used.</blockquote> | <blockquote>The next few items are all very close to the same height. If in doubt which one is right, compare the components and change the order as appropriate. The order here follows the pictures and the specific components used. Part substitutions can affect this as well so if in doubt, check.</blockquote> | ||
<blockquote>Also, for the sockets, Pin 1 must be aligned with the square solder pad. Another way to verify that you installed them correctly is to make sure that the notch on the socket is aligned with the notch on the PCB silkscreen outline. </blockquote> | |||
|- | |||
| | |||
* OPTIONAL: Install two (2) 8-pin IC sockets for U4 & U5. These parts are not included in the original Renard 64XC BOM. However, it is strongly suggested that you use sockets for these IC chips so they are included in the latest BOM. Insert the sockets as per the silkscreen. Solder pin #1 and check the component for "slippage". Once the component placement is confirmed, solder the other 7 pins for each socket. These items do not require trimming. | |||
<!--|| [[Image:Wiki - Renard SS24 Assembly Step20.jpg | 200px]]--> | |||
|- | |||
| | |||
* OPTIONAL: Install one (1) 6-pin IC socket for U3. This parts are not included in the original Renard 64XC BOM. However, it is strongly suggested that you use sockets for these IC chips so they are included in the latest BOM. Insert the socket as per the silkscreen. Solder pin #1 and check the component for "slippage". Once the component placement is confirmed, solder the other 7 pins. This item does not require trimming. | |||
<!--|| [[Image:Wiki - Renard SS24 Assembly Step20.jpg | 200px]]--> | |||
|- | |||
| | |||
* Install eight (8) 14-pin IC sockets for U7-U14. Insert the sockets as per the silkscreen. Solder pin #1 and check the component for "slippage". Once the component placement is confirmed, solder the other 13 pins for each socket. These items do not require trimming. | |||
<!--|| [[Image:Wiki - Renard SS24 Assembly Step21.jpg | 200px]]--> | |||
|- | |- | ||
| | | | ||
| Line 66: | Line 81: | ||
|- | |- | ||
| | | | ||
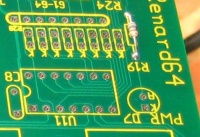
* Install the eight (8) 680 ohm | * Install the eight (8) 680 ohm resistor networks R10-R13 and R20-R23. The resistor network should have a dot on it to indicate pin 1. Insert pin 1 of the resistor network into the square solder pad. Sometimes a piece of tape is used to hold the resistor network in place while soldering the first pin. Once this is done, check the resistor network to ensure that it is straight and plumb to the board. If not, re-heat the first lead and reposition as required. Then, solder the other 7 pins. The leads do not have to be trimmed for this component. | ||
|- | |- | ||
| | | | ||
| Line 82: | Line 97: | ||
* Install the clock oscillator U3. The oscillator must be installed in the correct orientation. The oscillator has three rounded corners and one squared corner. Make sure that the squared corner is positioned to match the PCB silkscreen. Solder Pin #1, and then verify that the component placement matches the silkscreen and that the component has not "slipped" out of the hole. Once verified, solder the the remaining pins. Trim the excess leads as you would with a resistor or diode. | * Install the clock oscillator U3. The oscillator must be installed in the correct orientation. The oscillator has three rounded corners and one squared corner. Make sure that the squared corner is positioned to match the PCB silkscreen. Solder Pin #1, and then verify that the component placement matches the silkscreen and that the component has not "slipped" out of the hole. Once verified, solder the the remaining pins. Trim the excess leads as you would with a resistor or diode. | ||
<!--|| [[Image:Wiki - Renard SS24 Assembly Step15.jpg | 200px]]--> | <!--|| [[Image:Wiki - Renard SS24 Assembly Step15.jpg | 200px]]--> | ||
|- | |- | ||
| | | | ||
| Line 122: | Line 126: | ||
<!--|| [[Image:Wiki - Renard SS24 Assembly Step17.jpg | 200px]]--> | <!--|| [[Image:Wiki - Renard SS24 Assembly Step17.jpg | 200px]]--> | ||
|- | |- | ||
|colspan="2" |<blockquote> If you are unsure about your ability to build this board, then you should go to [[Beginners Setup Guide | |colspan="2" |<blockquote> If you are unsure about your ability to build this board, then you should go to [[Beginners Setup Guide Renard 64 | The Beginner's Setup Guide]] at this point. [[Beginners Setup Guide Renard 64 | The Beginner's Setup Guide]] will walk you thru some initial tests to make sure that everything is working correctly before inserting the IC chips. </blockquote> | ||
|- | |- | ||
|<center>'''INSTALLATION NOTE:''' </center> | |<center>'''INSTALLATION NOTE:''' </center> | ||
Revision as of 16:18, 27 August 2010
Board Assembly
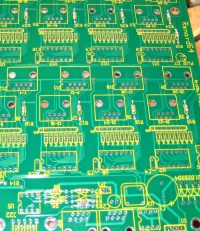
- Note: Pictures will be added as soon as they are available
- The following sequence of steps is by no means the only way to Assembly the Renard 64. It is simply a suggested order of assembly. Many builders have varied opinions on what the order should be. In general, you start with the "shortest" items and work towards the tallest. This generally means that resistors are first and connectors are last but every board is different.
- A good temperature controlled soldering iron should be used for building the Renard 64. Try to get the smallest diameter rosin core solder you can find (either 60/40 or 63/37). DO NOT USE LEAD FREE SOLDER!! This takes special equipment and a very high skill set that few DIYers have. If you do use Lead Free Solder and have problems (which is VERY likely) please let us know when you ask for help. Lead Free Solder can look like a good joint but still not be electrically conductive.
- One safety note is prudent here. Solder is METAL (lead and tin)...In order to use it,it must be MELTED. HOT, Molten Metal can BURN! Also, metal leads get hot while soldering. So, any unprotected fingers that are being used to "hold" a component in place will be burned!! Painter's tape is one way of holding items down while the board is being flipped over. Another way is to use another unpopulated board or flat surface to allow the board to be flipped while keeping the components in place.
- NOTE: The part numbers referenced in the following instructions are those taken from the Renard 64 BOM.
| |
|
|
|
|
|
|
|

|
|
|
|
|
|
|
|
|
|
|
| |
| |
| |
| |
| |
| |
| |
| |
| |
| |
| |
| |
| |
| |
| |
| |
| |
| |
| |
| |
| |
| |
| |
| |