Submaster Lighting Channels: Difference between revisions
Jump to navigation
Jump to search
m Jlowe moved page Over Control Effects to Submaster Lighting Channels: Feature Changed |
Updated for 12K. |
||
| Line 1: | Line 1: | ||
''Current as of Version 12K.'' | |||
'''Submaster Lighting Channels''' are basically channels that are used to control lighting output of a group of channels over a period of time. It can be used to apply long ramp ups or ramp downs to channels that have sequence data already assigned. | |||
'''Some Examples of How This Could Be Used:''' | |||
*Ramp Up an eight channel chase over five seconds so that the chase builds with the music rather than being 100% on. | |||
*Ramp down at the end of a sequence to fade out running effects as the music fades. | |||
*Adjust the level of a group of channels that are to be less emphasized over a period of time in a sequence. | |||
*Ramp Up/Down at the beginning and end of PixelPlane effects to ease transitions from one effect to another. | |||
[[File:SubMasterLighting_MasterLightingManagement.png|thumb|Figure X-X]] | |||
'''To Create a Submaster Lighting Channel:''' | |||
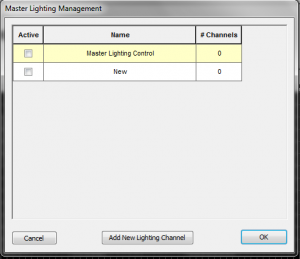
*Click ''Manage Channels -> Manage Master Lighting Channels''. | |||
*Click ''Add New Lighting Channel''. Figure X-X will appear. | |||
*Click in the Name field and name the Submaster Lighting Channel. | |||
<br clear=all> | |||
[[File:SubMasterLighting_AddChannels.png|thumb|Figure X-Y]] | |||
'''To Assign Channels to a Submaster Lighting Channel:''' | |||
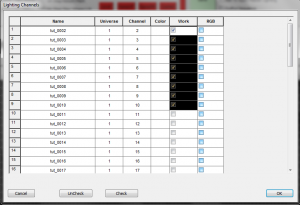
*Left-click in the Channels field. | |||
*Figure X-Y will open. | |||
*Highlight the channels you want the Submaster Lighting Channel to control. | |||
*Click the ''Check'' Button and then click OK. | |||
*Your channels have now been associated with the Lighting Channel. Place a checkmark in the ''Active'' box to make it active, then click OK. | |||
<br clear=all> | |||
'''Working with Submaster Lighting Channels:''' | |||
*Add your new lighting channel to the display group of the channels it is associated with. | |||
*When you view the display group, you can now see the lighting channel in the channel grid along with the associated channels. | |||
*Apply Ramp Up, Ramp Down, and Level effects to the lighting channel as you need, just like you would to any other channel. | |||
*These effects will change the overall light output of the associated channels based on the effects you have assigned to it. | |||
'''Activating the Submaster Lighting Channel:''' | |||
*Next to the save button, check the ''Ask to Apply to Master Lighting'' box. | |||
*When you play your sequence with the Preview or Output, the Master Lighting Management window will open. Verify that the Submaster Lighting Channel is checked as active and click "ok" to run the sequence with the submaster lighting channel active. | |||
Revision as of 17:01, 8 February 2013
Current as of Version 12K.
Submaster Lighting Channels are basically channels that are used to control lighting output of a group of channels over a period of time. It can be used to apply long ramp ups or ramp downs to channels that have sequence data already assigned.
Some Examples of How This Could Be Used:
- Ramp Up an eight channel chase over five seconds so that the chase builds with the music rather than being 100% on.
- Ramp down at the end of a sequence to fade out running effects as the music fades.
- Adjust the level of a group of channels that are to be less emphasized over a period of time in a sequence.
- Ramp Up/Down at the beginning and end of PixelPlane effects to ease transitions from one effect to another.

To Create a Submaster Lighting Channel:
- Click Manage Channels -> Manage Master Lighting Channels.
- Click Add New Lighting Channel. Figure X-X will appear.
- Click in the Name field and name the Submaster Lighting Channel.

To Assign Channels to a Submaster Lighting Channel:
- Left-click in the Channels field.
- Figure X-Y will open.
- Highlight the channels you want the Submaster Lighting Channel to control.
- Click the Check Button and then click OK.
- Your channels have now been associated with the Lighting Channel. Place a checkmark in the Active box to make it active, then click OK.
Working with Submaster Lighting Channels:
- Add your new lighting channel to the display group of the channels it is associated with.
- When you view the display group, you can now see the lighting channel in the channel grid along with the associated channels.
- Apply Ramp Up, Ramp Down, and Level effects to the lighting channel as you need, just like you would to any other channel.
- These effects will change the overall light output of the associated channels based on the effects you have assigned to it.
Activating the Submaster Lighting Channel:
- Next to the save button, check the Ask to Apply to Master Lighting box.
- When you play your sequence with the Preview or Output, the Master Lighting Management window will open. Verify that the Submaster Lighting Channel is checked as active and click "ok" to run the sequence with the submaster lighting channel active.
| HLS User Manual and Reference Guide | ||
|---|---|---|
| Previous Page | Current Chapter | Next Page |
| Fill Effects | Chapter 5: Sequencing Channels and Adding Effects | Sequencing with RGB Channels |