Renard Connection Instructions (early Renard Designs)
This page describes how to connect up the various Renard controllers that have been made available for others to build.
The Renard controllers fall into two basic categories. Some controllers have SSRs included on the controller PCB, and are connected directly to the AC power lines and to the AC load (lights, usually). Other controllers work with separate SSRs, and are not directly connected to the AC power line (except maybe to supply a zero-crossing signal).
Transformer Board
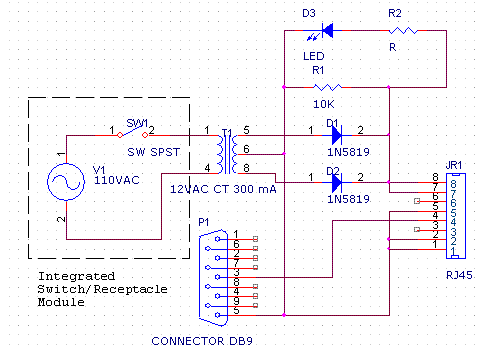
Here is the schematic of a transformer board that may be useful for bring the input (RS232), the zero-crossing signal (and low-voltage power, in some cases) to the Renard controllers. The current rating of the transformer is good for powering perhaps four Renard8 boards (assuming 75 mA each), or two xmus Renard16 board. This transformer board can be used to bring input signals and zero-crossing signals into the Renard64 board and into the Ren-C converter, although some other method must be used supply low-voltage power to the controller (the Renard64 requires 1A when the status LEDs are installed, and the Ren-C board draws power from the 595 board that it is attached to).
The various Renard boards all have several different connection options, and must be configured properly to use this transformer board. You can find the instructions for configuring the boards in the board-specific sections later on this page.
Note: the 1N5819 diodes can be replaced with 1N4001 diodes, especially if you are not using this board to provide power to the Renard controller (i.e. you are using it just for the input signal zero-crossing connections.
Controllers with Integrated SSRs
Xmus 16-Channel Controller
Frank Kostyun 24-Channel Controller
Controllers without Integrated SSRs
Renard8
Renard64
The power requirements for Renard64 depend on how the board is assembled. If the LEDs are installed on the board and the PWM firmware is used (so that the on-board status LEDS dim), the board will require about 1A at +5V. If the LEDs are omitted but the PWM firmware is used, the board will require about 0.5A (this configuration might be needed for use with LED strings). If the non-PWM firmware is used, the board will need less than 100 mA (regardless of whether the status LEDs are installed or not. These instructions (for now) assume that the first option above is chosen.
To use the Renard64 board with the transformer board described above, the Renard64 board must be assembled as follows:
1) Omit U6 (H11AA1), R1, R2 and J1
2) Install Q1 (2N3904)
3) Install R14 (10K)
4) Jumper J2-2 to J2-3
5) Omit D1
In this case, the easiest way to bring power into the Renard64 board is to install a 3-pin Molex connector in place of U1 (omitting D1, as indicated above, and also omit C1), and use a PC power supply to provide 5V power (Ground to Pin 2, +5V to pin 3, leave Pin 1 open).
