E68X-to-DMX
E68X-to-DMX Adapter
The E68X-to-DMX Adapter as the name implies, converts the TTL logic level of the DMX Raw data stream from the E68x controller and converts it to the proper RS-485 levels. The E68x can be configured to send a raw DMX data stream to the first pixel controller connector in a group. The output is a single-ended TTL level (5v) which is not suitable for direct connection to a DMX RS-485 network. This adapter takes that input and converts it to the proper differential output required. This initial version is a simple design and does not emply any isolation at the input or outputs to the RS-485 line. This was done to keep costs to a minimum and keep the board small. Later versions may include full isolation if there's enough demand for it.
The current version (v1b) is currently at the working prototype level. After some more testing it will be considered a full production level (or upgraded).
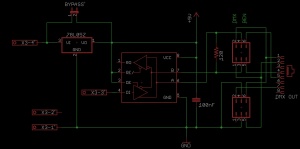
Schematic
The schematic is quite simple and contains few parts. It can be made quite cheaply by replacing certain jumpers, etc with wires. The output jumper layout to support both Renard or DMX wiring schemes was taken from member RPM's E1.31-Renard/DMX bridge. Setting all of the jumpers one way uses the pseudo standard RJ45 DMX format with D+/D- on 1/2 and ground on 7. Setting all the jumpers the other way selects Renard format with D+/D- on 4/5 and ground on 1/2. Note that in both cases, it is still DMX output - this just saves you from making a special cable so that straight Cat5 patch cables can be used. The board includes an optional 78L05 voltage regulator that can be used if you exclusively use 12v pixels. This will convert the voltage to 5v for the RS485 chip but can be bypassed if you have 5v pixels.

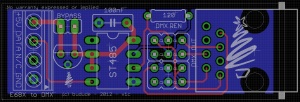
Board Layout
The board layout is very straight forward with a pixel connector and reguator (optional) at one end, an RS-485 chip in the middle and an output jumper setup with RJ45 to DMX connector at the end. Two methods of connections to the E68x are possible. The first consists of a standard 4-contact terminal block that can be wired back to the removable block that plugs into the E68x. The other method consists of running a 20 gauge or so wires down from the board and terminating them directly into a removable block that can be plugged directly into the E68x. This latter method saves on the terminal block and keeps the setup quite neat. Only 3 wires are used (+5v, Ground, Data) but a 4-wire connector was used so it would physically match up to the connector (1.5mm pitch) on the E68x.

E68x Configuration
The E68x should be configured with the following parameters:
- Pixel Type of "DMX PIXEL"
- String Count of 1
- Pixel Count of 170
The convert must be plugged into the first connector of the group (1-1, 2-1, 3-1 or 4-1) only.
Converter Configuration
The only thing to configure on the board are the 4 Renard/DMX jumpers. The four jumpers must be placed all on the left for DMX wiring or all on the right for Renard wiring. You must install all four of the jumpers or install wire jumpers instead for the converter to work properly.