How to make a Schedule in Vixen
Overview
This section explains how to schedule a program in Vixen. These instructions assume you have already sequenced a few songs and have already created a program.
Opening the Scheduler
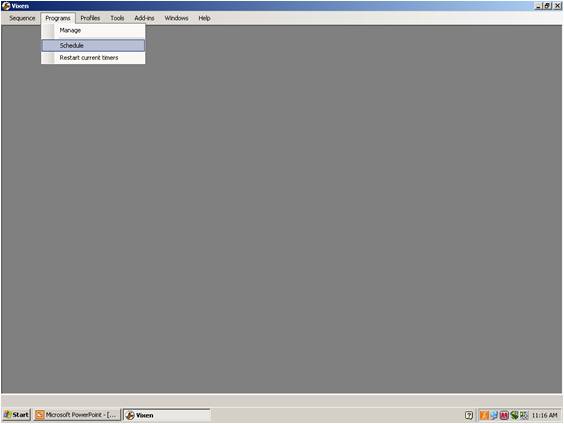
If Vixen is not already open, go ahead and open it now. Select Programs from the menu bar and then Schedule (see figure 1).
Figure 1: Opening the Scheduler in Vixen
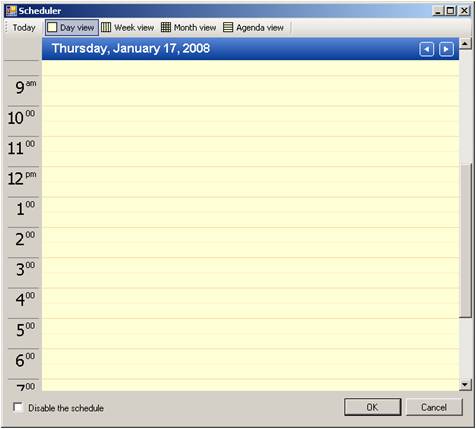
The Scheduler window will appear as shown in figure 2.
Figure 2: Scheduler with no programs scheduled
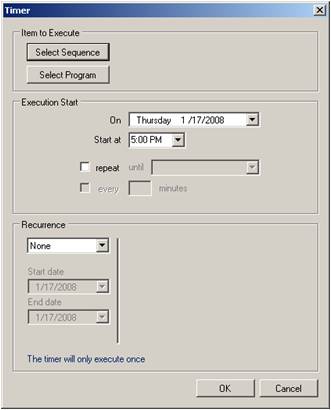
Right click on any time slot on the scheduler and select "Add". The Timer dialog box should appear (see figure 3). This dialog box is divided into three sections: Item to Execute, Execution Start, and Recurrence. We will address each section in turn.
Figure 3: The Timer Dialog Box
Selecting an Item to Execute
The Item to Execute section is where you select the program or sequence you want to schedule. There are two buttons in this section:
- Select a Sequence; which activates the Open dialog box with your sequences listed
- Select a Program; which activates the Open dialog box with your programs listed
Scheduling a Sequence
To schedule a sequence, select the Select Sequence button.
If you do not see your sequences, check the "Files of type:" list box at the bottom of the dialog box and select Vixen Standard Sequence if it is not already selected. (Note: you will use this method to select scripted sequences, Ledtriks sequences and Trigger sequences also.) If you still do not see your sequences, check the “Look in:” edit box at the top of the dialog box and make sure you are in the same directory in which you store your sequences — by default this should be the “Sequences” directory.
Once you have found the sequence you want, select it by clicking on it with the mouse and then select open. (Note: you can only select one sequence per scheduled event.) You should see the title of your sequence in bold letters to the right of the Select Sequence button.
Scheduling a Program
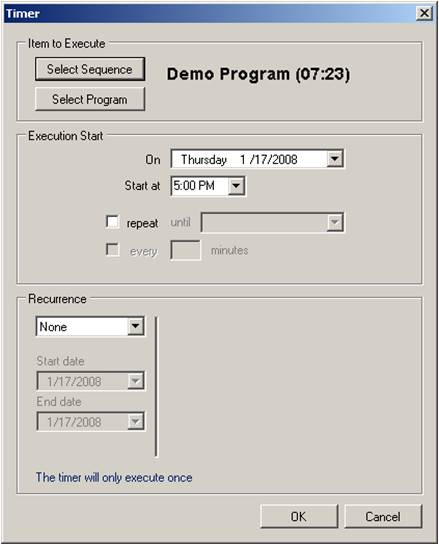
To schedule a program, select the Select Program Button. If you do not see your program(s), check the “Look in:” edit box at the top of the dialog box and make sure you are in the same directory in which you stored your program — by default this should be the “Programs" directory. Once you have found the program you want, select it by clicking on it with the mouse and then select Open. (Note: you can only select one sequence or one program to begin during any scheduled event). You should see the title of your sequence in bold letters to the right of the Select Program button (see figure 4).
The rest of these directions assume you have chosen to schedule a program.
Figure 4: Timer with Program Selected
Scheduling Execution Start Time and Date
Next step is to establish the starting date and time for your program. Set both of these values in the Execution Start section.
Selecting the Start Date
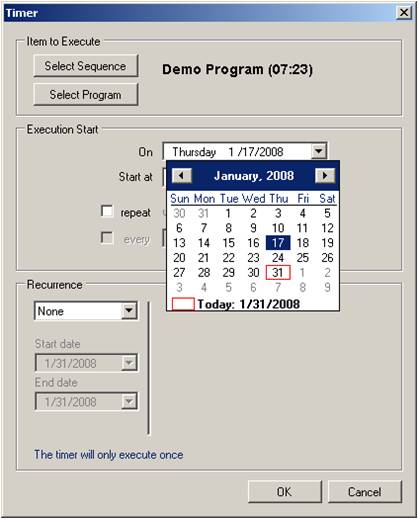
Select the down arrow on the right side of the On drop down box, this exposes a calendar (see figure 5). Move through the calendar until you find the desired start date. Select the date and it should appear in the on drop down box.
Figure 5: Selecting a date for the scheduled event
Selecting the Start Time
Select the down arrow on the right side of the Start at: drop down box. A list of times in half-hour increments appears. Select the time closest to your desired start time. (Note: the drop down box only reflects half-hour increments, but you can edit the minutes of the selected time if you want to start at some time other than the top or bottom of the hour. For example if we wanted to start at 5:13PM, we would select 5:00 PM, then click on the minutes portion of our selected time and type in 13, then tab out and the desired time of 5:13 PM will be the scheduled start time).
The Repeat Option
Vixen 2.x gives you the option of repeating your selected sequence or program for a set period of time. Use these options only if you want to play your selection more than once during the day.
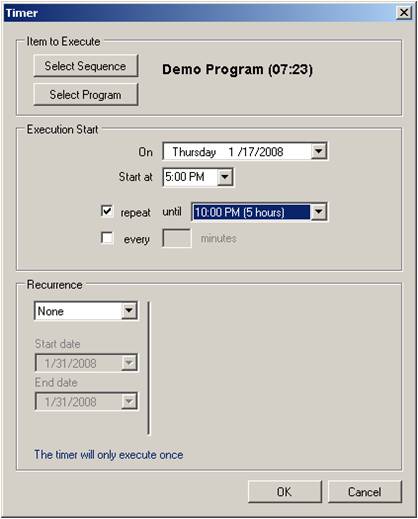
For example, assume you wanted to play the selected program in a continuous loop from 5:00PM to 10:00PM. Select the Repeat option box, this will activate the Until drop down box. Select 10:00PM in the drop down box (see figure 6). The program will now loop uninterrupted and continuously for the next 5 hours.
(Note: if you chose a start time that is not a half-hour increment, the sequence will not stop at the time you specified. For example, if you set a sequence to start at 5:13PM and loop until 10PM, it will loop until 10:13 PM. Vixen pays attention to the time it is supposed to repeat (5 hours), not the stop time.)
Figure 6: Timer Dialog Box with Repeat option selected
Assume you wanted to play your program on the top and bottom of the hours from 5:00PM to 10:00PM. Select the Every option box, this will activate the Minutes edit box. Enter the number 30 in the edit box and tab out. The selected program will now play once every half hour from 5:00PM with the last time it is played starting at 9:30PM. (Note: Vixen will only start a program or sequence if there is enough time to complete it before the end time occurs. In the example given above, it will not start playing at 10:00 PM because that is the scheduled stop time.)
Setting the Number of Days the Program Will Run
Vixen not only allows you to schedule the time to run the program, but also set which days it will run. Use the Recurrence section to set these values.
If you only want your program to play once on the date you selected, make sure the Recurrence drop down is set to None (the default value).
If you want it to play every day over a set period of time, select "Daily" from the drop down. This will activate the Start Date and End Date drop down boxes. Select the starting and ending dates.
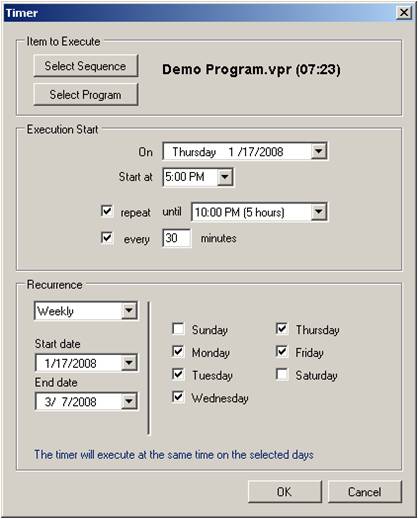
If you wanted to only run your program on set days of the week (for example, weekdays only for two weeks), select Weekly from the drop down box, set the starting and ending dates for the time period you want, and then select the weekdays on the option boxes that appear to the right of the starting and ending dates. For this example, you would select all days except Saturday and Sunday (see figure 7).
Figure 7: Selecting a Recurring Schedule on Weekdays Only
The process is similar for the Monthly and Yearly options. More than likely, you usually use None, Daily, and Weekly. (Note: the weekly option is especially useful if you have two programs you want to play on alternating days or if you have a weekday program and a weekend program.)
Finishing the Scheduling Process
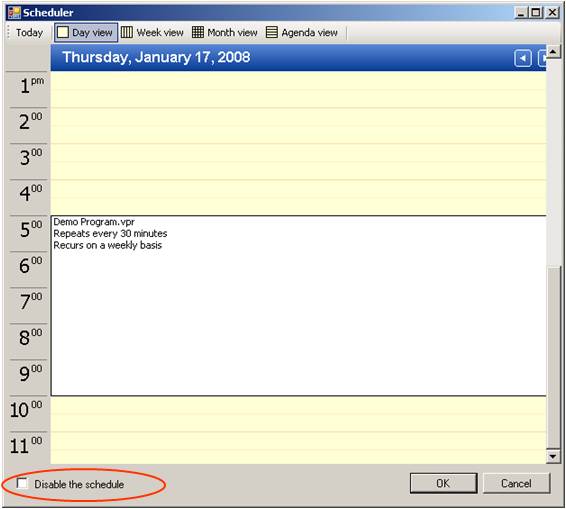
Select the "OK" button. The Time dialog box should disappear and the Scheduler should reflect the times you entered (see figure 8). Inspect the schedule and make sure it reflects what you wanted. When your are satisfied with the schedule, select OK and the Scheduler will close.
There are several different views on the Scheduler. By pressing the top row of buttons (Today, Day view, Week view, Month view, and Agenda view) you can change how your schedule is shown. Experiment with each of these views to see which one you prefer.
If you did not want the program to play during a specified time in the middle of the schedule (say you were going out of town for a few days and didn’t want to run the show while you were gone), you may disable the show without deleting the schedule. On the bottom left corner of the Scheduler dialog box, there is an option to “Disable the schedule” (red circled option on figure 8). Selecting this option suppresses all schedules and prevents them from playing until you un-check it.
Figure 8: Temporarily Turning off the Scheduled Program
