My 9' - 360 degree tree build

A2K97

New member
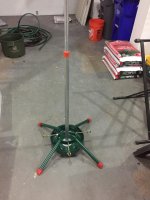
After buying a house with a yard last year, this is my first year having a display element that wasn't attached to the house. The obvious first choice was a mega-tree, or mid-size tree, since it's not really MEGA. I combed over all the available info on this site, and made it my own. Just wanted to share it with all of you, especially those considering adding a mega-tree to their display.

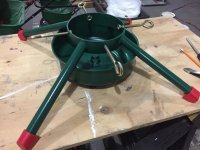
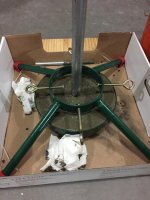
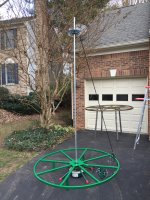
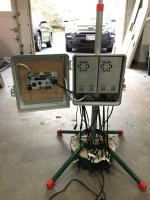
I knew I wanted to add a mega-tree at the end of last year, so I ordered all the necessary lights, controllers, and power supplies. Beyond that, I didn't really have a lot of direction. Then back in the beginning of November, I was wandering through Lowes looking for something unrelated to Christmas lights, when I happened upon their Christmas tree stands. And things started clicking. The stands are $50, but it turned out to work perfectly. The only part that touches the ground is the four red plastic caps on the ends of the legs, minimizing the amount of grass killed.

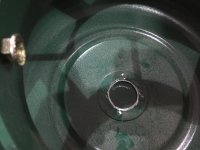
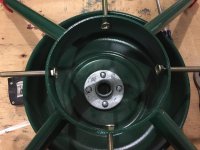
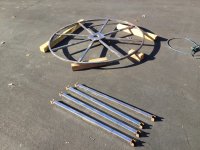
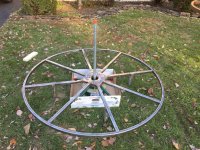
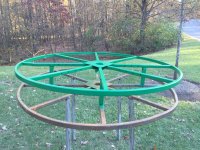
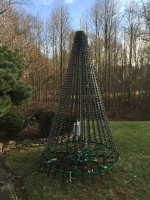
As you can see from the pictures, I cut out the sharp tabs where a real tree would stick. I then drilled 4 holes and mounted a 1" galvanized flange to the bottom of the stand. Then I screwed a 3' piece of 1" galvanized pipe into the thread. I'm using the Boscoyo 16/32 Mega-Tree topper, which calls for 3/4" EMT. As you can see in the last picture, the 3/4" EMT slides perfectly inside the 1" galvanized pipe. This was pretty steady, but I obviously needed to add some weight. Borrowing from the portable hole model, I filled the bottom of the stand with concrete. It probably added 30-35lbs of weight.
 

Attachments

  • IMG_2662.jpg
    IMG_2662.jpg
    127.9 KB · Views: 318
  • IMG_2663.jpg
    IMG_2663.jpg
    141.9 KB · Views: 282
  • IMG_2664.jpg
    IMG_2664.jpg
    138.1 KB · Views: 293
  • IMG_2666.jpg
    IMG_2666.jpg
    75.9 KB · Views: 300
  • IMG_2667.jpg
    IMG_2667.jpg
    81.7 KB · Views: 291
Part two deals with the base of the tree. There are lots of ideas out there. PVC, bending pipe, staking it to the ground, trampoline hoops, etc.

I was all set to follow the Boscoyo instructions and stake the strips directly to the ground. But the idea of using a large cable reel, credit to aknflyer, really appealed to me. But finding them seemed like an impossible task. I even tried finding them using Google maps satellite view. One day however, I drove past a truck hauling one of these metal reels, and tracked the company down. Sure enough, they had a yard full of metal and wood cable reels. Some of them quite large. I explained to the manager what I was going to do with it, although I'm not sure he really understood, and he let me have it for free. He loaded it into my truck with a forklift, and a $20 tip later, I was on my way.

The reel I got is 5.5' across. The 8 connecting legs are attached with bolts. The thing was pretty rusty, but a couple hours with an angle grinder and it looked pretty decent. A couple of cans of green spray paint and it was looking great. I cut down 4 of the legs to 8", which gave me about 1" of clearance above the tree stand. By only using 4 of the 8 legs, I can actually have different height legs if needed. And I can make a second tree out of the other reel, but one was plenty this year.
 

Attachments

  • IMG_2668x.jpg
    IMG_2668x.jpg
    652.1 KB · Views: 305
  • IMG_2671x.jpg
    IMG_2671x.jpg
    475.7 KB · Views: 294
  • IMG_2672x.jpg
    IMG_2672x.jpg
    452.8 KB · Views: 274
  • IMG_2673x.jpg
    IMG_2673x.jpg
    636.6 KB · Views: 281
  • IMG_2674x.jpg
    IMG_2674x.jpg
    594.1 KB · Views: 310
Part 3 was putting it all together. I did a quick test to get the strip height correct. I'm using 50 pixels per strip, at 2" spacing. That's 1600 lights, which is more than the entire rest of my house. The actual lit tree is only 8.5' tall from the top of the hoop to the bottom of the Boscoyo topper. I did not rely solely on the squeezing tension of the Boscoyo topper. I used an EMT set screw coupling as a hard stop. I did have to grind the small bump inside the EMT coupling to get it to slide over the 3/4" EMT, and drill a couple of holes in the 3/4" EMT to get the set screws to fully lock in. Then the Boscoyo topper just slides down on top of it, but I still tightened it up as well.

I used Boscoyo strips and square pixels. I'm just a square pixel guy, no other reason behind it. I also used the MISR clips on the top of each strip. So each strip started with two holes, which were then folded around the MISR clip, and then my first light was the very next hole...skipping every other hole down to the bottom. At the bottom, each strip had 10 extra holes to allow for different tension points. The last light on the bottom of each strip was about 4" from the top of the hoop. I went with the bungee cords with balls method to attach the strips at the bottom. I started out with 8" bungees, which seemed to do the job, but I have since switched to the 6" bungees to put a little more tension on the strips. With the 8" bungees there was a lot of sway with the slightest breeze. I really like the bungee method because it allowed me to move the strips to the side while working on the connections. I think with zip-ties it would be less forgiving, but it would obviously work. I also went with the J-hooks on the top, which made mounting the lights a breeze.

For my controller and power supply, I went with the trusty CG-1500. I am using a Falcon F4v3 and two 360 watt power supplies. Yes, I crammed it all in there. Yes, I know I should have a fuse block. My pixels are 12v and I pretty much did power injection after every 100 pixels. I'm only running at 20%, so there are no power issues.

Assembly was pretty straight forward. The tree base gets set in place. Then the hoop is placed over the top of the tree base. This is done with the 10' piece of EMT removed. Then the control box is attached to the 3' piece of 1" galvanized pipe, and the 10' piece of 3/4" EMT slides into the 1" galvanized pipe. For those with keen eye for detail, no, there is nothing physically connecting the tree base to the hoop, but it doesn't seem to be an issue. I used 17" tie out stakes (giant cork screws) to secure the hoop to the ground. I used four around the base of the hoop. Initially I used bungees to attach the hoop to the stakes, but the upward tension from the 32 strips was too much and lifted the hoop slightly off the ground. That was solved with heavy duty zip ties. And I did use the included guy wires that came with the Boscoyo kit. Once everything was in place, then I hung the lights one strand at a time. No need to struggle to hoist the tree with all the weight attached. Then it was just a matter of hooking up all the connections.

It's been running for a couple weeks now with no issues, and there have been some pretty windy days. I think it looks great and plan on building 3 more next year. Hope this is helpful to someone out there.
 

Attachments

  • IMG_2675x.jpg
    IMG_2675x.jpg
    543.6 KB · Views: 344
  • IMG_2678.jpg
    IMG_2678.jpg
    90.2 KB · Views: 326
  • IMG_2679.jpg
    IMG_2679.jpg
    129.7 KB · Views: 349
  • IMG_2691x.jpg
    IMG_2691x.jpg
    598.9 KB · Views: 373
Nice work, I've been debating on doing something with my strips because staking them to the ground is a pain. I have the same boscoyo kit.
 
Brilliant idea using that metal cable reel as a hoop! I've asked at a couple metal fabrication shops to have a "base" built for my tree (pretty much the same as yours in dimensions) but I hadn't thought of the cable reel. I'm in Oregon, near the Portland area, and I really don't have to be concerned with lots of wind or ice or snow, just rain.

Very nice build and thanks for sharing the details.
 
Thanks for the credit on the cable reel.
Mine differs from yours as I crank the topper up with a winch, and the bungies from hoop to ground keep it from lifting too high (mine does float in the air). If I want more tension, just add another click to the winch. I removed all the cross bracing (to lighten) and used 3 pcs of conduit set in holes in the hoop tied to a closet flange that rides the pole. Nice looking build though.
P.S. The reels are very common in every city. Search for telecom or cable companies. They would love to get rid of them.
 
Last edited:
The tree looks great! I'm Kicking my self, because they left two spools just like that on my lot and I scrapped them out!!! Never thought of using them for a mega tree.

One question though, do you have any fuses coming off from the power supplies for power injection?

Thanks, Dale P.
 
Dale,

I do not have any fuses coming off of the power supplies for power injection, but I know I probably should.
 
Do you like the 360 design or do you think a 270 setup would be better. Some say that the 360 back lights interfere with the effects of the front lights. I did a 180 tree and am expanding it to either 270 or 360.
 
do you have a closeup picture of how you attach to the ring at the bottom?
Part 3 was putting it all together. I did a quick test to get the strip height correct. I'm using 50 pixels per strip, at 2" spacing. That's 1600 lights, which is more than the entire rest of my house. The actual lit tree is only 8.5' tall from the top of the hoop to the bottom of the Boscoyo topper. I did not rely solely on the squeezing tension of the Boscoyo topper. I used an EMT set screw coupling as a hard stop. I did have to grind the small bump inside the EMT coupling to get it to slide over the 3/4" EMT, and drill a couple of holes in the 3/4" EMT to get the set screws to fully lock in. Then the Boscoyo topper just slides down on top of it, but I still tightened it up as well.

I used Boscoyo strips and square pixels. I'm just a square pixel guy, no other reason behind it. I also used the MISR clips on the top of each strip. So each strip started with two holes, which were then folded around the MISR clip, and then my first light was the very next hole...skipping every other hole down to the bottom. At the bottom, each strip had 10 extra holes to allow for different tension points. The last light on the bottom of each strip was about 4" from the top of the hoop. I went with the bungee cords with balls method to attach the strips at the bottom. I started out with 8" bungees, which seemed to do the job, but I have since switched to the 6" bungees to put a little more tension on the strips. With the 8" bungees there was a lot of sway with the slightest breeze. I really like the bungee method because it allowed me to move the strips to the side while working on the connections. I think with zip-ties it would be less forgiving, but it would obviously work. I also went with the J-hooks on the top, which made mounting the lights a breeze.

For my controller and power supply, I went with the trusty CG-1500. I am using a Falcon F4v3 and two 360 watt power supplies. Yes, I crammed it all in there. Yes, I know I should have a fuse block. My pixels are 12v and I pretty much did power injection after every 100 pixels. I'm only running at 20%, so there are no power issues.

Assembly was pretty straight forward. The tree base gets set in place. Then the hoop is placed over the top of the tree base. This is done with the 10' piece of EMT removed. Then the control box is attached to the 3' piece of 1" galvanized pipe, and the 10' piece of 3/4" EMT slides into the 1" galvanized pipe. For those with keen eye for detail, no, there is nothing physically connecting the tree base to the hoop, but it doesn't seem to be an issue. I used 17" tie out stakes (giant cork screws) to secure the hoop to the ground. I used four around the base of the hoop. Initially I used bungees to attach the hoop to the stakes, but the upward tension from the 32 strips was too much and lifted the hoop slightly off the ground. That was solved with heavy duty zip ties. And I did use the included guy wires that came with the Boscoyo kit. Once everything was in place, then I hung the lights one strand at a time. No need to struggle to hoist the tree with all the weight attached. Then it was just a matter of hooking up all the connections.

It's been running for a couple weeks now with no issues, and there have been some pretty windy days. I think it looks great and plan on building 3 more next year. Hope this is helpful to someone out there.
 
FishKing
I like the look of the 360 tree. I did not notice any interference from the back light on the front lights. I think it fills things out, plus I can watch it from my house. After all, they are my lights. And people sometimes view my show from a wide angle and I think having less than 360 would leave some gaps. But it really boils down to preference.

ukewarrior
I do not have a close up picture, but I will try to describe it. The bungee cords I used have a ball, and the cord loops around back to the ball. At the halfway point on the bungee cord, opposite of the ball, you push that through one of the holes at the bottom of the Boscoyo mounting strip. Pull the loop all the way through until the ball is flush against the mounting strip. Then pull the bungee cord down and loop it under the base ring and back up over the mounting strip. Bring the loop end up and hook it over the ball. I hope that makes sense, and is what you were actually asking about.
 
I like what you have done. Nice!

All the standard tree stands that we have (and look like the one you are using) would buckle under that amount of weight (lights, strips, hoop, etc.). Did you do anything extra to the base of it, in particular the small legs?
 
I didn't do anything to reinforce the tree stand. I did examine the welds when I bought them, and had some concerns about failure. I'm not an expert, but the welds just look like ok welds. You have to figure it was designed to hold a 10'-12' tree, ornaments, and lights. That's probably somewhat similar to what the LED tree weighs, but that doesn't account for stress loads caused by wind. The welds might fail one day, but so far no issues.
 
I really like this build. i am planning a 9' tree with 2" spacing on my lights. The biggest difference is I plan to do a 180 tree instead of 360. I would like to see pics of it lit at night. Also, what is the viewing distance? Again, that is a nice build. Thank you for sharing.
 
Back
Top