Using Servos with Vixen and Arduino

Hi Everyone,

So I figured I'd continue with this question here so it has some context, instead of a new thread.
Seems my Windows 11 machine handles the ESP32's classic Bluetooth very well with Vixen (latest release). But if I add a battery-powered Bluetooth speaker in the mix, both stutter and hiccup. I haven't tried much troubleshooting yet. Will try another speaker and Windows 11 machine. I will disable as many processes as possible on the machine and the one Web server feature in Vixen.

Any thoughts before I pull out what's left of my hair? LOL

Thanks, Take care, Joe.

P.S. Guess this is why people use the Falcon player on the Pi. J.
 
Looks like my Replies don't work .

I have to send new message each time I guess .

Just waiting for supporting membership to kick in and hopefully that fixes .
 
Hi Everybody,

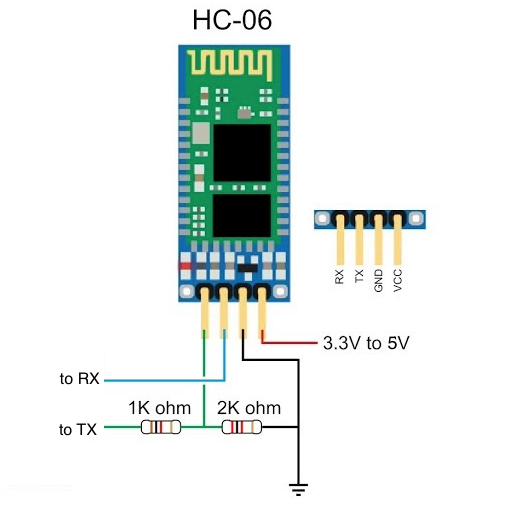
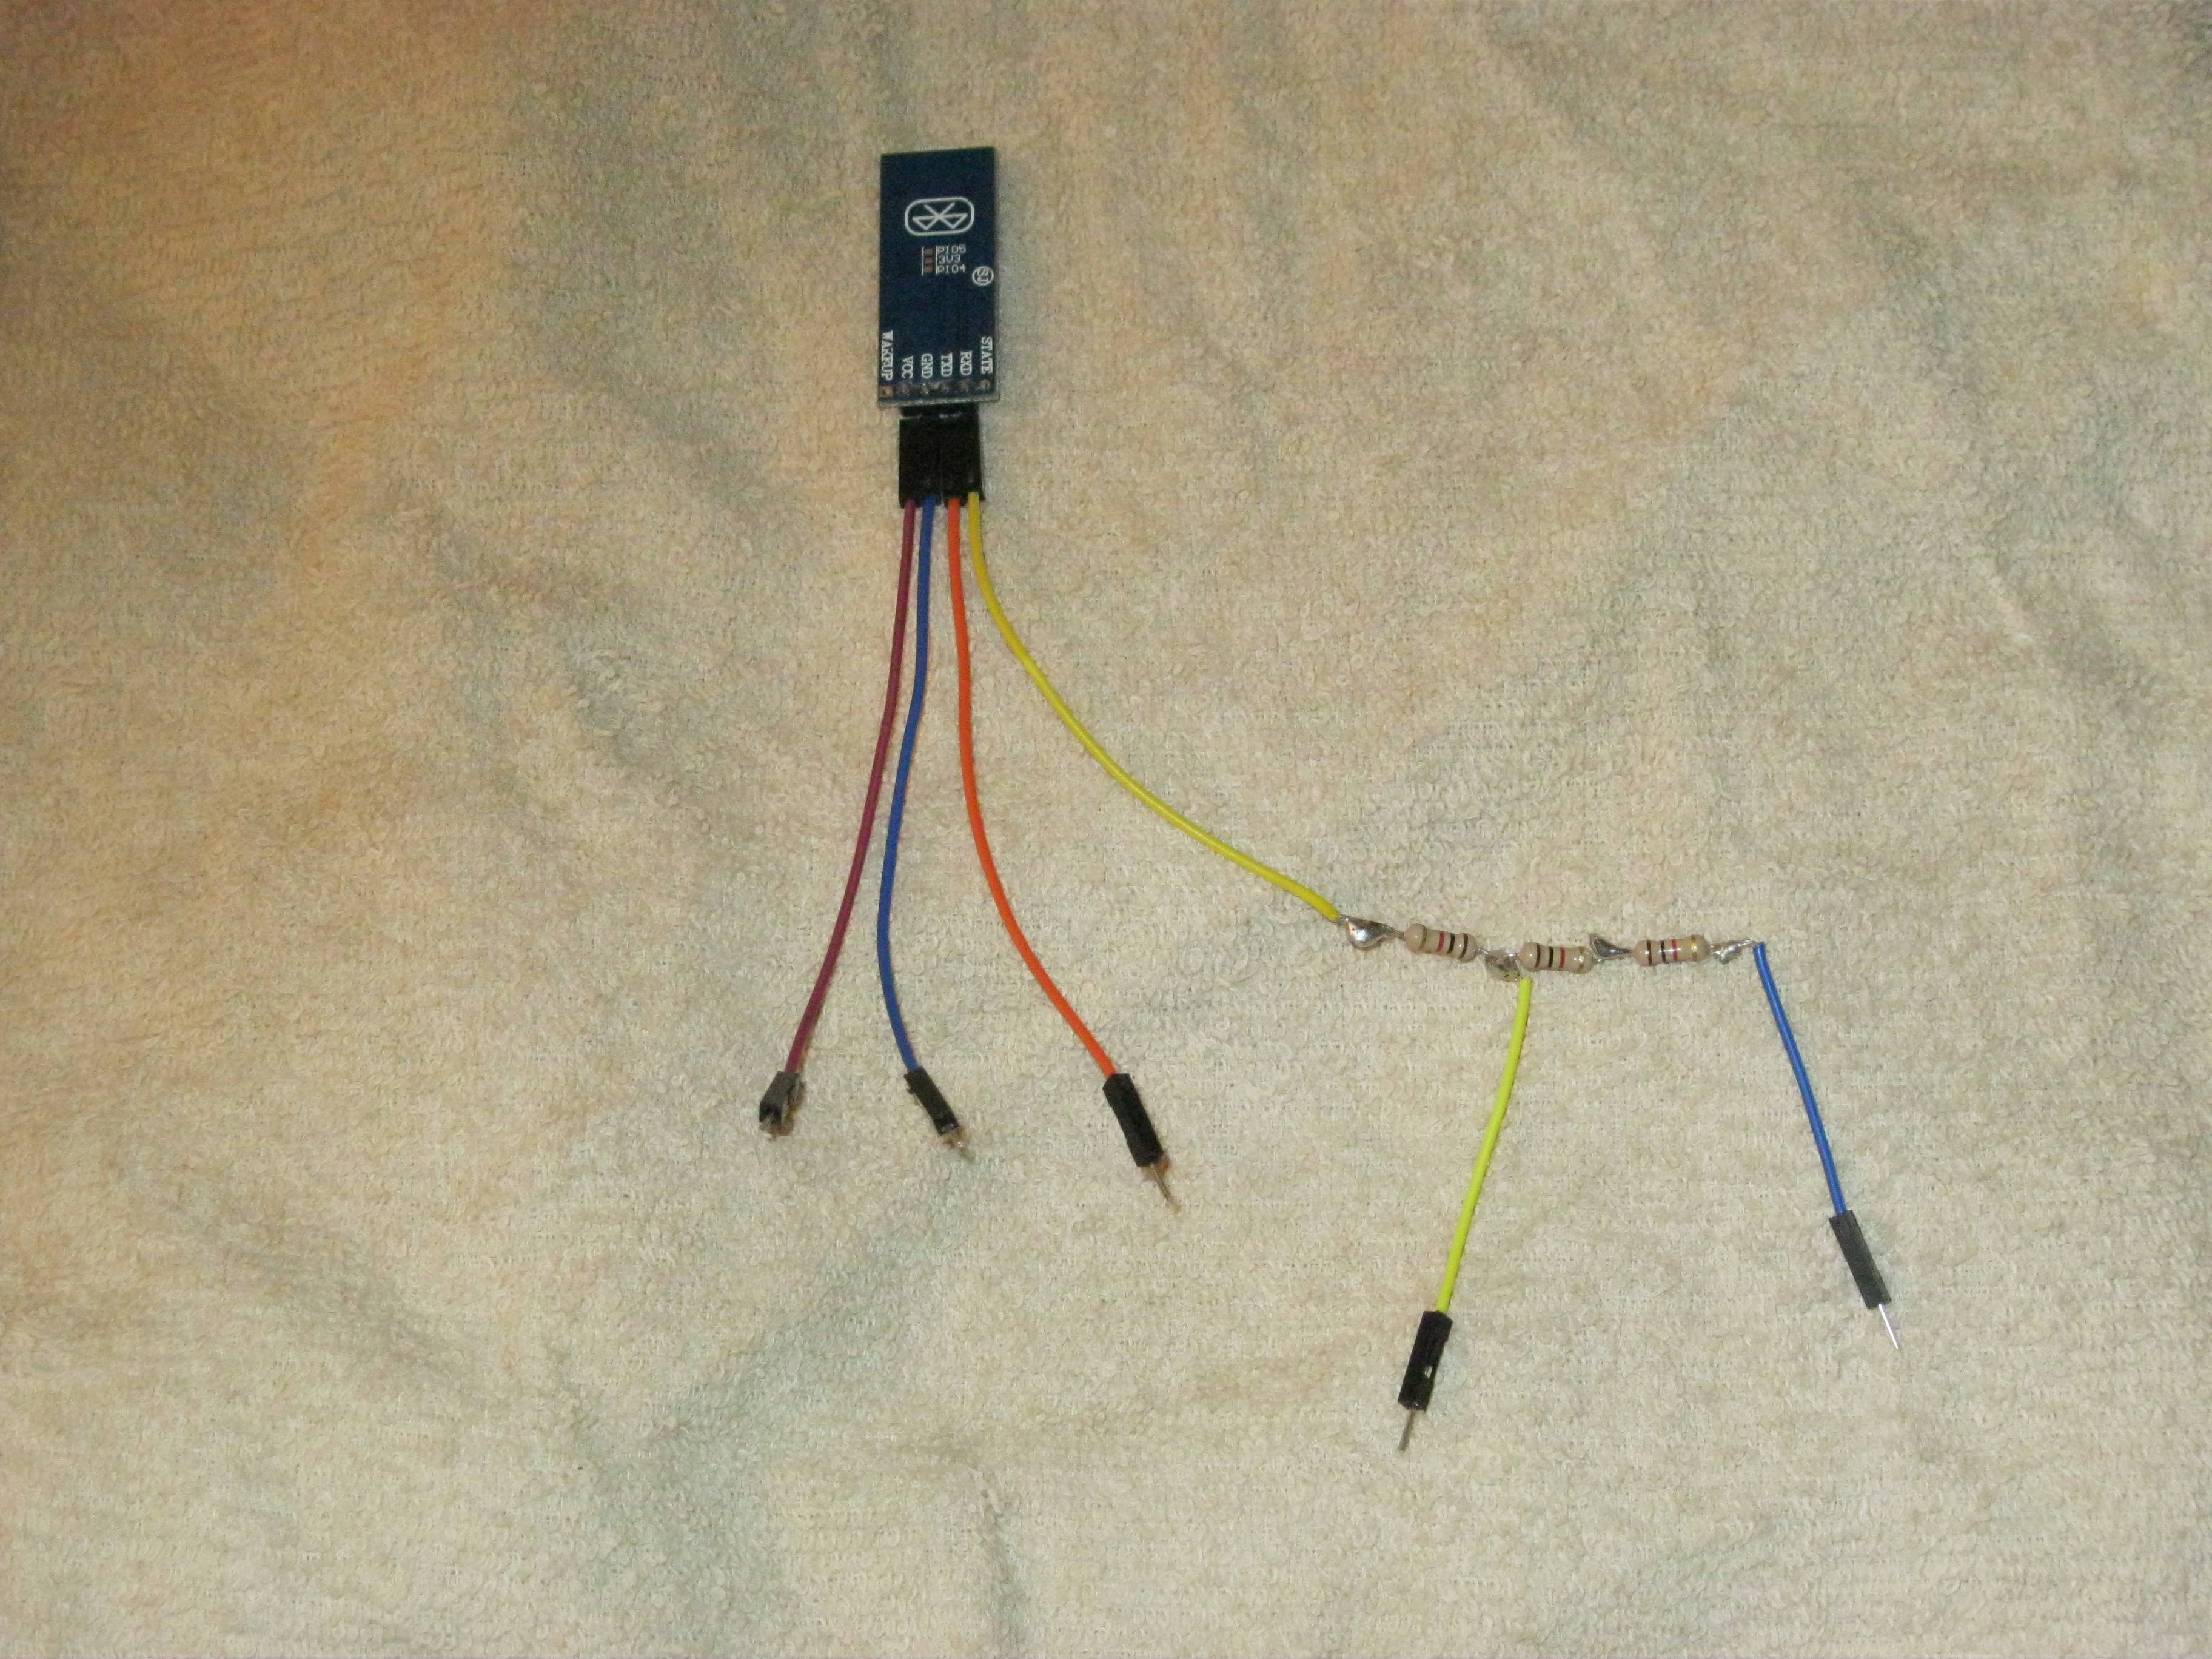
I thought I'd share this because it was an issue for me. I had success in the past using the HC-06 Bluetooth transceiver with an Arduino for serial (like for the DCC++ basestation for model trains). But for whatever reason, I was having an issue with Vixen and 2 boards. So it seems to be the Arduino board itself; these were clones. I bought a new Uno and got the Bluetooth serial working on this new board with Vixen! You'll need to change the baud rate on the HC-06 to match Vixen. The HC-06 has a default set to 9600. It's a little tricky to change the baud rate on the HC-06, but I had already changed it a couple years ago. Really nice not to have an actual connection to the computer to write or play a sequence. To upload code the USB connection is necessary. You have to use a voltage divider on the RX pin of the transceiver;
DCCpp4.png

Once paired, you can select the COM port that the HC-06 is on for the configuration in Vixen. Remember, RT to TX, and TX to RX. In the video, the Uno is powered by the barrel jack with approx. 9 VDC.


DCCpp2.jpg


Moral of the story, it was a hardware issue and the first time I had a problem with a clone.

Take care, Joe.
 
Last edited:
Hi Folks,

I wanted to share this video of my efforts to animate the mouth of a moose head with a servo (with my homemade, quickly cobbled together) mechanism:


Not my best work, but got it done quickly. Moose arrived yesterday afternoon from Amazon. Like a lot of stuff from Amazon, the item wasn't exactly as pictured. The moose head is not the same pattern as in Amazon's photo!

The servo is just running a loop on the ESP32 going from positions 85 to 120.

Now onto doing some sort of sequence in Vixen. Should be easier with just one servo.

Take care, Joe
 
Hello, where could I find the code to control about 10 servos with Arduino + Vixen. I've been trying this for a long time but it has never worked for me. Thank you
 
ESPixelStick V4 can control up to 16 servo motors via an I2C PWM card (PCA-9685). You can look at the code in the OutputServoPCA9685 files
 
Hello,

I have tried this code, the servos work for me but I have a problem. I want to make a water fountain with water jet movement and for this I will use the servo. But with this code the servo only moves to the left and I want it to be able to move from left to right.

I don't know if I have explained myself well, that's why I leave here a link to a video where he does it.

Link:


Thank you so much.

Hi Folks,

So this is just an update (my efforts) that the variable speed library works well (for me) with the servo code below, but the VarSpeedServo.h library needs to be installed manually in the Arduino IDE. Because servos sometimes behave in an unintentional manner, I have added a relay to only apply power when needed, using last pin. The code handles the variable speed library and drives more than just 8 servos, 9 servos in my case. My code is not efficient or tight, but it works for me. I am sure it can be greatly improved upon!

Code:
#define numChannels 10
#include <VarSpeedServo.h>
// https://github.com/netlabtoolkit/VarSpeedServo/releases library needs to be manually installed

VarSpeedServo servo1;
VarSpeedServo servo2;
VarSpeedServo servo3;
VarSpeedServo servo4;
VarSpeedServo servo5;
VarSpeedServo servo6;
VarSpeedServo servo7;
VarSpeedServo servo8;
VarSpeedServo servo9;
//VarSpeedServo servo10;


void setup() {
    Serial.begin(115200);
   
    pinMode (11,OUTPUT);

    digitalWrite(11,HIGH); //relay set to trigger on LOW, servos are not powered until sequence starts, if necessary
   
    servo1.attach(2);
    servo2.attach(3);
    servo3.attach(4);
    servo4.attach(5);
    servo5.attach(6);
    servo6.attach(7);
    servo7.attach(8);
    servo8.attach(9);
    servo9.attach(10);
    //servo10.attach(11);


      servo1.write(95,75);  //as a precaution, sets all servos to position 95, approx. mid position for figures on horns
      servo2.write(95),75;
      servo3.write(95),75;
      servo4.write(95),75;
      servo5.write(95),75;
      servo6.write(95),75;
      servo7.write(95),75;
      servo8.write(95),75;
      servo9.write(95),75;
    
}


void loop() {
      while(!Serial.available());

      //set Vixen header to '~!'. Ths code is expcting that!
      for( ; ; )
      {if(Serial.read() == '~') {break;}}

       while(!Serial.available());
      for( ; ; )
       {if(Serial.read() == '!') {break;}}

       while(!Serial.available());


      //define an array of the size of the number of channels, to store the channel values
      byte channelValues[numChannels];

      for(byte iChn = 0; iChn < numChannels; iChn++){
        while(!Serial.available());
        channelValues[iChn] = Serial.read(); //read channel value from serial data
      }

     //write(value, speed) - "speed" varies the speed of the movement to new position -- 0=full speed, 1-255 slower to faster

      servo1.write(map(channelValues[0], 0,255, 89, 110), 75); //Schroeder 90-110, speed set to "75"
      servo2.write(map(channelValues[1], 0,255, 90, 110), 75); //Patty     90-110
      servo3.write(map(channelValues[2], 0,255, 90, 110), 75); //sally     90-110
      servo4.write(map(channelValues[3], 0,255, 90, 110), 75); //Linus     90-110
      servo5.write(map(channelValues[4], 0,255, 90, 110), 75); //PigPen    90-110
      servo6.write(map(channelValues[5], 0,255, 85, 105), 75); //Frnklin   85-105
      servo7.write(map(channelValues[6], 0,255, 90, 110), 75); //Lucy      90-110
      servo8.write(map(channelValues[7], 0,255, 90, 110), 75); //Chuck     90-110
      servo9.write(map(channelValues[8], 0,255, 75, 98), 75); //Snoopy    75-98
      digitalWrite(11,channelValues[9]); // for relay for servo power supply if necessary
}

It's not easy doing the sequencing when you have chronic tendonitis; very mouse intensive, LOL.

Take care, Joe.
 
Hello,

I have tried this code, the servos work for me but I have a problem. I want to make a water fountain with water jet movement and for this I will use the servo. But with this code the servo only moves to the left and I want it to be able to move from left to right.

I don't know if I have explained myself well, that's why I leave here a link to a video where he does it.

Link:


Thank you so much.
Which code are you referring ?

You determine the sequence value which corresponds to 90 degrees of the servo's movement and that should be your 0 point .
From there you have left and right control .
If you could elaborate a bit on what you are using as a controller etc we could offer better advice .
.
 
This is the code:

I'm using an Arduino Mega (original) conected with a USB cable to my laptop. I'm testing with a micro servo 9g conected directly to the Arduino board.

Code:
#define numChannels 10
#include <VarSpeedServo.h>
// https://github.com/netlabtoolkit/VarSpeedServo/releases library needs to be manually installed

VarSpeedServo servo1;
VarSpeedServo servo2;
VarSpeedServo servo3;
VarSpeedServo servo4;
VarSpeedServo servo5;
VarSpeedServo servo6;
VarSpeedServo servo7;
VarSpeedServo servo8;
VarSpeedServo servo9;
//VarSpeedServo servo10;


void setup() {
Serial.begin(115200);

pinMode (11,OUTPUT);

digitalWrite(11,HIGH); //relay set to trigger on LOW, servos are not powered until sequence starts, if necessary

servo1.attach(2);
servo2.attach(3);
servo3.attach(4);
servo4.attach(5);
servo5.attach(6);
servo6.attach(7);
servo7.attach(8);
servo8.attach(9);
servo9.attach(10);
//servo10.attach(11);


servo1.write(95,75); //as a precaution, sets all servos to position 95, approx. mid position for figures on horns
servo2.write(95),75;
servo3.write(95),75;
servo4.write(95),75;
servo5.write(95),75;
servo6.write(95),75;
servo7.write(95),75;
servo8.write(95),75;
servo9.write(95),75;

}


void loop() {
while(!Serial.available());

//set Vixen header to '~!'. Ths code is expcting that!
for( ; ; )
{if(Serial.read() == '~') {break;}}

while(!Serial.available());
for( ; ; )
{if(Serial.read() == '!') {break;}}

while(!Serial.available());


//define an array of the size of the number of channels, to store the channel values
byte channelValues[numChannels];

for(byte iChn = 0; iChn < numChannels; iChn++){
while(!Serial.available());
channelValues[iChn] = Serial.read(); //read channel value from serial data
}

//write(value, speed) - "speed" varies the speed of the movement to new position -- 0=full speed, 1-255 slower to faster

servo1.write(map(channelValues[0], 0,255, 89, 110), 75); //Schroeder 90-110, speed set to "75"
servo2.write(map(channelValues[1], 0,255, 90, 110), 75); //Patty 90-110
servo3.write(map(channelValues[2], 0,255, 90, 110), 75); //sally 90-110
servo4.write(map(channelValues[3], 0,255, 90, 110), 75); //Linus 90-110
servo5.write(map(channelValues[4], 0,255, 90, 110), 75); //PigPen 90-110
servo6.write(map(channelValues[5], 0,255, 85, 105), 75); //Frnklin 85-105
servo7.write(map(channelValues[6], 0,255, 90, 110), 75); //Lucy 90-110
servo8.write(map(channelValues[7], 0,255, 90, 110), 75); //Chuck 90-110
servo9.write(map(channelValues[8], 0,255, 75, 98), 75); //Snoopy 75-98
digitalWrite(11,channelValues[9]); // for relay for servo power supply if necessary
}
 
Here is a photo of the conections, i was trying with a 180 and 360 servos.
 

Attachments

  • IMG_20240418_091200.jpg
    IMG_20240418_091200.jpg
    614.6 KB · Views: 3
Try this for servo 1 as it give full range of movement on the servo ->

servo1.write(map(channelValues[0], 0,255, 0, 180), 75); // you can get your best settings by editing 0 and 180 to find the end points.

to set your servo to 90° simply apply a level effect of value 50% in your sequencer
to move the servo below 90° use a ramp down effect from 50% value towards 0 for desired position
to move the servo above 90° use a ramp up effect from 50% value towards 100 % value for desired position
the duration of the effect will constitute time .

ramping effects will be where you play with the motion/direction
level/solid effect values will hold a servo's position .

a solid/level effect of approx 50% will hold 90° position.


Hope this makes sense and helps you in understanding .
I don't know how to sequence in Vixen.
hopefully someone can help there
 
You can delete the 75

servo1.write(map(channelValues[0], 0,255, 0, 180)); // you can get your best settings by editing 0 and 180 to find the end points.
 
Thank you very much angus40 for your support.

I just tried it, the problem is that when I get into Vixen it goes to position 0 and I would like it to stay at 90º. I attach a video of how the progress is going. Greetings and Thank you very much.

 
The servo will stay at 90° provided you have a level/solid effect of 50% value.
if you have no effect on the timeline in Vixen for that channel ,the servo will go to 0.

try this , create a solid effect that is 15 seconds long
then for the next 15 seconds create a ramp up effect that starts at 50% value and goes to 100% value
next create a 15 second ramp down effect that goes from 100% value to 50% value
lastly create / copy paste the 15 second 50% level effect

Now you will have 1 minute 60 seconds worth of effects (for demo purpose)

Vixen will set the servo to 90° for 15 seconds then move to 180° over 15 seconds time period
then to 90° over 15 seconds then hold at 90° for 15 seconds

With this you should get the idea how to sequence and time your servo .

Do not have any gaps between effects , the first effect should start at 0 on the timeline.


°
 
Perfect, I tried it like this and it works, I wanted to know if there was another more comfortable way, where I don't have to enter a value of 50% but since it works I'll leave it like that. Thanks
 
A 180° servo has linear positional movement of 0° - 180°
To achieve full range of movement on a sequencer's single channel timeline , creative sequencing is about as comfortable as it gets
to having 90° set as park position .

This is ideal for head movement should you sequence a skull for example etc.
 
If you wouldn't mind losing 1 degree of motion you could write a line in your code that translates a received 0 to go to 90 degrees. This might also "park" the servo at 90 degrees when no sequences are running.
I'm not sure if this will work since I don't use Vixen 3 but its just a thought.
 
if memory serves , I believe by using 50% valued effect for 90° rather than 0
removed jitterbug/jumpy movement and gremlins disappeared.
But then again , it could have been my sequencing habits at the time .
 
Back
Top