Creating Chase Effects: Difference between revisions
Jump to navigation
Jump to search
(Copied from GSM) |
No edit summary |
||
| (12 intermediate revisions by 2 users not shown) | |||
| Line 1: | Line 1: | ||
A chase effect is an effect that spans multiple channels with a lighting effect that moves through those channels over a period of time. When it is set to lights, it creates an appearance of a "chase" through lighting channels. Chases can be created manually in HLS, or, through an Action menu to chase a group (the easy way). | |||
====Manual Chase==== | |||
[[File:HLS_SequenceWindow_Chase1.png|350px|thumb|Figure 5-14]] | |||
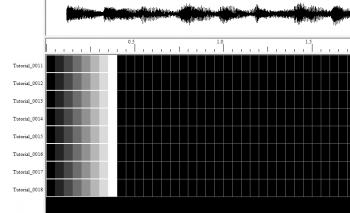
*For illustration, we will be adding a chase to eight channels. First, add the effect you want to chase to each of the eight channels. This can be level, ramp up, ramp down, or any other effect for a single channel. (See Figure 5-14 for an example where Ramp Up was chosen to run over 8 cells in each channel.) | |||
<br clear=all> | |||
[[File:HLS_SequenceWindow_Chase2.png|350px|thumb|Figure 5-15]] | |||
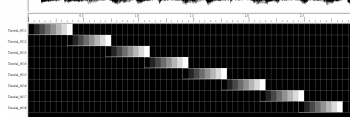
*Next, slide each channel effect to create the chase. This is done by clicking on the left-most cell on channel 2 first, then moving the mouse to the right. All channels in the effect will slide to the right. The same procedure is to be used for the rest of the channels. The results are shown in Figure 5-15. | |||
[[File: | <br clear=all> | ||
====Chase (The Easy Way)==== | |||
*For illustration, we will be adding a chase to eight channels. First, add the effect you want to chase to each of the eight channels. This can be level, ramp up, ramp down, or any other effect for a single channel. (Look up to Figure 5-14 for an example where Ramp Up was chosen to run over 8 cells in each channel.) | |||
[[File:HLS_SelectGroupActionToExecute_Chase.png|350px|thumb|Figure 5-16]] | |||
*Next, select the cells in all eight channels that you want to chase. (Remember to CTRL-Left click the left-most cell to let HLS know you want to select instead of move.) | |||
*Once the selection-box is complete, Right-click the group of cells and select ''Perform Action on Selected Group''. | |||
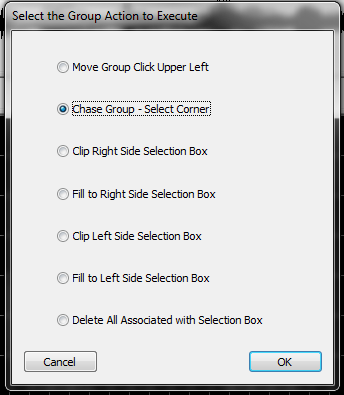
*In the menu that opens, select ''Chase Group'' and click ''OK'' (see Figure 5-16). | |||
<br clear=all> | |||
[[ | *Click in one of the corners and move the mouse to pull the channels apart into a chase formation. | ||
[[Category: | *When satisfied with the result, left-click again and hit ''ESC'' (Look up to Figure 5-15 to see end result). | ||
*'''Tip:''' BOTH methods can create the SAME end result. However, the built in chase function is much faster. | |||
'''Video:''' [http://www.youtube.com/watch?v=j7QLnSoEB4M Chase Effects] | |||
<noinclude> | |||
{| class="wikitable" | |||
! colspan="3"| [[HLS User Manual and Reference Guide]] | |||
|- | |||
! align="center"|Previous Page | |||
! align="center"|Current Chapter | |||
! align="center"|Next Page | |||
|- | |||
| align="center" | [[Setting Defaults for Effects]] | |||
| align="center" | [[HLS User Manual and Reference Guide#Sequencing_Channels_and_Adding_Effects | Chapter 5: Sequencing Channels and Adding Effects]] | |||
| align="center" | [[Mirroring Effects]] | |||
|} | |||
<br /> | |||
[[Category:HLS User Manual]] | |||
</noinclude> | |||
Latest revision as of 04:10, 24 March 2013
A chase effect is an effect that spans multiple channels with a lighting effect that moves through those channels over a period of time. When it is set to lights, it creates an appearance of a "chase" through lighting channels. Chases can be created manually in HLS, or, through an Action menu to chase a group (the easy way).
Manual Chase

- For illustration, we will be adding a chase to eight channels. First, add the effect you want to chase to each of the eight channels. This can be level, ramp up, ramp down, or any other effect for a single channel. (See Figure 5-14 for an example where Ramp Up was chosen to run over 8 cells in each channel.)

- Next, slide each channel effect to create the chase. This is done by clicking on the left-most cell on channel 2 first, then moving the mouse to the right. All channels in the effect will slide to the right. The same procedure is to be used for the rest of the channels. The results are shown in Figure 5-15.
Chase (The Easy Way)
- For illustration, we will be adding a chase to eight channels. First, add the effect you want to chase to each of the eight channels. This can be level, ramp up, ramp down, or any other effect for a single channel. (Look up to Figure 5-14 for an example where Ramp Up was chosen to run over 8 cells in each channel.)

- Next, select the cells in all eight channels that you want to chase. (Remember to CTRL-Left click the left-most cell to let HLS know you want to select instead of move.)
- Once the selection-box is complete, Right-click the group of cells and select Perform Action on Selected Group.
- In the menu that opens, select Chase Group and click OK (see Figure 5-16).
- Click in one of the corners and move the mouse to pull the channels apart into a chase formation.
- When satisfied with the result, left-click again and hit ESC (Look up to Figure 5-15 to see end result).
- Tip: BOTH methods can create the SAME end result. However, the built in chase function is much faster.
Video: Chase Effects
| HLS User Manual and Reference Guide | ||
|---|---|---|
| Previous Page | Current Chapter | Next Page |
| Setting Defaults for Effects | Chapter 5: Sequencing Channels and Adding Effects | Mirroring Effects |