Audio File: Difference between revisions
| Line 19: | Line 19: | ||
*'''Lo Pass Filter:''' This filter will filter the audio to only show the portions that are in lower frequencies, such as bass drum and other low (in pitch, not volume) notes. | *'''Lo Pass Filter:''' This filter will filter the audio to only show the portions that are in lower frequencies, such as bass drum and other low (in pitch, not volume) notes. | ||
**Wikipedia: [http://en.wikipedia.org/wiki/Low-pass_filter Low Pass Filter] | **Wikipedia: [http://en.wikipedia.org/wiki/Low-pass_filter Low Pass Filter] | ||
*'''Band Pass filter:''' This filters on BOTH high and low frequencies. The '' | *'''Band Pass filter:''' This filters on BOTH high and low frequencies. The ''Frequency'' value is the "desired" frequency. A band pass filter will filter OUT both the high and low frequencies that are further away from that frequency. | ||
**Wikipedia: [http://en.wikipedia.org/wiki/Band-pass_filter Band Pass Filter] | **Wikipedia: [http://en.wikipedia.org/wiki/Band-pass_filter Band Pass Filter] | ||
<br /> | <br /> | ||
Revision as of 04:57, 27 January 2013
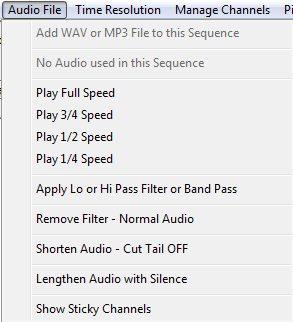
Beyond the basics of loading the audio file, which is discussed here, there are several other important functions in the Audio File Menu.
Speed Controls
The Speed Control handles playback speed of the audio file. Being able to adjust the playback of the audio assists in proper timing placement in faster songs or just getting timings very precise. To activate, click the speed desired and then click the play button.
Audio Filters
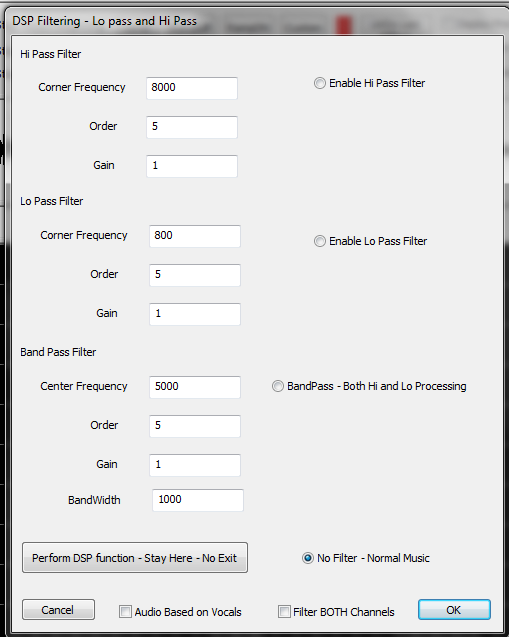
This is a very powerful feature of HLS and one that can come in handy when setting up beat tracks.
- Hi Pass Filter: This filter will filter the audio to only show the portions that are in higher frequencies, such as a female vocal or high (in pitch, not volume) notes.
- Wikipedia: High Pass Filter
- Lo Pass Filter: This filter will filter the audio to only show the portions that are in lower frequencies, such as bass drum and other low (in pitch, not volume) notes.
- Wikipedia: Low Pass Filter
- Band Pass filter: This filters on BOTH high and low frequencies. The Frequency value is the "desired" frequency. A band pass filter will filter OUT both the high and low frequencies that are further away from that frequency.
- Wikipedia: Band Pass Filter
Common Frequencies:
- 200 Hz and below: The bass of the mix. The bottom end of the sound.
- 200 – 400 Hz: The body of the low end instruments.
- 400 Hz – 1 kHz: The low mid/mid area of the mix. The body of guitars and vocals reside here.
- 1 – 3 kHz: Snare drums and kicks start in this range and extend almost to 4 kHz.
- 4 – 8 kHz: High-mids, the top end of most drums, guitars, and organs. Also the body of cymbals is in this range, bottoming out in 3 kHz range.
- 8 – 10 kHz: Cymbals mostly live here. You’ll also find the top end of vocals here.
- Summarized from: abovegroundmagazine.com
Visual chart of instruments and frequency ranges: frequency chart
Video
- Watch this video uploaded by Joe Hinkle. (Note: This video link starts at the 3:22 mark, where discussion of the DSP filtering begins.)
Adjust Audio Length
HLS has the ability to shorten audio on the tail end. This is useful at times when a song may fade to several seconds of silence which are undesirable. To clip the audio, you must set the GREEN mark on the audio ruler. To do so, locate the point you wish to cut the audio and press CTRL + Right Mouse Button to place the GREEN mark. Then, select to shorten audio and click YES through the warnings. HLS will shut down after cutting and saving.
HLS also has the ability to lengthen audio with silence. When selected, HLS will warn you that you are about to lengthen your audio. Select YES to continue. Then add the amount of silence to add in Minutes, Seconds, and Milliseconds. Press OK when done.
Show Sticky Channels
Sticky channels are those channels which stay visible on the grid when they are active. These are generally beat tracks which allow you to use them as a reference guide with different display groups. The Show Sticky Channels menu item will toggle between Sticky Channels and the regular view of the audio file.
| HLS User Manual and Reference Guide | ||
|---|---|---|
| Previous Page | Current Chapter | Next Page |
| Starting a new HLS Sequence | Chapter 2: Creating a Sequence | Time Resolution |

