Frequency Spectrum
Frequency Spectrum Add-in
Overview
- The Frequency Spectrum add-in splits the audio soundtrack of the sequence into frequency bands.
- These bands are linked to channels in the sequence.
- The add-in examines the soundtrack.
- The Scale and sliders are adjusted to set the threshold for the add-in.
- If the amplitude of a frequency band reaches the threshold point then the cells of the linked channels where this occurs are set to 100% intensity. Cells that were not set by the add-in retain their original value.
Components of Frequency Spectrum Add-in
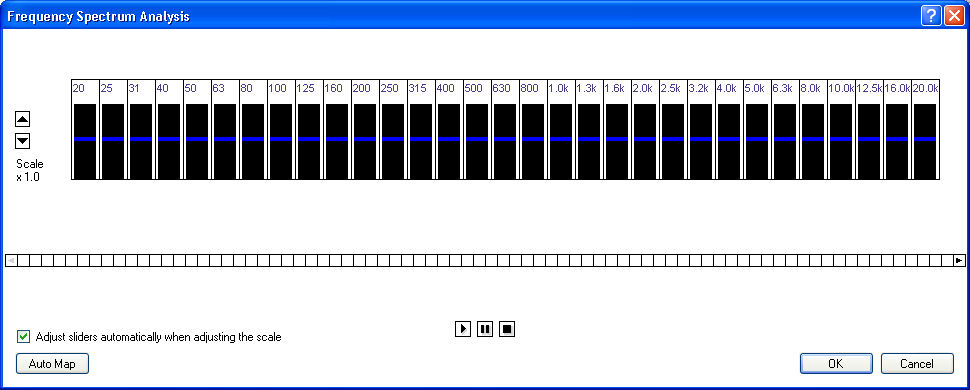
Frequency Spectrum add-in screen
Frequency Bands
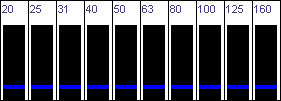
The audio is split into 31 bands ranging from 20Hz up to 20kHz. When you play the sound track a bar graph showing the amplitude of that frequency is displayed in the black rectangle. The lower portion of the bar graph is Green, with the mid an upper sections appearing as Yellow and Red respectively. The height of the bar graph is affected by the Scale setting.
Channel Indicators
The channels in the sequence are shown as a row of squares below the frequency band. If there are more channels than can be displayed in the window then there will be scroll arrows visible to indicate that more channels are available. Click on the arrow to display these channels. Hovering the mouse pointer over a channel indicator will display the channel name.
Auto Mapping channels
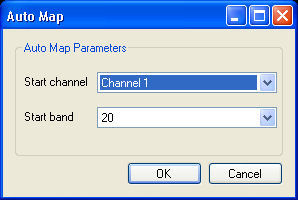
The channels can be automatically mapped. Click on the Auto Map button to display the auto map options screen. With auto mapping you need to have 31 consecutive channels available if all frequency bands are used.
The first channel in the sequence and the first frequency band are displayed when the auto map window is initially displayed.
- From the Start channel drop down list select the first channel to be used by the add-in.
- From the Start band drop down list select the first frequency band that you want to utilize. Any frequency bands below the selected start band will be ignored.
- Click on the OK button to map the channels. The frequency bands will then be individually mapped onto consecutive channels according to the choices you have made.
Manually Mapping Channels
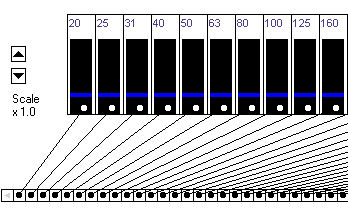
Manually mapping the channels allows you to be more selective and creative with the channel mapping when compared to auto mapping.
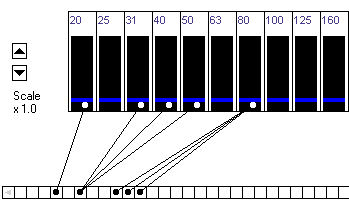
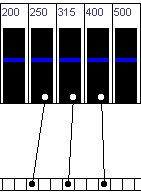
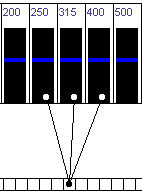
In the example shown above you can see a frequency band linked to a single channel, a group of frequencies linked to a single channel and a single frequency band linked to multiple channels. More complex linkages can be achieved than has been shown.
- To link a frequency band to a channel, position the cursor over the black area of the frequency band and drag the cursor over to the desired channel. When the mouse button is released the link will be created. Or it can be done in the reverse direction by dragging from the channel indicator to the frequency band.
- To break a link drag the White marker (at the top of the link connecting line) into any white space outside of the black area. Or by dragging the Black marker (at the bottom of the link connecting line) into any white space outside of the channel indicators.
- To move a link simply drag a marker to the desired location. When you move a link from one frequency band into another band already containing a link, then the link you are moving will replace that link.
- To link a frequency band to multiple channels simply drag from the black area of the desired frequency band to as many channels as required.
- To link a channel to multiple frequency bands requires an intermediate step. Once the first link to a channel is made, the add-in will not let you directly link additional frequency bands to that same channel. You must first create links to separate channels.
Then drag the links to the desired channel.
Play
The frequency spectrum add-in only has simple Play, Pause and Stop functions.
When you play the sound track, bar graphs of the amplitude for each of the frequency bands are displayed within the black rectangles. The lower portion of the bar graph is Green, with the mid an upper sections appearing as Yellow and Red respectively. The height of the bar graph is affected by the Scale setting.
Scale
The scale factor is used to adjust the virtual amplitude of the sound track within the add-in. If the scale value is low (initial default is x 1.0) then only the loudest portions of the sound track will reach the threshold. As the scale value is increased then more of the sound track will reach the threshold.
To change the scale click on the Up and Down buttons. The scale value is displayed beneath the buttons.
Threshold Sliders
The sliders are used to adjust the threshold set point for the add-in.
By default the sliders are automatically adjusted when adjusting the scale.
If the option is not ticked then the slider positions do not change when the scale is changed.
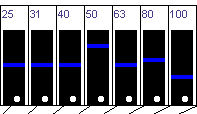
The sliders can be manually adjusted even if auto adjust is ticked. To adjust the sliders position the mouse cursor over the blue slider ( the cursor changes to a double arrow) and drag the slider to the required position.
The higher the slider is set then the higher the threshold is and the louder the sound track within that frequency band needs to be to reach the threshold. And conversely the lower the slider position, the lower the threshold and the quieter the sound track within that frequency band needs to be to reach the threshold.
Completing the process
Clicking on the OK button will commence the analysis of the soundtrack.
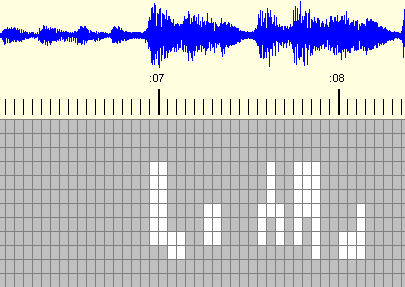
When the amplitude of a frequency band reaches the threshold then any channels that are linked to that frequency band will have those cells in the sequence (where this occurs) set to 100% intensity. Cells that were not set by the add-in retain their original value.
The above example shows the end result. A low scale value has been used, showing the add-in being triggered by the louder sections of the soundtrack but not responding to the quieter sections.
