16 Channel Renard with SSR Assembly Instructions
Overview
- Assembly Time: 2 hours
- Skill Level: Medium
Disclaimer
ALL INFORMATION WITHIN THIS DOCUMENT IS PROVIDED "AS IS" AND WITHOUT ANY EXPRESS OR IMPLIED WARRANTIES, INCLUDING, WITHOUT LIMITATION, THE IMPLIED WARRANTIES OF MERCHANTABILITY AND FITNESS FOR A PARTICULAR PURPOSE. I DO NOT GUARANTEE ANY INFORMATION IN THIS DOCUMENT IS ACCURATE, AND IT SHOULD BE USED FOR ABSTRACT EDUCATIONAL PURPOSES ONLY.
Reference Material
Tools
- Bench Soldering Iron
- Silver Solder
- Flat cut dykes
- Desoldering bulb
Other Requirements
- You will need an RS232 to RS485 converter. I would suggest EBAY
Related Documents/Links
Build Steps
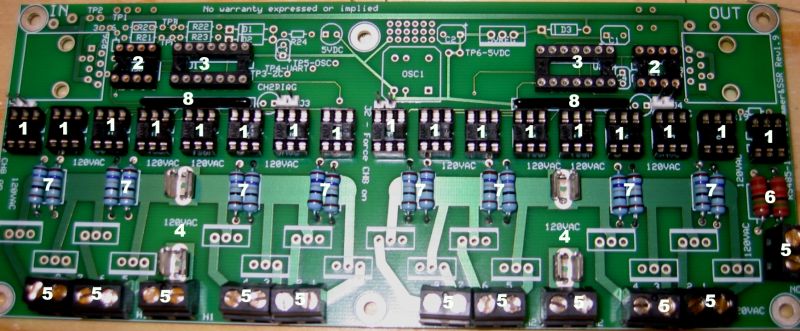
| Install Item | Qty | Mouser P/N | Location | Notes |
|---|---|---|---|---|
| 1. IC sockets 6 pin | 17 | 571-3902611 | U3-U19 | Make sure they are oriented the same way as the silk screen image. U19 is oriented opposite of the others. |
| 2. IC Sockets 8 Pin | 2 | 575-193308 | U20 & U21 | |
| 3. IC Sockets 14 Pin | 2 | 575-199314 | U1 & U2 | |
| 4. Bossman Fuse Holder | 4 | 504-1a3399-10 | H1 & H2 pads | Make sure the notch on the fuse holder is oriented so one is on the top and the other on the bottom to properly hold the fuse. |
| 5. Euro Sytle Terminal Blocks | 11 | 538-398890-0302 | Lower Edge of Board | |
| 6. 15Kohm resistors | 2 | 71-ccf60-15k-e3 | R17 & R18 | |
| 7. 178ohm resistors | 16 | 273-178-rc | R1 - R16 | Orient the colored bands all the same way for ease of troubleshooting later. |
| 8. 10pin 680ohm bus resistor | 2 | 266-680 | above U7 & U15 | |
| Numbered Photo - Numbers coorospond to the build steps | ||||
| 9. 2 ping jumper mount | 4 | 571-3-644456-2 | J1 - J4 | |
| 10. Green LED | 2 | 604-wp7104gt | Ch2Diag #1 & #2 | |
| 11. Monolithic Radial Capactor | 2 | 81-rpee41h105m4k1e12 | C1 & C2 | |
| 12. Amp Modular Jacks rj45 | 2 | 571-5520251-4 | Upper Right and Left | |
| 13. Coated axial ceramic capacitors | 2 | 80-c410c104m5u | C3 & C4 | |
| 14. Voltage Regulator | 1 | 821-TS7805C2 | 5vReg | |
| 15. 8 amp Triac | 16 | 511-BTA08-400b | Bottom of board | Be sure to solder these well as they will be carrying 110v A/C |
Still Entering Give me so time to finish before you edit this please
