Creating Basic Effects
Introduction to Sequencing in HLS
Sequencing in HLS works by adding effects to lighting channels at specific time intervals to coordinate the lights with a set peice of music. HLS is different than other sequencers in that it moves beyond the idea of controlling individual channels and individual moments in time. While that can still be done, HLS is most powerful in it's use of macro-level control.
- RGB channels can be controlled without concern with the color levels of each underlying channel.
- Pixels can be grouped into Pixel Planes where complex effects can be as simple as drag and drop without having to think about things on a channel level.
- With HLS, sequencing thousands of channels becomes quite manageable.
The Sequencing Window and Toolbar
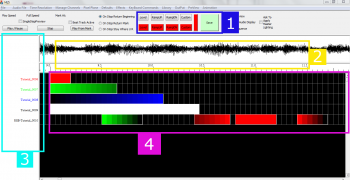
The HLS Sequencing Window has four basic components which are important when sequencing (See Figure 5-1).
1. The first component, highlighted in blue, is the toolbar for applying effects in a sequence.
- The top row of buttons are basic effects.
- The second row of colored buttons are the colors set for RGB channels.
2. The second component, highlighted in yellow, is the audio oscilloscope and the time bar, which shows where you are in the song.
3. The third component, highlighted in turquoise, is the listing of channels that are currently being viewed.
4. The fourth component, highlighted in purple, is the sequence grid, which contains the cells where effects are applied to channels.
Selection Mode in HLS
Applying effects to channels in HLS works differently than some other sequencing programs. When you click the left mouse button in the channel grid, the Selection Mode becomes active and will remain active until you click again or press the ESC key.
- TIP: Sometimes it may appear as if HLS is unresponsive or hung up. Most likely, you are in Selection Mode and HLS is waiting for a selection box to be completed. If things ever appear hung up or unresponsive, press ESC.

Basic Method to Create a Selection Box:
- Use the left mouse button and click in the left-most cell that the effect will be applied to.
- A dotted line will appear around the cell.
- Drag the mouse to the right (and down to apply to multiple channels).
- Click the left mouse button again when in the right-most cell that the effect will be applied to.
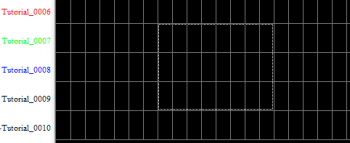
- All of the cells you have chosen will be surrounded by a dotted line. (See Figure 5-2).
- Note: If you are not happy with your selection, press ESC and draw the selection rectangle again.
Basic Effects

Level:
- Shortcut key: L
- Level effects are at the same intensity (default 100%) throughout the effect length.
- To add a Level effect, place a selection box around an area of cells.
- Press the L key or click the Level button on the menu bar.
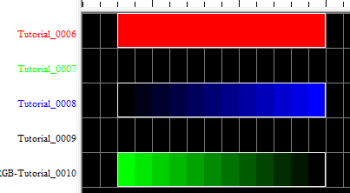
- See Figure 5-3, Channel Tutorial_0006.
Ramp Up:
- Shortcut key: U
- Ramp Up effects start at a low level intensity (default 0%) and move up to a higher level intensity (default 100%) throughout the effect length.
- To add a Ramp Up effect, place a selection box around an area of cells.
- Press the U key or click the Ramp Up button on the menu bar.
- See Figure 5-3, Channel Tutorial_0008.
Ramp Down:
- Shortcut key: D
- Ramp Down effects start at a high level intensity (default 100%) and move down to a lower level intensity (default 0%) throughout the effect length.
- To add a Ramp Down effect, place a selection box around an area of cells.
- Press the D key or click the Ramp Down button on the menu bar.
- See Figure 5-3, Channel Tutorial_0010.
Modifying Effects
Moving Effects:
- Moving an effect is to move it from one place in a sequence to another, such as moving it to start 1/2 second later than currently setup.
- Left-Click on the first cell of the effect to move.
- Move the mouse pointer to the new location.
- When satisfied with the change, left-click again.
Stretching and Shrinking Effects:
- Stretching an effect is to lengthen the time an effect will take place.
- Shrinking an effect is to shorten the time an effect will take place.
- Left-Click on the last cell of the effect to stretch or shrink.
- Move the mouse OUT from the starting cell to stretch or IN towards the starting cell to shrink.
- When satisfied with the change, left-click again.
Deleting Single Effects:
- Deleting an effect is removing the selected effect from the channel.
- Right-click on an effect and select Delete this Effect.
- Warning: No confirmation screen will appear.
Deleting an Area of Effects:
- Deleting an area of effects will remove all the effects inside a selection box.
- Use the left mouse button to click on the left most cell and drag right (and down, if applicable) to select the end of the area you wish to delete.
- Left-click again to finalize the selection box.
- Right-click and select Delete Selection.
- Warning: Always be sure you know what is contained in the Selection Box. Once it's gone, it's gone!
Copy/Paste Effects:
- This is copying and pasting of an effect from one area to another.
- Select the effect you wish to copy by CTRL& Left-Clicking the left-most cell to copy. (This lets HLS know that you are wanting to select cells rather than move the effect.)
- Move the mouse to the end of the effect to copy.
- Left-click to finalize the selection box.
- Right-Click and select Copy from Selection Box.
- Tip: Use the shortcuts CTRL+C to copy and CTRL+V to paste.
- Move the mouse to the desired location for the copied effect, and left-click to finalize the selection.
- Note: The selection box will retain the size and shape of the copied cells.
- Press CTRL+V or right-click and select Paste from Selection Box to paste the copied cells.
Modify Effect Attributes:

- Effects can be modified in length, type of effect, intensity, and deleted all from this window.
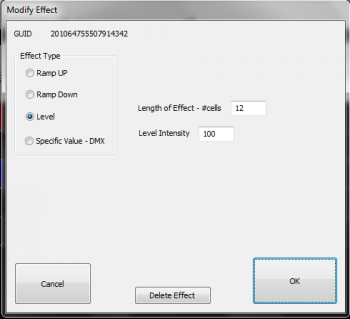
- Right-click an effect and select Modify This Effect. The Modify Effect window will appear (See Figure 5-4).
- Change the effect type using the radio buttons.
- If the effect is a ramp, you can adjust the beginning and ending intensities.
- If the effect is a level, you can adjust the overall intensity.
- For all effects, you can adjust the number of cells.
- You can also delete the effect by clicking Delete.
| HLS User Manual and Reference Guide | ||
|---|---|---|
| Previous Page | Current Chapter | Next Page |
| Chapter 4: Display Preview | Chapter 5: Sequencing Channels and Adding Effects | Adding and Using Beat Tracks |
