Importing and Exporting Data and Sequences:
Importing and Exporting Data and Sequences
Using HLS Sequence Images
Introduction
HLS Sequence Images are a template of saved sequences that can be used when starting a new sequence. The HLS Image contains everything setup in a sequence other than sequence data. This means that if you save an image, you can create a new sequence with that image which will contain your channel setup, previews, display groups, etc. You can have different image files for different shows you may run, such as Christmas, Halloween, or 4th of July.
Saving an HLS Image
Before you can create a sequence based on an image, you must create the image from a pre-existing sequence.
- Open the sequence you wish to create an Image from.
- Click File -> Create Image Without Effect to create the Image.
- HLS will save your image and pop up a window saying Save Complete.
- Click OK and then close and re-open HLS.
- Note: HLS saves these files in the HLS/Library folder with a naming scheme of: SequenceName_Image_XXXXX.img. SequenceName is the name of the sequence saved from, and XXXXX is numbers based on when it was saved.
Applying an Image to a New Sequence
- Open HLS and click File -> Start NEW Sequence USING a SAVED Image.
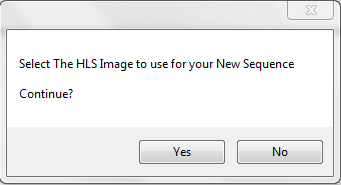
- HLS will prompt you to verify you want to use a saved image. (Click yes). See Figure 11-1.
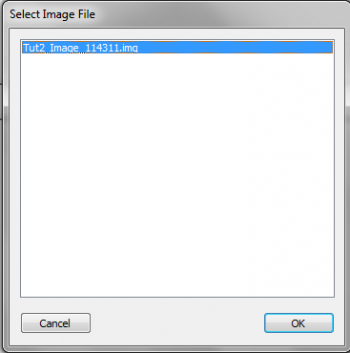
- HLS will then open a window with all previously saved Images for you to choose from. See Figure 11-2.
- Select the image you wish to use, and click OK.
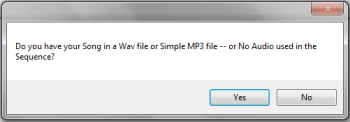
- HLS will then ask if you want to use an audio file (YES for audio, NO for a sequence of no audio). See Figure 11-3.
- Continue to follow the steps presented in HLS Sequence Creation Wizard.
- Once your sequence has been created, HLS will save it. All of your previously created channels, display groups, previews, output settings, etc. will now be available in your new sequence.
Importing and Exporting CSV
Introduction
To aid in mass channel configuration and changes, HLS allows the user to export channel information to CSV (Comma Separated Values). This is a common text-based data export that can be imported in various programs, such as Excel. This exported data can then be viewed in another program, modified, and then imported back into HLS.
- Some potential uses for this feature include:
- Adjusting channel information
- Creating new channels
- Printing channel information
Exporting Data to CSV

- To export your channel data, open the channel manager (Manage Channels -> Manage Raw Channels).
- In the bottom-right of the window, click Export CSV File (see Figure 11-4).
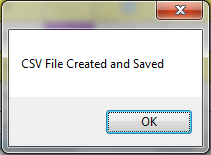
- A window will open confirming that the export is complete (see Figure 11-5).
- The location of the exported file will be inside the HLS folder for the sequence you exported information from.
- Ex.: Channel info exported from a sequence named "Carol". Go into the HLS/Carol folder and the exported file will be named Carol Export.csv.
Working With Exported Data

- Note: For this example, Excel will be used, but any program that can manipulate CSV files will work.
- Open the exported file in Excel.
- The Channel information will be listed in column format with headings explaining what each column value is for (see Figure 11-6).
- Guid: This is a unique identifier given by HLS for that channel.
- Current Name: The current name of the channel.
- Universe: DMX Universe the channel is assigned to.
- Channel: Output channel assignment.
- RGB: Boolean value (0 or 1) for whether the channel is RGB.
- Prev Group: Preview Group assignment.
- Prev Number: Preview Group Number.
- New Name: This field is used by HLS when channels are being renamed.
- Make desired changes Excel. Know that HLS is unable to apply any error-correction for values you put in here since you are modifying it outside of HLS.
- If you add channels, you will not have a GUID. HLS will assign this on import.
Importing CSV Data Into HLS
- Once changes have been made, save the CSV file.
- Go ahead and save your HLS sequence in case there is a problem with the import.
- Click Manage Channels -> Import CSV and Update Raw Channels.
- You will be prompted with a warning about saving your sequence. Click YES since you have already saved (Or click NO and save now).
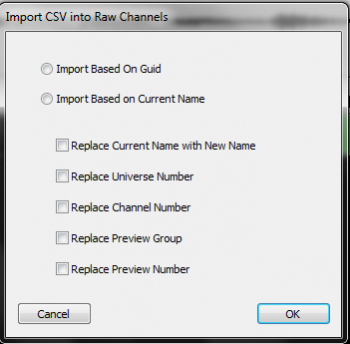
- There are two ways to import the data (see Figure 11-7):
- Import based on GUID: Import and use the GUID when making changes to channel data.
- Import based on Current Name: Ignore the GUID field on import and copy any changes based on the Current Name field.
- Specific actions to take with the imported data:
- Replace Current Name with New Name: The "original" name of the channel will be replaced with the one you have entered into "new name".
- Replace Universe Number: Overwrite old DMX Universe number with data from CSV.
- Replace Channel Number: Overwrite old Output Channel number with data from CSV.
- Replace Preview Group: Overwrite old Preview Group number with data from CSV.
- Replace Preview Number: Overwrite old Preview Number with data from CSV.
- Once you have made the selections you need, click OK.
- Select your CSV file to import from and click open.
- HLS will now import the CSV data and will let you know how many matches were made, then save your sequence.
- Important: If you create NEW channels in CSV, you MUST FIRST create empty channels in the raw channel manager so HLS has a place to move that data into the sequence. If you do not do this, the data from those new channels will not be imported.
Importing a Sequence from Vixen
- Follow the steps to create a sequence: HLS Sequence Creation Wizard
- Under the File menu, select Import a Vixen File. – You will be prompted to select the VIX file.
- Select the VIX file you would like to convert. Note that the HLS conversion will give the new HLS file the same name as your VIX file with different extensions. You may see a note about HLS making a slight timing adjustment to the VIX timing to make it more exact.
- Select OK, The conversion will take place and you will see a note showing that the channels have been converted. This may take some time.
- After the conversion you can choose the Manage Channels menu, select channels to create a group and work like you normally would with HLS.
Importing a Sequence from LOR
First, follow the steps to start a new sequence: HLS Sequence Creation Wizard
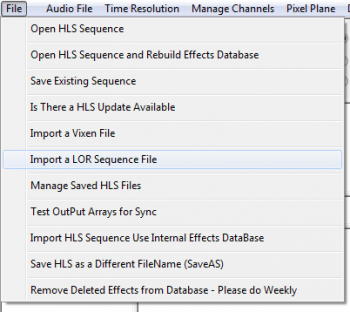
- Click File, Import a LOR Sequence File. Then navigate and select the appropriate LOR sequence for the audio just added to the HLS sequence. Also select the HLS sequence that was created. It will ask to overwrite. Select Yes. Once OK has been clicked, the conversion will begin (see Figure 11-10).
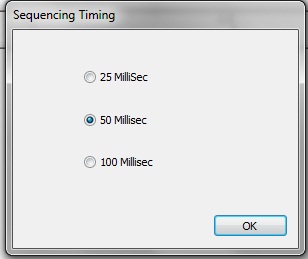
- Next will be a prompt to select a sequence timing interval (see Figure 11-11). It may be helpful to match the timing interval of the sequence being imported.
- A counter will show the status of the channel import process. Once complete, notification will be provided of the channels successfully converted into HLS. A prompt will appear to shutdown HLS to convert RGB channels (if any are present).
- Restart HLS (if needed) and open the sequence.
- Use channel manager to set up channels, configure groups, or add or delete channels.
Sharing HLS Sequences
Files Needed for Sharing/Moving Sequences
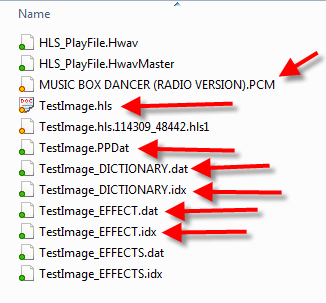
HLS creates a number of files in each sequence folder. Many of these are backups or potentially other files that are not needed when looking to share a sequence with another person. Another time you would do this is if you had a "work" computer that you did the sequence work on, but needed to move sequences to a "show" computer for the actual output.
Figure 11-12 indicates the files that should be included in a zip file when sharing the sequence.
- Note: The PCM file is the audio file in the sequence. This is an internal HLS file and cannot be played in a normal audio player.
Creating the Zip File
- Open Windows Explorer and navigate to your HLS Folder. Inside will be folders containing each of your sequences. Open the folder for the sequence you wish to share.
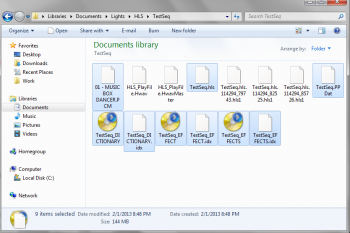
- Select the files that need to be included in the shared sequence. You can select multiple files by holding down the CTRL key and clicking desired files. (See Figure 11-13.)
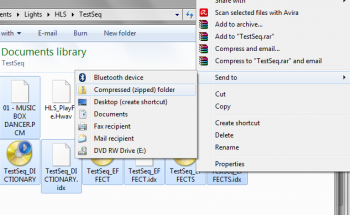
- Right-click on the selected files, select Send to -> Compressed (Zipped folder). See Figure 11-14.
- Your files will be compressed into a zip file. Name it and click enter. You can now share this file with others.
Sharing Library Effects
Sharing Effects
Library effects can be shared between users of HLS. Someone may develop unique chases or other effects for certain display elements that you might find handy. You may also have created some useful library effects you would like to share with others. The idea is to help one another out rather than re-inventing the wheel.
Sharing Your Library Effects
- Open Windows Explorer and navigate into the HLS/Library folder.
- Each of your libraries will be saved as LIBRARYNAME.hlsLIB.
- Select the library files you wish to share, right-click on them, and choose Send to -> Compressed (zipped) folder.
- Name your Zip folder.
- Visit the DIYC forum thread for sharing Library files and post with your zipped file uploaded.
Using Someone Else's Library Effects
- Visit the DIYC forum thread for sharing Library files and download any attachments you wish to use.
- Extract the zip file into your HLS/Library folder.
- Open HLS and use the new libraries as you wish.
- Be sure to post in the forum thread thanking the member whose library you are using.
Copying and Pasting Channels from Another Sequence
Introduction
By default, HLS is not designed to copy entire channels from one sequence to another sequence. You can copy and paste channels as you need within a single sequence, but, there is no pre-defined way to copy and paste to another sequence all-together.
Generally speaking, this would not be a common action, however, there are cases when it would be useful. For example, you might download an HLS sequence from the internet for a song you are currently sequencing. The sequence you downloaded may use arches in such a way that you want to use it as a base to sequence your own arches. Since you have already started on your own sequence of the song, the ideal would be to copy and paste the downloaded sequence's arch channels and paste them into your working sequence.
To copy and paste these channels, the Library can be used to carry over the channels to another sequence.
Creating a Library for Copying Channels
To keep your Library database clean, consider creating a new library that only contains copied sequence channels. Then, when you are done copying, you can simply remove that entire library since it will no longer serve a purpose. Review the Creating a Library page for instructions. Once you have your library created, go on to the next section.
Selecting Whole Channels for Sequence to Sequence Copying
- To select the entire channel, start at the left-most grid square of the song sequence.
- Left-click one time on the top-most channel you wish to copy to activate the selection box.
- Press and hold Page Down until you reach the end of the song sequence.
- Move the mouse to select all of the channels you want to copy/paste and left-click one time to fully select all channels.
Saving Whole Channels in the Library
- Click Library -> Add Effect Group to Library.
- Select the library you created for copying whole channels.
- Make sure Effect Grouping is selected.
- Type a name for your copied channels and click OK.
- Exit HLS
Pasting Copied Channels into the Desired Sequence
- Open the HLS sequence you wish to paste the copied whole channels into.
- Set the active display group to the channels that you will paste into.
- Click Library -> Insert into Sequence Effect from Library.
- Select the copied channels from the library.
- Click Yes, Yes to the prompts from HLS.
- Left-click in the left-most, top channel you wish to paste the channels into.
- Save your sequence.