Reference Guide:: Difference between revisions
No edit summary |
m (OriginalHotrodder moved page Reference Guide-PDF to Reference Guide:: The "PDF" addition was not needed and was confusing.) |
(No difference)
| |
Latest revision as of 03:27, 25 March 2013
Reference Guide
Restoring a Sequence from Backup
By default, HLS will save a backup copy of your sequence each time that you save it. This allows the opportunity to back out of unwanted changes, problems, or any other issues. Therefore, it is best practice to save often, especially when making significant changes. This will then create a "trail" of files that will allow you to restore to an earlier time.
The backup files are located in your sequence folder. If you navigate to your sequence: HLS\Sequences\My Sequence, there are files in there with the extension hls1. These are the backup files saved each time you save your sequence.
To restore to an earlier version of a sequence:
- Open HLS
- Click the File menu, then select Manage HLS Files
- A dialog box will open alerting you to select the sequence to manage. Click OK.
- Navigate to the desired sequence, select it, then click OPEN.
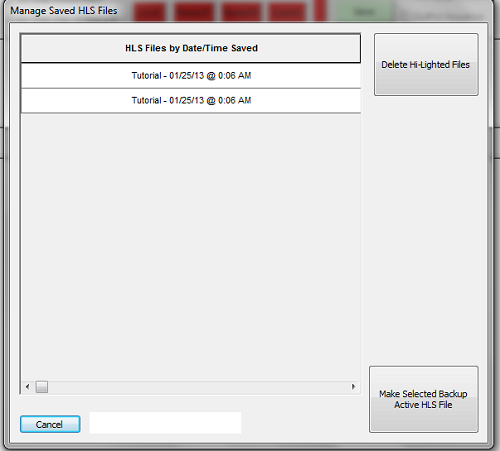
- The picture shows a list of previously saved versions of your sequence file with the date and time of save. You can select one and delete it, or you can select one and make it the active file.
- Once clicking the Make Selected Backup Active HLS File, you will be asked to confirm. Say YES.
- You will then be prompted that HLS must shutdown.
- Restart HLS and open your sequence to begin using the restored backup file.
HLS Dimming Curves
Introduction
Dimming Curves can be applied to specific lighting channels. Dimming curves allow you to adjust the "curve" of a light's intensity based on that light's DMX intensity value set in the sequence software.
DMX allows for 256 levels of brightness, or intensity. Level 1 is the lowest value of light, and level 256 is the brightest. In an HLS sequence, when you set an intensity of 50%, for example, this is equivalent to turning that channel's light on at a brightness level of 128. This is the default behavior in HLS when no dimming curve is applied.
Human vision does not recognize brightness on a 1:1 scale. "In general, eye sensitivity to light increases exponentially with the decrease in light intensity..." (telescope-optics.net). Vision works more on a non-linear scale, with eyes detecting changes in contrast from A-B more than actual brightness. Eyes are also more sensitive to light changes at lower levels than higher levels. This website, while it deals with looking at stars, discusses this quite thoroughly: Telescope-optics.net
The reason incandescent lights appear to fade "smoother" than LED lights is because incandescent light tends to dim at a similar curve to the human eye, while LED lights dim on a linear 1:1 curve (Sandevices). So LED gives an appearance of not having much dimming in the lower levels, and not much dimming in the higher levels. This makes LED's look like they do not have as much range when dimming, but it is actually due to the human response to light levels.
To counter for this, Gamma Correction was created. This is used in a lot of display technology, such as monitors and televisions. The idea is to take what we know about human response and mimic that curve. (Wikipedia: Gamma Correction). This is what HLS does with Dimming Curves. You can customize a curve to dim a LED light at levels which are more reflective of the human eye.
Creating a Dimming Curve
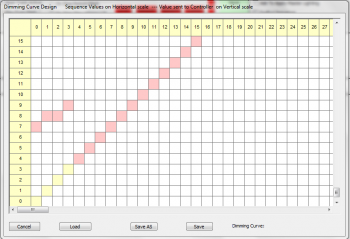
- To begin creating a Dimming Curve, click Library -> Dimming Curves.
- Figure 12-2 will appear.
- You can adjust the curve by left-clicking on the salmon colored cell (you may have to scroll down to see them) and then clicking on the cell where you want it to be.
- Sequence Values are on the horizontal scale; Controller Values are on the vertical scale. What this means is that you adjust the horizontal value for a dmx value and set it to the vertical value you want to go to the controller.
- Example: You want a value of 50% in the sequence to be the 25% value on the controller. So, click the colored cell on the horizontal scale line of 128 and move it to the vertical scale value of 64.
Saving/Modifying Dimming Curves
- To save your custom dimming curve, click the Save As button.
- HLS will automatically open the file dialog box in the Dimming Curves folder.
- Type a name for your curve and click Save.
- To modify a dimming Curve, open the dimming curve window (Library -> Dimming Curves).
- Click the LOAD button to load a previously saved dimming curve.
- Make needed changes, then click the "save" button or "Save as" to save under a new name.
Applying a Dimming Curve to a Channel
You can apply a Dimming Curve to single channels, or you can select a dimming curve and assign it to a group of selected channels. First, open the Channel Manager (Manage Channels -> Manage Raw Channels).
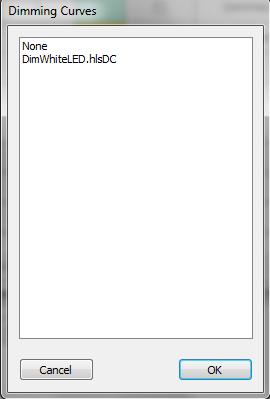
To apply to single channels:
- Right-click in the Dimming Curve cell for the desired channel.
- Figure 12-3 will appear. Select the appropriate dimming curve and click OK.


To apply to a group of channels:
- In the channel manager window, click Get Dimming Curve File (see Figure 12-4).
- Select the dimming curve you wish to load.
- Select the channels you wish to apply the dimming curve to by clicking and dragging down to highlight.
- Click Add Dimming Curve to apply the curve to the selected channels.
- Dimming curves will be assigned as in Figure 12-5.
RGB Dimming Curves
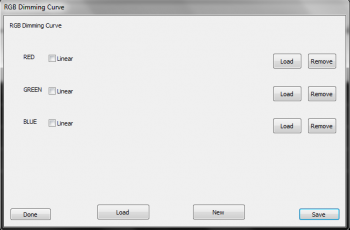
RGB Dimming Curves are similar to regular dimming curves, except you can set specific curves for each color value.
- Click Library -> RGB Dimming Curves. Figure 12-6 will open.
- Select Load and select individual channel dimming curve files for each color.
- Click New and name your file.
- Click Save to save it. Assign it to channels the same as with regular Dimming Curves.
Sane Default Curve
To help people get started on creating curves for LED lighting, a fairly sane default curve has been created. This curve is based on a thread in the DIYC forums that discussed dimming curves and appropriate DMX values for LED lights that will come closer to reflecting the dimming of incandescent lighting.[1]
This curve is based on white light and would need to be further refined for specific RGB Curves. Download here. Other members are encouraged to share their dimming curves as well.
| HLS User Manual and Reference Guide | ||
|---|---|---|
| Previous Page | Current Chapter | Next Page |
| Restoring a Sequence from Backup | Chapter 12: Reference Guide | Crosshair Cursor |
</noinclude>
Crosshair Cursor
The Crosshair Cursor is a useful tool for being able to sync up exact times for channels and with the visual audio representation. Or to sync channels with beat tracks. All with out having to scroll up or see it perfectly aligned.
To activate the Crosshair Cursor, you can click the Defaults menu and select Crosshairs ON/OFF. Or, a more simple method, is to Toggle the cursor by pressing T. This allows you to quickly turn it on and off as you need. Figure 11.2-1 shows what it looks like when activated.
The HLS Toolbar==
- Change RGB Color Effects: Select RGB channel effects you wish to colorize. Click the large rectangle and select the desired color. Click the Change RGB Color Effects button and the selected effects will be changed to the desired color. Your effects and their values will remain the same.
- Chase RGB Vertical: Create a "color chase" on a vertical plane.
- Select multiple channels with pre-existing effects on a vertical plane.
- Click the first of the two color blocks in the row.
- Set beginning and ending colors for color wheel chase.
- Click Chase RGB Vertical button to chase through the colors on the wheel vertically through the selected channels.
- Chase RGB Horizontal: Create a "color chase" on a horizontal plane.
- Select multiple cells of a pre-existing effect on a horizontal plane.
- Click first of two color blocks in the row.
- Set beginning and ending colors for color wheel chase.
- Click Chase RGB Horizontal button to chase through the colors on the wheel horizontally through the selected grid cells.
Master Lighting Channel
Introduction
- A Master Lighting Channel is an overall light control.
- It controls the total light intensity on the "stage".
- A Master Lighting Channel could be used for a slow fade at the beginning or end of a song, or for a total control of bringing the intensity down for the whole sequence, etc.
- There will always be a Master Lighting Channel visible in the Channel Manager in HLS. You don't have to use it if you don't want to, but you cannot delete it.
- If you apply no effects to the channel, then that means lights will run at whatever intensity they are set at in the sequence.
Using the Master Lighting Channel in HLS
- To use the Master Lighting Channel, it must first be added to a display group.
- Once the display group you have added it into is active, you will be able to add basic effects to that channel just like a regular HLS channel.
- For example, you can add a 10 second ramp down at the end of your sequence in the Master Lighting Channel. This will slowly fade all of your channels, no matter what effects they may be demonstrating during that period.
- Note: Any cells with NO effect in them on the master lighting channel means the channels will demonstrate the intensity set in the sequence.
Activating a Master Lighting Channel
- To activate a Master Lighting Channel, when you export illumination data, you will be asked if you want to make the Master Lighting Channel active.
- Check the box to make the channel active. Otherwise, your sequence will ignore any effects placed on that channel and will run lights with regular intensity.
