Ren-T Assembly Instructions
Configurations
This board can be assembled and used in various ways. It can be used simply to generate a zero-crossing signal for the Renard8, Renard64 and Ren-C boards (and optionally for some of the other boards), power for the Renard8 board, and/or convert RS232 to RS485 for use with any of the Renard coop boards (including Ren-C). It can also be built using a number of different transformers (depending on which board is used, and which transformers the builder has on hand).
Selecting a Transformer
There are several different possible choices of a transformer. The most basic considerations are the input voltage, the output voltage and output current ratings of the transformer. In this discussion, primary will refer to the transformers input winding(s) (that are connected to the AC power line), and secondary refers to the output winding(s) of the transformer.
The input voltage of the transformer must be the same as the AC line voltage available in your locale. You cannot use a 120VAC transformer in a location with 240 VAC power, nor can you use a 240VAC transformer if your local power is 120VAC. There are some transformers with dual primaries that can be wired up to accept either 120 or 240 VAC, but discussion of how to use these is beyond the scope of this page.
Non Center-Tapped Transformer
This is a transformer which has effectively one single output winding with two connections (at each end of the output winding). This is functionally the same as a center-tapped transformer (see the next section) in which the center-tap wire is left dis-connected (by cutting it off or placing a wire-nut or electrical tape over it).
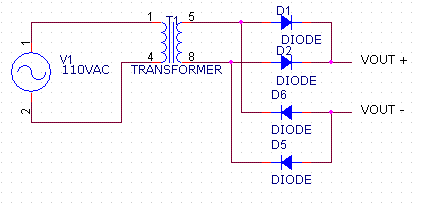
If you use this type of transformer, the output voltage of this type of transformer should be 6.3VAC or 8VAC, and the output wires of the transformer should be connected to here and here on the PCB. (picture to be added). The effective schematic ends up looking like this after taking into account the diodes which are actually installed:
The waveform across the output of the transformer (pins 5,8) is a sinewave with amplitude 1.41*Vtrans when fully loaded (where Vtrans would be the 6.3V or 8V rated value of the transformer). The amplitude will be somewhat higher if there is no load on the transformer or just a minimal load.
The output of the rectifier circuit (VOUT+ - VOUT-) is a rectified sinewave, as shown below. The amplitude of the output waveform is (1.41*Vtrans - 2Vf), where Vf is the forward voltage of the diodes (about 0.7V for regular diodes, 0.4V for Schottky diodes).
Center-Tapped Transformer
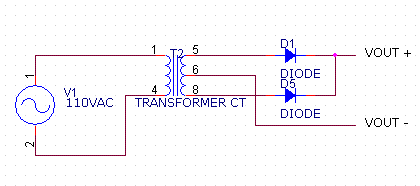
This is a transformer which has a single output winding with three connections (one at either end of the winding, and one in the exact middle), in which the middle connection (the center-tap) is to be used. One disadvantage of this circuit is that the iron and copper in the transformer is only used with 50% effectiveness (compared with the four-diode, non center-tapped circuit) because at any point in time only half of the transformer is supplying current.
If you use this type of transformer (and use the center-tap), the output voltage should be either 12.6VAC or 16 VAC, and the output wires should be connected to here, here (center-tap) and here. (picture to be added).
The waveform across the output of the transformer (pins 5,8) is a sinewave with amplitude 1.41*Vtrans when fully loaded (where Vtrans would be the 12.6V or 16V rated value of the transformer). The amplitude will be somewhat higher if there is no load on the transformer or just a minimal load. The voltage between the transformer center-tap and either of the other two legs is 1/2 of this value.
The output of the rectifier circuit (VOUT+ - VOUT-) is a rectified sinewave, as shown below. The amplitude of the output waveform is (1.41*Vtrans/2 - Vf), where Vf is the forward voltage of the diodes (about 0.7V for regular diodes, 0.4V for Schottky diodes).
Dual-Secondary Transformer
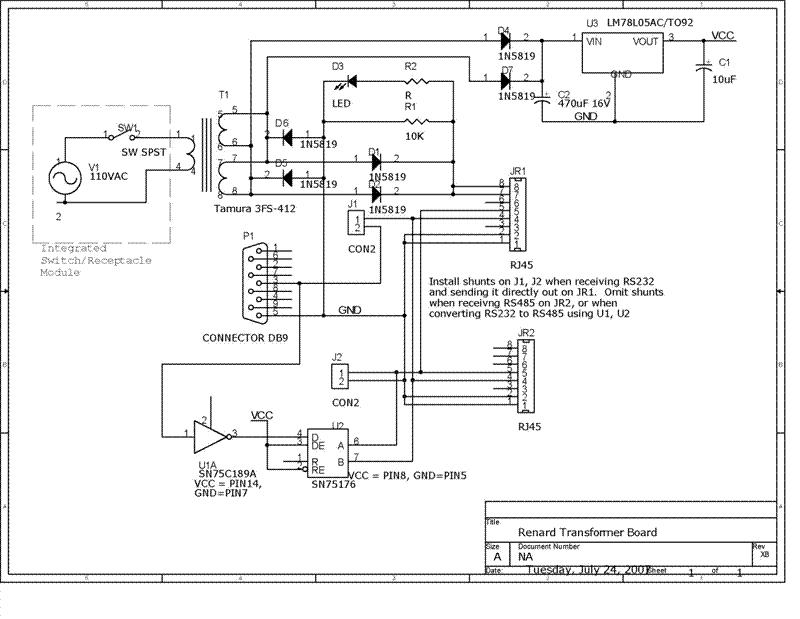
This is a transformer that has two sets of output windings that may be connected either in series or parallel. An example of this is the Tamura 3FS-412 Transformer that is shown in the schematic below. This transformer has two output windings, each good for 6.3VAC at 0.5A each. The output windings can be connected in series to provide 12.6VAC at 0.5A (with an optional center-tap), or in parallel to provide 6.3VAC at 1.0A. Note that the output windings have polarity, so that care must be taken to avoid creating short circuits by mis-wiring the outputs.
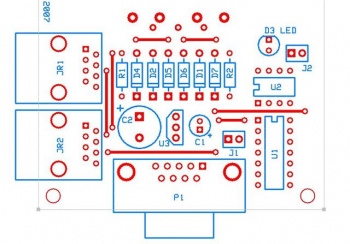
The Ren-T board provides the proper holes so that this Tamura transformer can be soldered onto the board (here, picture to be added).
Assembly
Case 1
Connecting PC to first controller without converting to RS485
- 1. Using a Center-Tap Transformer with the Center-Tap connected
- D1, D2, D3, R1, R2, P1, JR1, J1 (shunt), J2 (shunt)
- 2. Using a Transformer without a Center-Tap (or a disconnected Center-Tap)
- D1, D2, D3, D5, D6, R1, R2, P1, JR1, J1 (shunt), J2 (shunt)
Case 2
Connecting one Controller to the next (RS485 pass-through)
- 1. Using a Center-Tap Transformer with the Center-Tap connected
- D1, D2, D3, R1, R2, JR1, JR2 (omit shunts)
- 2. Using a Transformer without a Center-Tap (or a disconnected Center-Tap)
- D1, D2, D3, D5, D6, R1, R2, JR1, JR2 (omit shunts)
Case 3
Connecting PC to first controller, converting to RS485 in the process
- 1. Using a Center-Tap Transformer with the Center-Tap connected
- D1, D2, D3, D4, D7, R1, R2, P1, JR1, U1, U2, U3, C1, C2 (omit shunts)
- 2. Using a Transformer without a Center-Tap (or a disconnected Center-Tap)
- D1, D2, D3, D4, D5, D6, D7, R1, R2, P1, JR1, U1, U2, U3, C1, C2 (omit shunts)
BOM
Mouser part#'s listed.
- U3 ~ 1 - 595-UA78L05ACLPRE3 - Standard 5V, 100mA Fixed Pos Voltage Regulator
- U2 ~ 1 - 837-ISL81487EIP - RS-485/422 Interface ICs 5V TXRX ESD
- U3 ~ 1 - 595-SN75C189AN - RS-232 Interface ICs Quad Low Pwr
- C1 ~ 1 - 140-XRL16V10-RC - Radial Electrolytic Capacitors 16V 10uF 20%
- C2 ~ 1 - 140-XRL16V470-RC - Radial Electrolytic Capacitors 10V 470uF 20%
- D1, D2, D4, D5, D6, D7 ~ 6* - 625-1N5819-E3 - Schottky Rectifiers Vr/40V Io/1A ***(Different configs do not require 6 diodes!)***
- D3 ~ 1 - 604-WP7104GT ***(or)*** 604-WP7104IT - LED > GT = Green ~ IT = Red
- R1 ~ 1 - 291-1K-RC - 1/4W 5% Carbon Film Resistors 1Kohms 0.05
- R2 ~ 1 - 291-750-RC - 1/4W 5% Carbon Film Resistors 750ohms 0.05 (LED resistor)
- J1, J2 ~ 2 - 538-22-03-2021 - .100 K.K. Connectors VERT PCB HDR 2P TIN PLATING
- 2 - 649-65474-002LF - Bergcon Connectors SHUNT TIN
- P1 ~ 1 - 152-3409 - D-Sub Connectors 9C R/A PCB RECPT
- JR1, JR2 ~ 2 - 571-5520251-4 - Modular Jacks 8/8 SIDE ENTRY
Optional Parts
- 1 - 693-CMF1.1111.12 - Power Entry Modules 2.5A C8 INLET PCB MT (requires the AC cord below, or an older style 'laptop' power cord. Check the data sheet for a picture.)
- 1- 173-21114-E - AC Power Cord 10' 2W 18AWG BK
- 1 - 571-3902613 - IC Sockets 14P ECONOMY TIN
- 1 - 571-3902612 - IC Sockets 8P ECONOMY TIN
TRANFORMER CHOICES
41PG300 - 12.6CT .3A
838-3FS-412 - 12.6VAC 6.0VA Single Primary
838-3FD-412 - 12.6VAC 6.0VA Dual Primary (for 230V INPUT!)
- The transformers listed are not the only ones that can be used. They are what was used during the design and testing and are direct fits for the pads of the PCB.


