Ren-W XBee Radio Configuration: Difference between revisions
Jump to navigation
Jump to search
Dirknerkle (talk | contribs) No edit summary |
Dirknerkle (talk | contribs) No edit summary |
||
| Line 16: | Line 16: | ||
:::'''Interface Data Rate:''' this is the speed at which the XBee will communicate with the Renard SS controllers. Set this to 57600 for best performance. While the maximum setting for both a Renard and an XBee is 115,200, XBee radios are designed to provide up to 80kbps streaming throughput; setting to 115,200 may cause erratic behavior. | :::'''Interface Data Rate:''' this is the speed at which the XBee will communicate with the Renard SS controllers. Set this to 57600 for best performance. While the maximum setting for both a Renard and an XBee is 115,200, XBee radios are designed to provide up to 80kbps streaming throughput; setting to 115,200 may cause erratic behavior. | ||
:::'''Packetization Timeout:''' set to zero (the default is 3). A zero setting makes the XBee perform faster. | :::'''Packetization Timeout:''' set to zero (the default is 3). A zero setting makes the XBee perform faster. | ||
*9. When changes are complete, click the Write button near the top of the XCTU screen to save the changes to the XBee’s internal memory. A progress bar will appear and in a few moments, the completion message will appear such as the one | *9. When changes are complete, click the Write button near the top of the XCTU screen to save the changes to the XBee’s internal memory. A progress bar will appear and in a few moments, the completion message will appear such as the one in the lower left corner of this screen: | ||
:::[[File:Xctu-3c.JPG |300px]] | |||
Revision as of 03:14, 3 February 2010
- You will need the free XCTU software from Digi International (www.digi.com) as well as an XBee programming board. An inexpensive programming board is available from SparkFun Electronics (www.sparkfun.com - XBee USB Explorer, SparkFun part # WRL-08687, about $25). Other programming boards are available and prices vary widely.
- 1. Verify that the programmer board is unplugged from the USB port, and plug the XBee module into the board.
- 2. Connect the programming board into the computer's USB port. Wait a few moments for the computer to recognize it.
- 3. Start the XCTU software. Choose the proper communication port into which the programmer board is plugged.

- 4. Use the default communication parameters to begin (9600 baud, no flow control, 8 data bits, no parity, 1 stop bit).
- 5. Connect to the XBee module by clicking the Test/Query button. After a few seconds, a confirmation box will appear that communication was successful. The box will also display the type and firmware version the XBee module is using. Close the test/query box to continue. Note: if a connection is not made, verify that the correct com port and baud rate was selected and try again. If still unsuccessful, retry using a different baud rate.

- 6. Select the Modem Configuration tab.
- 7. Click the Read button. In a few moments, the screen will display multiple configuration items.

- 8. Only four items need changing: PAN ID, MAC Mode, Interface Data Rate and Packetization Timeout (scroll down the XCTU screen to view more settings).
- PAN ID: this is akin to a "domain" for a computer network, but for XBee, the ID is numerical instead of text. The default is 3332 for all XBee modules, but you can change it to a different number if you wish or if another XBee network is in use nearby. Note that only modules with the same PAN ID can communicate with one another. (See PAN ID concept notes below)
- MAC Mode: choose option 1 – 802.15.4 No ACKS. While all the modes function, this setting is the fastest for streaming data.
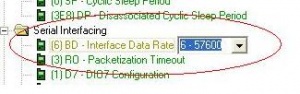
- Interface Data Rate: this is the speed at which the XBee will communicate with the Renard SS controllers. Set this to 57600 for best performance. While the maximum setting for both a Renard and an XBee is 115,200, XBee radios are designed to provide up to 80kbps streaming throughput; setting to 115,200 may cause erratic behavior.
- Packetization Timeout: set to zero (the default is 3). A zero setting makes the XBee perform faster.

- 9. When changes are complete, click the Write button near the top of the XCTU screen to save the changes to the XBee’s internal memory. A progress bar will appear and in a few moments, the completion message will appear such as the one in the lower left corner of this screen:
