Welded Wire Fence Displays
Introduction
Welded wire fence makes an excellent canvas onto which your lighted display can be created. The wire is very unobtrusive, making it virtually invisible, providing minimal distraction from the display itself. This is where you get to be creative - with the blank canvas wire matrix you can use your imagination to create virtually any 2D image you desire. And, since the fence is virtually transparent, you can readily make 3D displays.
This format is especially attractive for "fairy" LED lights that are also virtually transparent and can operate at low voltage, 5V or 12V.
-
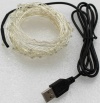
5V (USB) Fairy Lights - 10 meter length

Numerous formats are readily available for welded wire fencing:
- ½ inch x ½ @frac12; inch x 1 inch, inch, 1 inch x 1 inch, 1 inch x 2 inch, 1.5 inch x 1.5 inch, 2 inch x 2 inch, 2 inch x 3 inch, 2 inch x 4 inch and other mesh sizes are commonly available
- 100 foot long and at least 7 foot high rolls are commonly available; you can easily cut to size
- I highly recommended galvanized wire. PVC coated wire is OK as long as the underlying wire is galvanized
Welded wire display example
My example display utilizes 2 inch x 4 inch mesh wire 3 feet high and 14 feet long.
The display is of 8 Christmas tree shaped lighted images made from strings of 5V (USB) warm white fairy LED lights. Each of the 8 strings of fairy lights is 10 meters long and contains 100 LEDs. By trial-and-error I found that a string could be formed into a tree that is 3 feet high by 16 inches wide.
-
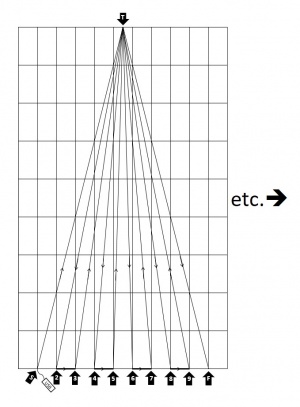
Schematic depiction of two trees in the display

Construction
Cut your welded wire to length
Form a short length of wire rope into a loop and attach it to the end of the top wire of the fence using a small wire rope clamp. Repeat for the other end of the fence.
-
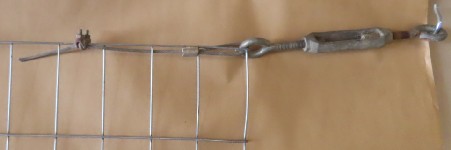
Wire rope loop clamped to fence + attached turnbuckle

Prepare "Double-J" hooks - 11 per tree
- Cut 16 gauge insulated wire into 3 inch lengths
- Bend each piece in half, utilizing a ¼ inch radius
- Bend the last ½ inch of the two ends up, utilizing a ¼ inch radius, perpendicular to the first bend

Starting with the USB connector end of the string of fairy lights,
- Place the wire into the center loop of a Double-J hook
- Straddle a vertical wire on the fence withe Double-J hook
- Slip the "J"s of the Double-J hook under the bottom wire of the fence
- Squeeze the Double-J wire ends to close up the loop so that it will stay attached to the bottom wire of the fence
- Referring now to the top wire of the fence,
- Referencing the vertical fence wire you just attached as wire #1,
- Locate the gap between wires #5 and 6 to the right
- Hang one on the horizontal wire, leaving the center loop off the Double-J hook accessible
To be continued...