Welded Wire Fence Displays
Introduction
Welded wire fence makes an excellent canvas onto which your lighted display can be created. The wire is very unobtrusive, making it virtually invisible, providing minimal distraction from the display itself. This is where you get to be creative - with the blank canvas wire matrix you can use your imagination to create virtually any 2D image you desire. And, since the fence is virtually invisible, you can readily make 3D displays.
This format is especially attractive for "fairy" LED lights that are also virtually invisible and can operate at low voltage, 5V or 12V.
WARNING welded wire metal fence conducts electricity. As a result, it is not recommended as a material for supporting 110V applications such as strings of incandescent lights. If you do use a conductive material for your display, make sure you ground it with heavy gage copper wire to metal stakes driven deep into conductive (moist) soil.
-
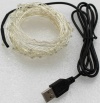
5V (USB) Fairy Lights - 10 meter length

Numerous formats are readily available for welded wire fencing:
- ½" x ½", ½" x 1", 1" x 1", 1" x 2", 1½" x 1½", 2" x 2", 2" x 3", 2" x 4" and other mesh sizes are commonly available
- 100 foot long and up to 7 foot high rolls are commonly available; you can easily cut to size
- I highly recommended galvanized wire. PVC coated wire is OK as long as the underlying wire is galvanized
Welded wire display example
My example display utilizes 2 inch x 4 inch mesh wire 3 feet high and 14 feet long.
The display is of 8 Christmas tree shaped lighted images made from strings of 5V (USB) warm white fairy LED lights. Each of the 8 strings of fairy lights is 10 meters long and contains 100 LEDs. By trial-and-error I found that a string could be formed into a tree that is 3 feet high by 18 inches wide.
-
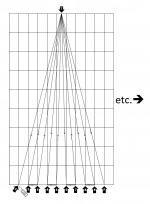
Schematic depiction of one tree in the display

Click the above thumbnail image and pick the 679 x 922 pixel image for a readable version.
Construction
- Cut your welded wire to length
- Form a short length of wire rope into a loop and attach it to the end of the top wire of the fence using a small wire rope clamp.
Repeat for the other end of the fence.
-
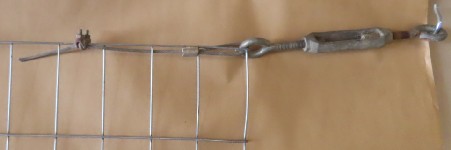
Wire rope loop clamped to fence + attached turnbuckle
-
- Prepare "Double-J" hooks - 11 per tree
- Cut 16 gauge insulated wire into 3 inch lengths
- Bend each piece in half, utilizing a ¼ inch radius
- Bend the last ½ inch of the two ends up, utilizing a ¼ inch radius, perpendicular to the first bend
-
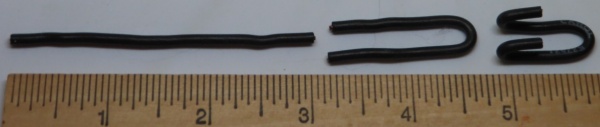
Fabrication steps for Double-J hooks
- Place a single Double-J hook on the top wire of the fence (marker "T" in the schematic above) as follows:
- Locate the gap between vertical wires 5 and 6
- Hang one "J" of a Double-J hook on the horizontal wire, leaving the center loop of the Double-J hook accessible
- The procedure for each of the Double-J hooks that will be placed on the bottom of the fence in the next steps is as follows:
- Place the fairy light wire into the center loop of a Double-J hook
- Straddle the appropriate vertical wire on the fence with the Double-J hook
- Slip the "J"s of the Double-J hook under the bottom wire of the fence
- Squeeze the Double-J wire ends to close up the loop so that it will stay attached to the bottom wire of the fence, straddling its vertical wire
- Now it's time to route your 10 meter string of fairy lights.
Following the large version of the Schematic above as a guide, and starting with the USB connector end of the string, secure the string in the Double-J hook at Starting location "S" in the diagram.
Proceed to string the fairy lights to each Double-J hook in turn, in the following order:
- S (Start) => T => 2 => 3 => T => 4 => 5 => T => 6 => 7 => T => 8 => => 9 => T => F (Finish)
- At the finish you will probably have a small amount of the fairy string remaining; just place it to the left along the bottom wire of the fence and secure the end. If you run a little short of fairy lights, extend its length by attaching some small gauge telephone wire to complete the design. The small variation will not be noticeable in the end product.
- At this point you will have 5 loops of fairy lights in the top Double-J hook that is dangling by only one of its "J"s. The final step is to hook both "J"s to the top wire and squeeze the wire ends to close-up the loop so that it will stay attached to the top wire of the fence. Remember that the top Double-J hook does not straddle one of the vertical wires. It is attached between vertical wires 5 and 6.


Repeat the process above for remaining trees, connect to your controller, and you're good to go.
Here's how a finished tree will look. Don't worry that all the strands aren't perfectly aligned; the overall display will look good.
-
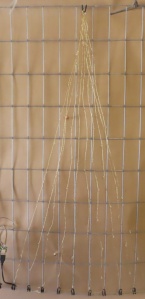
1 of 8 finished trees -
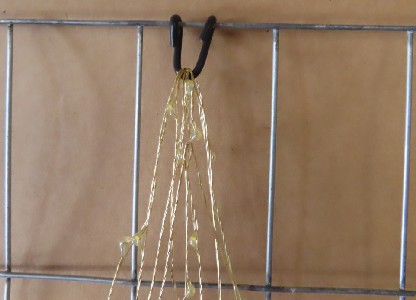
Detail of top Double-J hook installed -
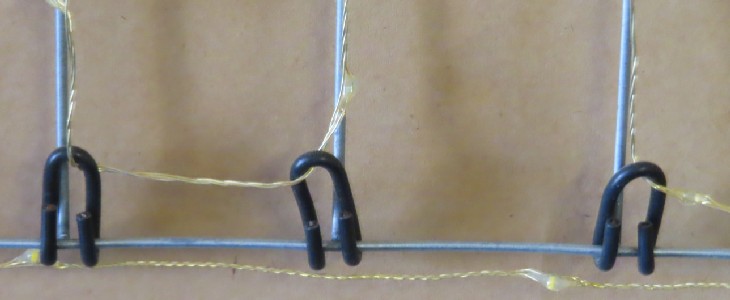
Detail of bottom Double-J hooks installed


Installation
The location where my welded wire fence display is placed happens to have a light pole conveniently located. Using nylon rope the display is lashed to the pole then tied off. That takes care of one end.
-
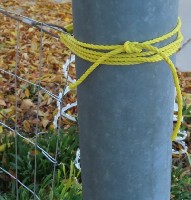
One end is lashed to a light post

At the other end I use a sleeve <=(see article), into which I place a T-post. The T-post is upside down to avoid having to remove the flat plate. One end of a turnbuckle is attached to the wire rope loop and the other end of the turnbuckle is lashed to the top of the T-post with nylon rope. Use the turnbuckle to tighten the welded wire display, taking advantage of the springiness of the T-post to tension nicely.
-
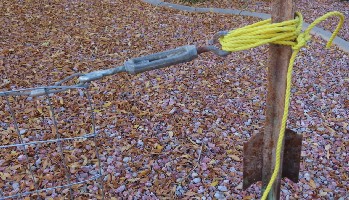
The other end connects to a turnbuckle, then lashed to a T-post

The bottom of the welded wire fence doesn't really need to be anchored; it simply hangs in suspension.
Here's the final result:
-
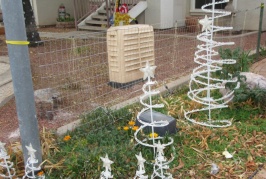
Welded wire display installed -
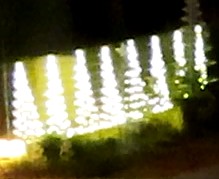
Welded wire display at night


Storage
Storage of the welded wire display is easy. Install open eye hooks in the wall, then suspend the display between them:
-
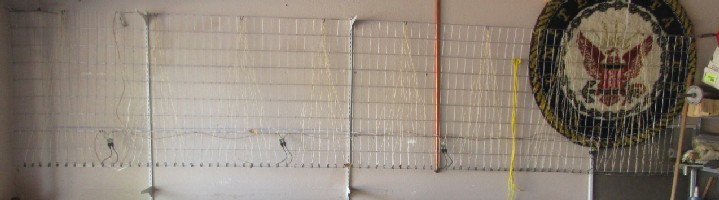
Welded wire display stored for the off-season
