LedTriks Controller Assembly Instructions
Disclaimer
ALL INFORMATION WITHIN THIS DOCUMENT IS PROVIDED "AS IS" AND WITHOUT ANY EXPRESS OR IMPLIED WARRANTIES, INCLUDING, WITHOUT LIMITATION, THE IMPLIED WARRANTIES OF MERCHANTABILITY AND FITNESS FOR A PARTICULAR PURPOSE. I DO NOT GUARANTEE ANY INFORMATION IN THIS DOCUMENT IS ACCURATE, AND IT SHOULD BE USED FOR ABSTRACT EDUCATIONAL PURPOSES ONLY.
THIS FILE IS DISTRIBUTED IN THE HOPE THAT IT WILL BE USEFUL, BUT WITHOUT ANY WARRANTY; WITHOUT EVEN THE IMPLIED WARRANTY OF MERCHANTABILITY OR FITNESS FOR A PARTICULAR PURPOSE.
Background
While there are a myriad of computer based controller hardware available that will run under the Vixen software for controlling Christmas lighting, there were no LED display panels that could be controlled thru Vixen. Robert Jordan decided that the Vixen community needed a LED sign and took it upon himself to design and prototype an LED scrolling board. While Robert had seen LED boards everywhere, he wanted one that allowed you to do text and animation. He envisaged a LED display board that could be your show sign and a place for animations during the show.
Why LEDTRIKs? When Robert first announced the concept of the board he was working on to the Vixen Forum, some suggested to Robert that the board would allow users to perform tricks with LEDs aka ‘LEDTRIKs’.
Circuit Diagram
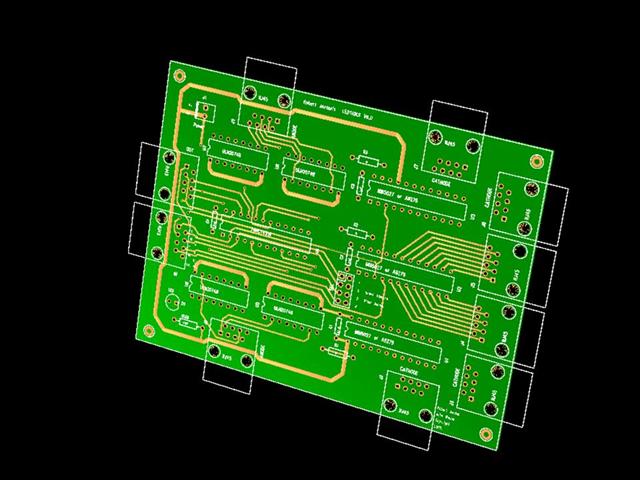
The circuit Diagram for LEDTRIKS is linked here. Schematic Diagram V6.0
The circuit is based on three MBI5027-GN-5027 16 Bit Constant current LED Sink Driver Integrated Circuits. The PC is connected to the LEDTRIKS via the RJ45 connector IN. You will need to assemble an interface cable to connect from the PC to the IN socket on the LEDTRIKS controller. The cable details are specified in the Building the Interface Cables section.
The board can be whatever size you like. The LEDTRIKS Board can control a single 16 x 48 LED board and up to 4 boards can be connected together – side by side.
(add Pic here)
Shown above (TBI) - LEDTRIKS Board Configuration Examples are the standard configuration – 1 panel wired in a 16 x 48 LED pattern and one of the optional configurations – 2 panels and two controllers wired in a 16 x 96 LED pattern. As the software is configured at the moment (pre-release), text and animation will be able to scroll across a 1x1, 1x2, 1x3, or 1x4 panel display.
1 Jun 2007. KC is looking into a change in the software to allow a 2 x 1, and up to 4 x 1 configurations.
The PCB design (version 6 – public BETA) is the current version of the LEDTRIKs design and has been configured for Vixen control and up to four boards can be cascaded.
Driving the LEDTRIKS LED Array
Hardware Elements
There are two main elements of the controller. One is a 48-bit shift register (three cascaded MBI5027 chips, which is similar to a 74HC595 chip followed by a ULN2803 chip) used to control the cathodes of the display (each output controls the cathodes for one column of the display). The other is a 4:16 latch/decoder (MM74HC4514 chip) used to enable the anodes for one row of the display.
The control signals (8 wires plus ground) are as follows:
1) An overall display inhibit signal. This signal unconditionally turns the LEDs off when it is high, allows normal operation when low.
2) Four dual-purpose data signals. These signals are bussed to all of the controllers that are connected to a parallel port. All four signals are connected to the data inputs of the latch/decoder mentioned above, to select 1 of 16 anodes. Each controller has a jumper array to allow one of these data signals to be used as the serial input to the shift register mentioned above (each controller should have a different bit selected for this function). A '1' in the shift register will enable the associated column in the display; a '0' will disable the associated column.
3) Clock for the shift register. Data is clocked into the shift register on the low-to-high transition of this clock, although it won't appear on the outputs until the shift register output latch is strobed.
4) Latch enable (strobe) for the shift register (normally low, pulsed high and then low again to cause shift register data to be copied into the output latch).
5) Latch enable (strobe) for the latch/decoder (normally low, pulsed high to capture the row address in the input latch).
The following procedure should be invoked at 16 times the designated refresh interval. As an example, if the entire display is to be refreshed 60 times per second, this routine should be called 960 times per second (16 rows/display_refresh * 60 display_refresh/sec). Each consecutive call to this row_update routine should select a different row, so that all 16 rows of the display are refreshed at the same rate. It is best if the rows are refreshed in some sort of random order, so that it will be more difficult for the viewer to notice any flicker. One way to do this is to have a 4-bit bit counter, and reverse the order of the counter bits to select which row to refresh.
1) For the selected row of pixels, transmit 48 bits of data for each controller. The data for multiple controllers is sent in parallel, with data for controller 1 sent on bit 0 of the data port, data for the controller 2 is sent on bit 1, and so forth. The clock line has to be pulsed high (and then low) while data on the data port is stable (so there will be 48 pulses on the clock line). This is basically the same procedure used in controlling the Olsen 595 board.
2) Place the row address on data bits 0-3 of the parallel port data register.
3) Inhibit the Display (and leave it inhibited for the next step).
4) Take both strobes high and back low again (while the row address is still on the parallel port output lines).
5) Enable the Display.
6) Determine which row to display next. See the note above about reducing flicker.
The driver program should inhibit the display when it exits. Otherwise one row of LEDs will be left on continuously at full brightness, which looks bad and is not good for the longevity of the LEDs.
Components
The parts List for the LEDTRIKS is fairly basic.
Qty Supplier Part# Description
1 Mouser 512-MM74HC4514N Multiplexer/decoder chip
4 Mouser 511-ULN2074B Driver Chip
3 Digikey A6279EA-T-ND Allegro A6279 ***
10 Mouser 571-5202514 RJ45 Modular Jack
4 Mouser 571-1-3902614 16 pin dip socket (RoHS compliant)
4 Mouser 581-SA105E104Z Ceramic cap
4 Mouser 571-1-3902618 24 pin dip socket (RoHS compliant)
1 Mouser 538-10-89-7081 4 x 2 Pin DIP header
1 Mouser 649-65474-002 Shunt Tin
1 Mouser 538-50-57-9402 2p Sl Conn
1 Mouser 538-70543-0001 2p sl conn fem
2 Mouser 538-16-02-0102 term bulk sl conn
1 Mouser 604-WP7104EC Led Red
1 Mouser 660-cf1/4c471J 470 ohm resistor
3 Mouser 660-CF1/4C102J 1k Resistor
While the Parts List shows the Allegro Part, you can use the MBI chip. Please note that the MBI5027-GN chip must be the GN suffix. This is a 24 pin DIL package. There are other IC packages available; however you can only use the GN with this PCB.
The PCB is available from wjohn on the Forum.
You are also going to need at least 768 LEDs, I have purchased a bag of 1000 LEDs from www.besthongkong.com. The price was $19.99 plus shipping. The Part / Model: BURC333W20BA04, 333 5mm Ultra Red Series LED .
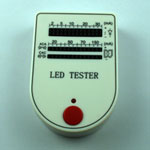
They also sell a handheld tester for LEDs for $9.99. This is a great way to test the LEDs BEFORE installing them into the panel.
Assembling the Circuit Board
Assembling the circuit board should be a fairly easy and straight-forward task for most hobbyists. Start by visually inspecting the PCB for any production faults. Ensure that none of the copper tracks (on the bottom of the PCB) are shorted or open and that the holes are clear of any obstructions. All the boards I have made have been electrically tested during manufacturing so there should not be any problems!
Additionally, you will need a fine tip soldering iron and high quality solder (tin/lead mix or lead free). I use a temperature controlled soldering station and a 0.8 mm solder with a rosin core. Note: the first batch of boards is not ROHS compliant.
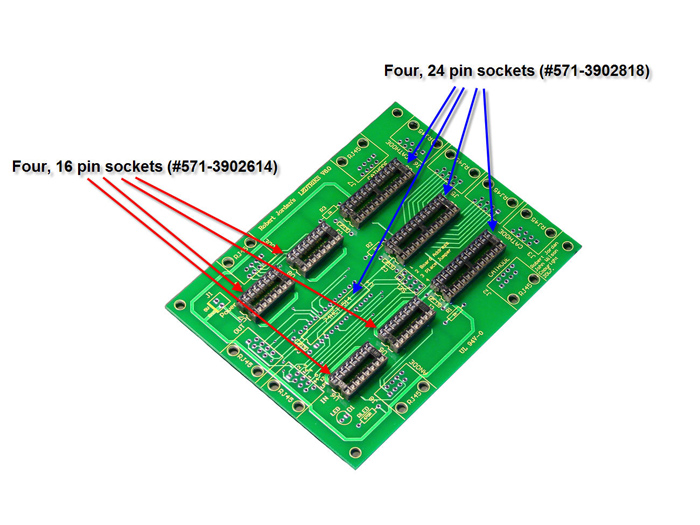
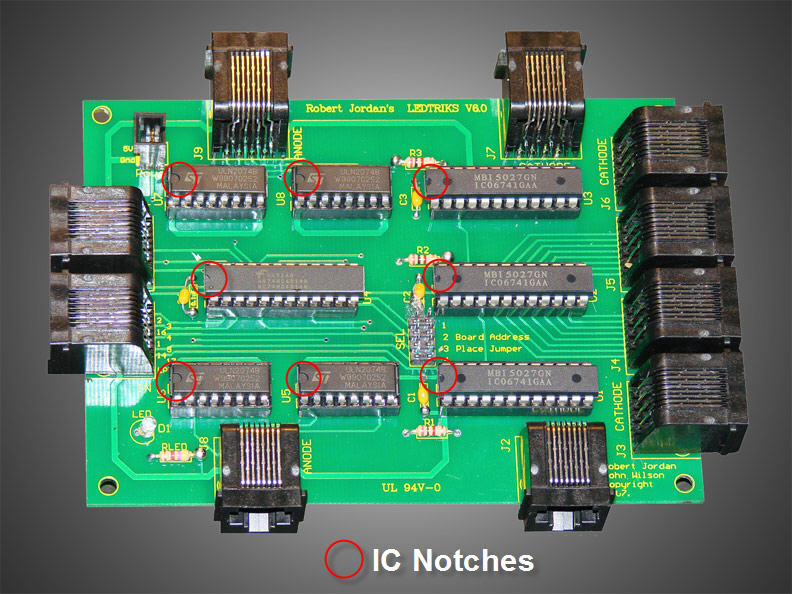
1. [Refer to Photo 1] Start by fitting four 16 pin sockets (#571-3902614) and four 24 pin sockets (#571-3902818) onto the board. Be sure that each of the sockets are aligned in the same direction and that the notch at the end of the IC sockets aligns with the notch in the silkscreen overlay on the PCB. The 16 pin sockets will house the four driver chips (511-ULN2074B). Three of four the 24 pin sockets will house the MBI5027-GN chips (or the Allegro A6279 chips) and the fourth will house the multiplexer/decoder chip (#512-MM74HC4514N).
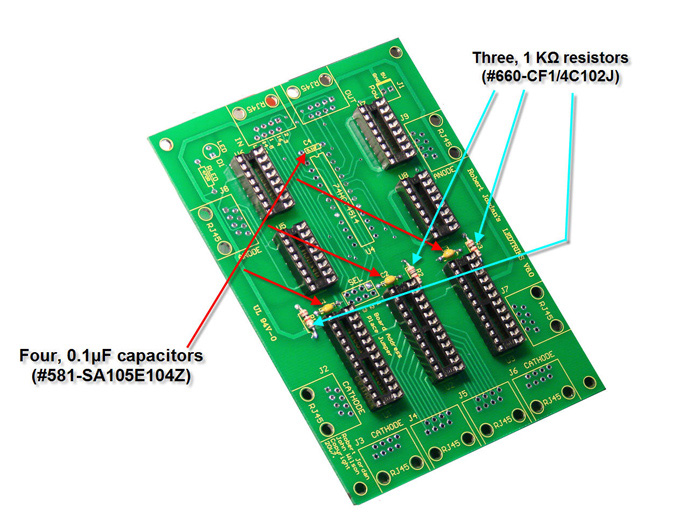
2. [Refer to Photo 2] Fit the four 0.1μF capacitors (#581-SA105E104Z) next. Note that the capacitors have no polarity, so you can install them onto the PCB in either direction. The capacitors are located at the front of each of the four, 24 pin IC sockets.
3. [Refer to Photo 2] Fit the three 1 KΩ resistors (#660-CF1/4C102J) next, just below each of the 24 pin IC sockets. On the PCB, they are labeled R1, R2, and R3. Note that the 1 KΩ resistors typical band markings are Brown/Black/Red/Gold.
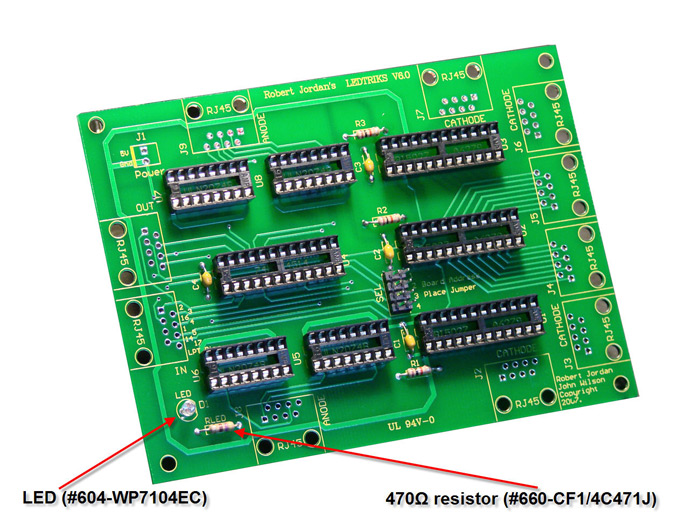
4. [Refer to Photo 3] Fit the power LED (#604-WP7104EC) and the 470Ω resistor (#660-CF1/4C471J) on the board. The LED must be oriented to the board so that the notch of the LED lies flat on the PCB and the square solder pad on the PCB contains the shorter leg of the LED. Note the 470Ω resistors typical band markings are Yellow/Violet/Brown/Gold.
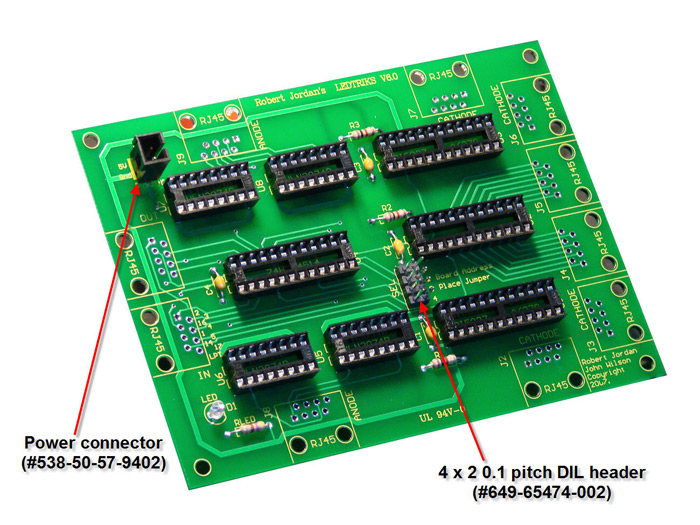
5. [Refer to Photo 4] Fit the power connector (#538-50-57-9402) to the space labeled “J1” on the PCB. Note that the square pad on J1 signifies the +5VDC connections.
6. [Refer to Photo 4] Fit the 4 x 2 0.1 pitch DIL header (#538-10-89-7081) on SEL 1 for the first board only.
  Note: Image above lists the incorrect part number for this step. Part #538-10-89-7081 is the DIL header, while
  part #649-65474-002 is the shunt that goes on the header (same as used on hard drives)
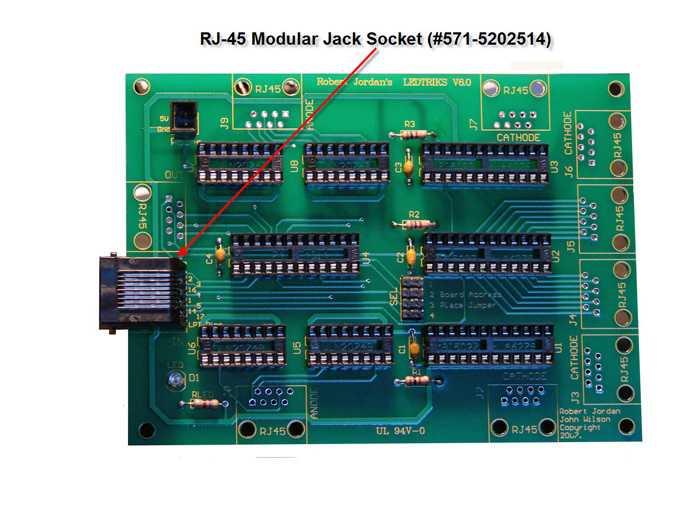
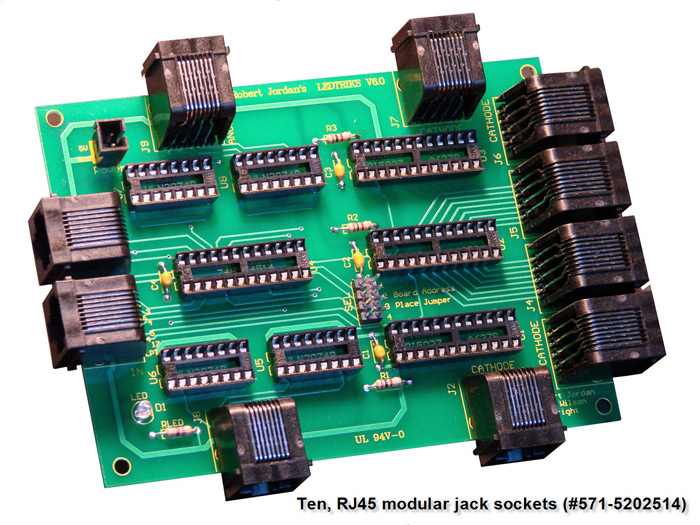
7. [Refer to Photo 5-6] Fit all ten of the RJ-45 modular jack sockets (#571-5202514) around the perimeter of the PCB. Note that some manufacturers of the RJ-45 sockets are a bit tighter when fitting them to the PCB than others; just take your time and align and insert the pins first before you gently seat the RJ-45 lock lugs through each of their respective holes on the PCB.
At this point you will have now completed the installation of all the parts to the controller board. Before attempting to seat one multiplexer/decoder chip (#512-MM74HC4514N) and three MBI5027-GN chips into the 24 pin sockets and four driver chips (511-ULN2074B) into the 16 pin sockets, I would suggest you visually inspect the board and check to make sure there are no solder bridges between the solder pads and that all solder joints are of good quality. Once completed, I would also recommend cleaning the copper side (bottom) of the PCB with a quality board cleaner (or isopropyl alcohol) to remove any resin residue left over from soldering.
8. [Refer to Photo 7] Finally, seat all IC’s into their respective sockets while ensuring that the notches on each of the IC’s align with the notches on the 16 and 24 pin sockets.
Connecting the LEDTRIKS to your PC
You are now ready to connect you LEDTRIKS controller to your PC. You will need to make a choice on how you want to power the board. This seems to be an area of confusion for a lot of people as to what they can use as a power supply for the LEDTRIKS or their Olsen controller. The main options are:
Option 1. A filtered and regulated 5 Volt DC power supply capable of providing at least 3 amps at 5 Volts DC.
Option 2. Use the power supply located in the Vixen controller PC.
Either option is suitable, I prefer Option 1 – the separate power supply. Others will tell you that they power their controllers using power from their PC. The one point I will make is that whatever option you choose it must be a filtered and regulated supply. This will rule out 99% of the plugpack/ wallwart options that are often considered by those new to Christmas lighting automation. If you are unsure, check with someone from the Vixen Forum .
Some people have had issues with low voltage on their parallel port of their PC with the 595 in the past and I had a problem with my first GRINCH. My Dell PC only provides 3.32Volts on the LPT: port. This was insufficient to trigger the MBI5027-GN to see a logical high. The solution was to drop the supply voltage on the GRINCH to 4.6V DC and the MBI5027-GNs were fine. This will only happen with a very small number of PCs (and older laptops). Other uses have found that their MBI5027-GNs work fine with their PCs, without the need to adjust the GRINCH’s voltage supply as they have a higher voltage on their LTP ports (closer to 5V). While this comment is specific to the GRINCH design, as both the GRINCH and LEDTRIKS share the same LED Controller IC (MBI5027-GN) I would recommend testing your PC first.
There is another IC that could be used in preference to the MBI5027-GN5027; the Allegro A6279. The specifications for the Allegro show that it is pin for pin compatible with the MBI5027-GN, with the additional feature that they are more tolerant of lower logic levels. While I have not tested the Allegro, It should work (standard disclaimer). The full details of the Allegro are IC LED DRIVER 16CH SER 24-DIP, A6279EA-T, and they are soon to be available from Digikey as part # A6279EA-T-ND. A couple of beta testers have ordered samples of the Allegros from the manufacturer and report that they are superior to the MBI in operation.
Building the Interface Cables
The Interface cable for LEDTRICKs will only work with LEDTRIKS. The Interface cable will connect between the parallel port of your controller PC and the ‘IN’ RJ-45 socket on the LEDTRIKS. The PINOUTs are shown in the following table.
| RJ45 Pin | D25 Pin | Purpose |
| 1 | 2 | Board 1 Data |
| 2 | 3 | Board 2 Data |
| 3 | 16 | Display Inhibit |
| 4 | 4 | Board 3 Data |
| 5 | 1 | Shift Register Clock |
| 6 | 5 | Board 4 Data |
| 7 | 14 | Shift Register Latch (Strobe) |
| 8 | 17 | Latch/Decoder Latch (Strobe) |
Building the LED Panel
There are lots of ways you can build the actual LED display panel. The most common way is to purchase a section of toolshop pegboard and insert the LEDs into the pegboard holes. Pegboards generally come in 1 inch spacing. You could also drill you own panel to a specific size using Perspex or hardboard.
Once you have made the decision on how to mount the LED to the panel, you will need to wire up the LEDs. The LEDs are wired in a grid pattern, with the anodes of the LED wire in sixteen parallel buses, and the Cathodes wired in 48 vertical buses.
Looking from the rear
Anodes
There are sixteen lines for anodes.
Starting at the top(either left or right), the first eight rows are wired on pins #1 to 8 of the first Anode RJ45 (J8); and rows nine to sixteen are wired to pins #1 to 8 of the second Anode RJ45 (J9).
Cathodes
Starting at the left corner, the first eight columns are wired on pins #1 to 8 of the first Cathode RJ45 (J2); Column Nine to Sixteen are wired to pins #1 to 8 of the second Cathode RJ45 (J3) and onwards.
Also note that running the wires from the control board all the way to the edge of the board is not required. The wires can be hooked anywhere on the appropriate buses. This may cut down on extra wire between the control board and the LEDTricks panel itself.
References
The most well know site is used to be www.computerchristmas.com, now it is our site
Vixen is a software program developed by K.C. Oaks. The website is www.vixenlights.com
http://wiki.vixenlights.com/tiki-index.php?page=LEDtriks+controller written by Phil Short.
http://www.kingelectronics.com/index.asp?sid=AB67164DE14B45FCA2F29BD9F7F23715&action=product&id=166
http://www.besthongkong.com/product_info.php?manufacturers_id=&products_id=32
http://www.doityourselfchristmas.com/forums/index.php is the website for the Vixen software and most supporting hardware.
Please contribute to the manual, send photos, ideas, hints, corrections and ideas to wjohn@iinet.net.au
