Nutcracker - RGB Sequence Builder


What is Nutcracker?
Nutcracker is a web based RGB Sequence builder designed and built by Sean Meighan (smeighan) in the Spring of 2012. It it a software tool that allows users to create sequences on target RGB objects.
New Version of Nutcracker
In early 2013, a new version of Nutcracker was released. Version 3 is now integrated with xlights and allows you to easily install Nutcracker on your PC and in real time see the impact of the various settings. The new version of Nutcracker is the only platform that will be maintained in the future.
For more information about Nutcracker version 3 CLICK HERE.
For training videos on how to use Nutcracker CLICK HERE.
The information below is about the earlier version of Nutcracker.
Using Nutcracker
The tool begins with a Target Generator that is a combination of input forms that request specific user information about the shape the user wants to model (Megatree, Matrix, etc...) and details about the lights and their layout on the shape. The second part of the tool is an Effects Generator that allows the user to apply effects various effects (Spirals, Text,Snowflakes, Meteors, Garlands, Butterfly, etc...) to the Target Shape you had generated in the 1st step. The tool then builds a mathematical model for the Target and the Effects. It displays an animated gif for the user to preview. The next step is for user to create export files from Nutcracker to import into Sequencing software on their PC.
Login / Create Login
To access Nutcracker you must have a login. If you do not already have a login, follow these steps:
- To begin using Nutcracker you must create a login on the Nutcracker Website
- Click on the link that says Click here to create a new account.
- Enter the requested information and hit the Register Button
After you have created your login you will return to the login page to access the Nutcracker software and your models.
Generate Target Object
After login you will be on the Target Generator page. On this page you will find a table of existing models that you have previously created as well as a form to create new models. The targets that you generate are the baseline on which Nutcracker tailors it's output to your specific needs.
To modify an existing object click on its name on the table and it will populate the form . Make your changes and submit the form again to save your changes.
To create a new object fill in the following field in the form:
- The first field you fill in is the Name of your object (up to 8 characters). This is a mandatory field. The name will allow you to select that target from the list of target models that will be on the top of this page in the future. Example names are: MT1, MTREE1, TREE, GRID1, MT12, MT32
- The next field is the Description of your object (up to 80 characters). This is a mandatory field. The description will allow you the ability to use a more detailed description of your object for later identification in the main object table. An example description is : 16 strand megatree made of Smart Strings. Used in front yard.
- The next choice is a selection button for the type of model you would like to build. This is a mandatory field. The current choices are:
- Mega-Tree (If you want a half mega tree, choose this and then later in the effects screens set window_degrees to 180)
- Matrix(Grid)
- Ray
- You must then enter a number for How many Strings will be in your tree(from 1-100) This is a mandatory field. The current model supports from 1-100 strings. This is the total number of strings of pixels you will be using. Do not count a string as two strings if you will be folding the string in half, it is treated as one string and you select the layout down below.
- You must then enter the Total number of Pixels on this string (this is just the count of pixels on one string) This is a mandatory field. This is the number of pixels from your string that will be used on the tree. If you have an 84 pixel string and plan on using 80 of them, enter 80 here.
- Enter the Unit of Measure This is a mandatory field. This is a selection button with the following choices
- inches
- cm
- Enter the Spacing between each pixel (in unit of measure) This is a mandatory field. This is typically 1-6" or 4-30cm. After we have both the number of pixels and the spacing, we will calculate the length of your string. Please put the acutal spacing that you will have on your tree. If you have pixels that are 4" apart , but you will set them at 3", then you enter 3".
- Choose the pixels string layout How Will you build your tree(this is a selection button) This is a mandatory field. You must select the layout model that matches your megatree. The following examples are using a 50 pixel string. Each color represents a different string. The choices are:
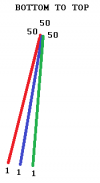 Bottom to Top (LOR calls this Edge to Center) This model has the pixel strings begin at the bottom of the tree and end at the top of the tree.
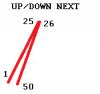 Up/Down Next (LOR calls this Wedge) This model has the pixel strings begin at the bottom of the tree and fold over in half at the top of the tree and come down adjacent to the string that went up and end at the bottom.
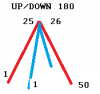 Up/Down 180 (LOR calls this Up and Over) This model has the pixel strings begin at the bottom of the tree and fold over in half at the top of the tree and come down on the opposite side of the tree and end at the bottom.
- The remaining questions deal with the physical size of the megatree.

- How high will your mega-tree be (in unit of measure) H1 This is a mandatory field. This is the height from the base ring of the megatree to the top of the megatree.
- What will be the bottom diameter of your tree (in unit of measure) D1 This is a mandatory field. This is the diameter of the base ring around the outside bottom of the megatree.
- What will be the top diameter of your tree (in unit of measure) D2 Zero (0) is valid choice. This is a mandatory field. This is the diameter of the top attachment point (hookhead)
- What will be the trunk diameter of your tree (in unit of measure) D3: Enter zero (0)if you are not going to have a bottom to your tree.
- What will be the height of the trunk of your tree (in unit of measure) H2 Enter zero (0)if you are not going to have a bottom to your tree.
- What will be the radius of your tree branches (in unit of measure) D4: Enter zero (0)if you are not going to have a bottom to your tree.
- Hit the Submit Form To Create Your Target Model button to create your Target model object.
- Click on the Target Generator Button to return to the Target generation screen or hit the Effects Generator button to go to the next phase of the software.


Generate Megatree Effects
This section of the software allows you to define the various effect types that you want to apply to your object model that you created in the Target Generation screen. Effects are various mathematical models that apply the unique patterns or light and colors on your Target object. The current Effect Types include:
- Spirals
- Text
- Snowflakes
- Meteors
- Garlands
- Butterfly
- User Defined


To begin creating your own custom effect:
- Choose the Target Model that you want to use from the drop down list
- Choose the effect Class that you want to use from the drop down list
- Hit the Submit Form to customize effect button
To review other custom effects that other users have created, click on Click here to see the gallery of effects other users have created
Generating Spiral Effects
EFFECT_CLASS: spirals Create spirals around your RGB device
- Name for your effect (Up to 25 characters):
- This is the name that this effect will show up in your library. The name will be upshifted and spaces will be changed to underscores. So "Sean Effect" will be come "SEAN_EFFECT".
- Handiness of Spiral (L or R):
- As the spiral goes from top to bottom, should it spiral to the left or to the right.
- Number of Spirals (1-9):
- This is the number of spirals that go around the tree
- Number of Rotations (1-4):
- This is the number of rotations a single spirals makes as it goes from the top to the bottom of your tree
- How Thick is each Spiral (1 to the Max number of strands on your tree):
- The number of additional pixelsthat will also be lit up as your spiral wraps around the tree.
- How much of your tree should be displaye (0-360 ):
- 360 means display your entire tree, this would be the normal value here.
- If you choose 180 degrees, then one half of your tree will be displayed. 360 means display the entire tree.
- This could be used when there is bleeding from the back of the tree thru the front.
- The barber pole effect works best when it only displays on half of the tree.
- If you choose 180, then 90 degrees to the left and 90 degrees to the right of the front of the tree will display.
- Choose a color for the top of the spiral (#000000 - #FFFFFF):
- Pick the color for the very top of the tree. This color will change into the bottom color.
- Choose a color for the bottom of the spi (#000000 - #FFFFFF):
- Pick the color for the very top of the tree. This color will change be the final color morphed from the top color.
- Delay between frames (in ms) (1-1000. 50 is typical):
- This delay will be used when building the animated GIF AND when producing the xml output files.
- Direction of rotation around the tree (cw, ccw):
- Which way do the spirals rotate around your tree. Clockwise or Counter-Clockwise
- Enter the percentage of pixels to sparkle (0-100):
- If you enter a zero, no pixels will be lit up as white.
- If you enter a 20, then 20% of the pixels being drawn will have their color overridden to be white.
- Use background Color (Y N):
- If you answer Y, then the next color will be used to paint every pixel of your tree as a backdrop for your animations
- Background color (#000000 - #FFFFFF):
- What color all pixels are set to as a background for your animations.
- Sequence Duration (in seconds) (0.01 to 10.0):
- Enter the total time you want this sequence to run. For now, i will limit this to 10 seconds max
- Show Frame (Y or N):
- If this is set to Y, then yout target model will be displayed as
- gray lines with no lights turned on.
Generating Text Effects
EFFECT_CLASS: text Scrolling text around your RGB device
- Name for your effect (Up to 25 characters):
- This is the name that this effect will show up in your library.
- The name will be upshifted and spaces will be changed to underscores. So "Sean Effect" will be come "SEAN_EFFECT".
- First line of text (1-32 characters):
- This is the text that will be scrolled right to left across your tree.
- Second line of text (1-32 characters):
- This is the text that will be scrolled right to left across your tree.
- How much of your tree should be displaye (0-360 ):
- 360 means display your entire tree, this would be the normal value here.
- If you choose 180 degrees, then one half of your tree will be displayed. 360 means display the entire tree.
- This could be used when there is bleeding from the back of the tree thru the front.
- The barber pole effect works best when it only displays on half of the tree.
- If you choose 180, then 90 degrees to the left and 90 degrees to the right of the front of the tree will display.
- Choose a color for the first line of text (#000000 - #FFFFFF):
- Pick the color for the first line of text
- All of the text will be the same color
- Choose a color for the second line of text (#000000 - #FFFFFF):
- Pick the color for the second line of text
- All of the text will be the same color
- Delay between frames (in ms) (1-1000. 50 is typical):
- This delay will be used when building the animated GIF AND when producing the xml output files.
- Enter the pixel number for top of Text1 (1 to Maximum number of Pixels on a Strand):
- In Nutcracker,Pixel#1 is always at the top of the rgb device.
- Enter the pixel number where the top
- of Your first line of text should be.
- Sequence Duration (in seconds) (0.01 to 10.0):
- Enter the total time you want this sequence to run. For now, i will limit this to 10 seconds max
- Show Frame (Y or N):
- If this is set to Y, then yout target model will be displayed as
- gray lines with no lights turned on.
Generating Snowflake Effects
EFFECT_CLASS: snowflakes Snowflakes on your RGB device
- Name for your effect (Up to 25 characters):
- This is the name that this effect will show up in your library.
- The name will be upshifted and spaces will be changed to underscores. So "Sean Effect" will be come "SEAN_EFFECT".
- How much of your tree should be displaye (0-360 ):
- 360 means display your entire tree, this would be the normal value here.
- If you choose 180 degrees, then one half of your tree will be displayed. 360 means display the entire tree.
- This could be used when there is bleeding from the back of the tree thru the front.
- The barber pole effect works best when it only displays on half of the tree.
- If you choose 180, then 90 degrees to the left and 90 degrees to the right of the front of the tree will display.
- Choose a color for the start of meteor trail (#000000 - #FFFFFF):
- Pick the color for the very top of the tree. This color will change into the bottom color.
- Choose a color for the bottom of the meteor trail (#000000 - #FFFFFF):
- Pick the color for the very top of the tree. This color will change be the final color morphed from the top color.
- Delay between frames (in ms) (1-1000. 50 is typical):
- This delay will be used when building the animated GIF AND when producing the xml output files.
- Enter the percentage of pixels to sparkle (0-100):
- If you enter a zero, no pixels will be lit up as white.
- If you enter a 20, then 20% of the pixels being drawn will have their color overridden to be white.
- Sequence Duration (in seconds) (0.01 to 10.0):
- Enter the total time you want this sequence to run. For now, i will limit this to 10 seconds max
Generating Meteor Effects
EFFECT_CLASS: meteors Falling meteors on your RGB device
- Name for your effect (Up to 25 characters):
- This is the name that this effect will show up in your library.
- The name will be upshifted and spaces will be changed to underscores. So "Sean Effect" will be come "SEAN_EFFECT".
- How much of your tree should be displaye (0-360 ):
- 360 means display your entire tree, this would be the normal value here.
- If you choose 180 degrees, then one half of your tree will be displayed. 360 means display the entire tree.
- This could be used when there is bleeding from the back of the tree thru the front.
- The barber pole effect works best when it only displays on half of the tree.
- If you choose 180, then 90 degrees to the left and 90 degrees to the right of the front of the tree will display.
- Choose a color for the start of meteor trail (#000000 - #FFFFFF):
- Pick the color for the very top of the tree. This color will change into the bottom color.
- Choose a color for the bottom of the meteor trail (#000000 - #FFFFFF):
- Pick the color for the very top of the tree. This color will change be the final color morphed from the top color.
- Delay between frames (in ms) (1-1000. 50 is typical):
- This delay will be used when building the animated GIF AND when producing the xml output files.
- Enter the percentage of pixels to sparkle (0-100):
- If you enter a zero, no pixels will be lit up as white.
- If you enter a 20, then 20% of the pixels being drawn will have their color overridden to be white.
- How long of a meteor trail (1 to Maximum pixels in a Strand):
- How many pixels behind the meteor head do you want a trail
- Sequence Duration (in seconds) (0.01 to 10.0):
- Enter the total time you want this sequence to run. For now, i will limit this to 10 seconds max
- How many meteors to launch each frame (1 to total pixels on your tree. Numbers ike 6-12 are reasonable.):
- Each frame, this many meteors will be randomly launched on your tree
- Random Color Code (1,2 for random, any other number then we use your start and end color):
- 1=multicolor meteors, 2=random colrs but each meteor is same hue
Generating Garland Effects
EFFECT_CLASS: garlands Falling circles on your rgb device
- Name for your effect (Up to 25 characters):
- This is the name that this effect will show up in your library.
- The name will be upshifted and spaces will be changed to underscores. So "Sean Effect" will be come "SEAN_EFFECT".
- How much of your tree should be displaye (0-360 ):
- 360 means display your entire tree, this would be the normal value here.
- If you choose 180 degrees, then one half of your tree will be displayed. 360 means display the entire tree.
- This could be used when there is bleeding from the back of the tree thru the front.
- The barber pole effect works best when it only displays on half of the tree.
- If you choose 180, then 90 degrees to the left and 90 degrees to the right of the front of the tree will display.
- Choose a color for the top of the spiral (#000000 - #FFFFFF):
- Pick the color for the very top of the tree. This color will change into the bottom color.
- Choose a color for the bottom of the spi (#000000 - #FFFFFF):
- Pick the color for the very top of the tree. This color will change be the final color morphed from the top color.
- Delay between frames (in ms) (1-1000. 50 is typical):
- This delay will be used when building the animated GIF AND when producing the xml output files.
- Enter the percentage of pixels to sparkle (0-100):
- If you enter a zero, no pixels will be lit up as white.
- If you enter a 20, then 20% of the pixels being drawn will have their color overridden to be white.
- Sequence Duration (in seconds) (0.01 to 10.0):
- Enter the total time you want this sequence to run. For now, i will limit this to 10 seconds max
- Spacing Between Garlands (3 to maxPixels):
- When a garland drops, how many pixels gap should there be ,
- before the next gaeland drops
- What type of garland (0-4):
- This is the type of line drawn around your tree.
- 0 .. Circle
- 1 .. Garland type 1
- 2 .. Garland type 2
- 3 .. Graland type 3
- 4 .. Garland type 4
- Show Frame (Y or N):
- If this is set to Y, then yout target model will be displayed as
- gray lines with no lights turned on.
Generating Butterfly Effects
EFFECT_CLASS: butterfly Butterfly Wing
- Name for your effect (Up to 25 characters):
- This is the name that this effect will show up in your library.
- The name will be upshifted and spaces will be changed to underscores. So "Sean Effect" will be come "SEAN_EFFECT".
- How much of your tree should be displaye (0-360 ):
- 360 means display your entire tree, this would be the normal value here.
- If you choose 180 degrees, then one half of your tree will be displayed. 360 means display the entire tree.
- This could be used when there is bleeding from the back of the tree thru the front.
- The barber pole effect works best when it only displays on half of the tree.
- If you choose 180, then 90 degrees to the left and 90 degrees to the right of the front of the tree will display.
- Delay between frames (in ms) (1-1000. 50 is typical):
- This delay will be used when building the animated GIF AND when producing the xml output files.
- Enter the percentage of pixels to sparkle (0-100):
- If you enter a zero, no pixels will be lit up as white.
- If you enter a 20, then 20% of the pixels being drawn will have their color overridden to be white.
- Sequence Duration (in seconds) (0.01 to 10.0):
- Enter the total time you want this sequence to run. For now, i will limit this to 10 seconds max
- Radian Shift (0.0 to 6.0):
- how much should color shift in radian shift
- Start Color (#000000 - #FFFFFF):
- Start color of the color shift.
- Set start and end color to #FFFFFF
- if you want the full color spectrum
- End Color (#000000 - #FFFFFF):
- End color for color shift.
- If you want the full spectrum, set start and end color to #FFFFFF
Generating User Defined Effects
EFFECT_CLASS: user_defined This effect class is for user defined functions
- Name for your effect (Up to 25 characters):
- This is the name that this effect will show up in your library.
- The name will be upshifted and spaces will be changed to underscores. So "Sean Effect" will be come "SEAN_EFFECT".
- How much of your tree should be displaye (0-360 ):
- 360 means display your entire tree, this would be the normal value here.
- If you choose 180 degrees, then one half of your tree will be displayed. 360 means display the entire tree.
- This could be used when there is bleeding from the back of the tree thru the front.
- The barber pole effect works best when it only displays on half of the tree.
- If you choose 180, then 90 degrees to the left and 90 degrees to the right of the front of the tree will display.
- Start Color (#000000 - #FFFFFF):
- This color will change into the bottom color.
- End color (#000000 - #FFFFFF):
- Pick the color for the very top of the tree. This color will change be the final color morphed from the top color.
- Delay between frames (in ms) (1-1000. 50 is typical):
- This delay will be used when building the animated GIF AND when producing the xml output files.
- Enter the percentage of pixels to sparkle (0-100):
- If you enter a zero, no pixels will be lit up as white.
- If you enter a 20, then 20% of the pixels being drawn will have their color overridden to be white.
- First user defined parameter (May contain an ASCII string up to 60 characters):
- param1 is first, user defined parameter
- param2 (ascii string):
- Second user defined parameter
- Sequence Duration (in seconds) (0.01 to 10.0):
- Enter the total time you want this sequence to run. For now, i will limit this to 10 seconds max
- Php Program (4000 bytes):
- Paste the php program that will be called for every frame,strand,pixel.
Export file to Sequencer
- Vixen 2.1
- Click here to make Vixen 2.1 sequencer files
- Click here for Vixen vir file.
- Click here for Vixen csv file.
- LOR S2
- Click here to make LOR S2 (*.lms) sequencer files
- Click here to make LOR S2 (*.lcb) sequencer files
- LSP 2.0
- Click here to make LSP 2.0 sequencer files (Not yet implemented)
- LOR S3
- Click here to make LOR S3 sequencer files (Not yet implemented)
- HLS
- Click here to make HLS sequencer files (this is still a prototype)
Importing Nutcracker Files to Sequencing software
- Vixen 2.1 sequencer files
- LOR S2 (*.lms) sequencer files
- LOR S2 (*.lcb) sequencer files
- LSP 2.0 sequencer files (Not yet implemented)
- LOR S3 sequencer files (Not yet implemented)
- HLS sequencer files (this is still a prototype)
Website
Tutorials
For tutorials for the new version of Nutcracker xlights CLICK HERE
Click on the following links to watch video tutorials on how to use the old version of Nutcracker.
- Introduction to Nutcracker
- Creating a target model
- Creating a target model (continued)
- Creating an Effect
- Creating an Effect (continued)
- Exporting your sequence
- Creating an Effect, SPIRALS (Part 1)
- Creating an Effect, SPIRALS (Part 2)
- Creating an Effect, TEXT
Other Software Tools
RGB Pixel Tree 3D Plugin was developed by Emmanuel Miranda (nuelemma) This tool allows the user to create a profile in Vixen 2.1 of all of the channels needed for a RGB Pixel Megaree and also creates a 3D Priview model. The software can be downloaded here
A demonstration of the tool in use is here