I really did not think I had to ask for help for this one, but I have this project where I want to drill 12mm holes in PVC for windows etc (for 12mm nodes) and looked at this video https://www.youtube.com/watch?v=cL9Dy0RlEEw&feature=youtu.be - I made a 3d JIG to do what I needed with a drill press, but everytime I try to drill the holes always start slanting down to one end. I have no idea why this is happening. How do you guys get completely straight lines - I need to ask because im wasting PVC bigtime when trying to lean by doing.
You are using an out of date browser. It may not display this or other websites correctly.
You should upgrade or use an alternative browser.
You should upgrade or use an alternative browser.
Drilling PVC in a straight line
- Thread starter aumoenoav
- Start date
Dkelly0802
New member
Is the drill press aligned correctly? What type of big are you using? With that type of jig I can't imagine why it would be slipping on you.
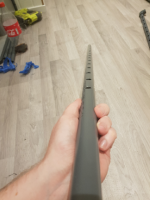
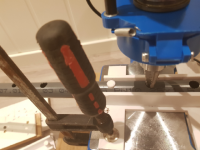
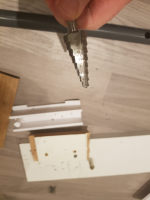
I use a stepping bit showed on the image.
Also showing on the images is how the PVC ends up. Im sure somehow its getting twisted, but not sure what could make that large twist.
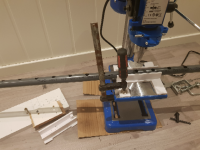
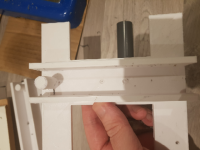
The jig im using is also showing, about the same principal as the youtube video I linked to and it has no give (the tube fits exactly to it).
Also showing on the images is how the PVC ends up. Im sure somehow its getting twisted, but not sure what could make that large twist.
The jig im using is also showing, about the same principal as the youtube video I linked to and it has no give (the tube fits exactly to it).
Attachments
chadowamsley
New member
I had this issue when I drilled some pipe. I rolled the pipe towards me for one or two holes, then I'd roll it away from me for one or two and so on. There was very little play, but enough to mess my line up.
I had this issue when I drilled some pipe. I rolled the pipe towards me for one or two holes, then I'd roll it away from me for one or two and so on. There was very little play, but enough to mess my line up.
Im not sure if I understood how you solved your issue?
I had this same issue since I was using a wood dowel. After a 1000+ holes the dowel started to wear. Since there was rotational play, like chadowamsley, I would rotate the PVC piece forward against the dowel, drill a few holes, and rotate the piece backwards against the dowel drill a few holes. Although this didn't work perfectly, it got me by. I thought about using a long 1/2" bolt, cutting off the threads utilizing only the smooth part of the bolt, but then I saw someone else video. They just mounted a block of wood to the end of the PVC. The square/rectangle bottom of the piece of wood rides along the ground keeping the piece of PVC from rotating. When you get to the end of the PVC you only have a few hole to drill so simply removing the block of wood and drilling them without the piece is fine.
The way that PVC pipe is made, there are usually some "striations" running the length of the pipe (it is from the extruder). I take a pencil and mark that line. Haven't had one go sideways without me knowing about it since.
Also, your pin in the jig should be as close to the size of the hole as possible. A trick learned while doing a whole bunch of holes is to push the pipe up against one side of the pin. Even with slop between the pin and the hole, the pin will be against the hole's outermost area. The one most likely to be straight. Do it the same direction each hole.
See the example attached.
T.D.Sutton
New member
I had exactly the same problem - see thread :-
http://doityourselfchristmas.com/fo...he-PVC-pipe-when-drilling&highlight=holes+pvc
In my case the "cure", finally, was to draw a line along the pipe for re-assurance when drilling, and the "flag", an 18" length of material through the second hole once it cleared the drilling jig, watch like a hawke that is is always vertical. I found I always had to keep a rotational load on the pipe when drilling, for what reason I have no idea, but the final result is "almost perfect"!!
The other major is to ensure the total stability of the drill press, the jig and the drill, if anything moves the result will be disaster, I know, I have 13 x 4 meter lengths of Swiss cheese to prove it, well over $100.00's worth!!! (The Swiss cheese is the result of drilling at 90 deg to get my methodology correct by using already drilled unusable lengths as test beds)
Once I had all of the above under control, when I now look along the completed PVC pipes with Pixels installed, they are as straight as a die, thankfully, so a big sigh of relief, and empty wallet!!
Terry
EButler8361
New member
As you can see....you are not alone with this issue. Last year was my first year with pixels and animated lighting stuff. I made a jig, bought a cheap drill press from Harbor Freight and also ordered a metric step bit so I could drill 12mm holes for the 12 mm pixels I had. In my mind...this was going to be easy and I figured the hardest part was making the jig.
I quickly learned it wasn't as easy as I thought. After much trial and error...with mostly errors, I also went with making a straight line on the pipe to use as an alignment point for the step bit. I purchased a long piece of aluminum channel stock and clamped that to the 1 inch pvc and used that as an edge guide to draw a straight line across the length of the pipe.
The other mistake I made that was painful. I bought a single 50 ct string of lights from a US vendor when I first got started in early 2016 just to see if I can make them light up, etc. I then ordered a larger quantity of lights from a different US vendor to build the props for last season in a pre-sale. When I drilled a few pipes with the 12 mm step bit, the 50 ct string I first ordered was "relatively" easy to push into the pipe and get them seated.
Once I received my larger shipment from the presale months later (and after I drilled out 330 feet of pipe with the 12 mm step bit with 2.5 inch spacing), I quickly learned my 12 mm hole with my new pixels was going to be extremely difficult to push into the pipe. I ended up using a 1/2" step bit and re-drilling the holes. On the back of the pipe I drilled a 14 or 16 mm hole to make it a lot easier to get the pixel in from the back.
Make sure the lights you have will go into a 12mm hole with reasonable effort and don't make the mistake I made. Had I not re-drilled the holes, I'm fairly certain my wife would have never helped me with this stuff again and I would still be sitting in my garage straining my nuts off pushing those pixels in.
As you can see....you are not alone with this issue. Last year was my first year with pixels and animated lighting stuff. I made a jig, bought a cheap drill press from Harbor Freight and also ordered a metric step bit so I could drill 12mm holes for the 12 mm pixels I had. In my mind...this was going to be easy and I figured the hardest part was making the jig.
I quickly learned it wasn't as easy as I thought. After much trial and error...with mostly errors, I also went with making a straight line on the pipe to use as an alignment point for the step bit. I purchased a long piece of aluminum channel stock and clamped that to the 1 inch pvc and used that as an edge guide to draw a straight line across the length of the pipe.
The other mistake I made that was painful. I bought a single 50 ct string of lights from a US vendor when I first got started in early 2016 just to see if I can make them light up, etc. I then ordered a larger quantity of lights from a different US vendor to build the props for last season in a pre-sale. When I drilled a few pipes with the 12 mm step bit, the 50 ct string I first ordered was "relatively" easy to push into the pipe and get them seated.
Once I received my larger shipment from the presale months later (and after I drilled out 330 feet of pipe with the 12 mm step bit with 2.5 inch spacing), I quickly learned my 12 mm hole with my new pixels was going to be extremely difficult to push into the pipe. I ended up using a 1/2" step bit and re-drilling the holes. On the back of the pipe I drilled a 14 or 16 mm hole to make it a lot easier to get the pixel in from the back.
Make sure the lights you have will go into a 12mm hole with reasonable effort and don't make the mistake I made. Had I not re-drilled the holes, I'm fairly certain my wife would have never helped me with this stuff again and I would still be sitting in my garage straining my nuts off pushing those pixels in.
It looked so easy on youtube I was ready to get finished all my PVC in an evening. I think I made up some new swear words while drilling the PVC.
Did you have to use the larger drill bit cause of the "taps" on the pixel lights or did the lights not fit through a 12mm hole at all?
Hey mrGrumpy, do you have any pictures of your jig for drawing a straight line on the pipe ???
I'm interested in seeing them if you do.
No, but waiting for wife to finish dressing so I'll sketch something.
Used 1/2 bit, but needed to clamp pipe down after each index, or the pipe would jump when I was too fast on the drill press.
The sharp bit grabbed a chunk of pipe. Need to think slow drilling - don't let it grab - even with clamp in place.
I actually turned up dulling my bit so it was less likely to grab. More pressure, led grabbing.
Didn't like step bit, had to turn over and drill other side too.

EButler8361
New member
It looked so easy on youtube I was ready to get finished all my PVC in an evening. I think I made up some new swear words while drilling the PVC.
Did you have to use the larger drill bit cause of the "taps" on the pixel lights or did the lights not fit through a 12mm hole at all?
The little notches or tabs...whatever you call them...made it extremely difficult to put those through the 12mm hole to get to the "seated" or indexed part of the pixel (just behind the tabs). The lights I have were also slightly variable....some thicker or larger diameter than others....very slight...but still made a difference.
A lot of the videos I watched, the folks seemed to use a 1/2" step bit. I didn't understand why since the pixel dimension is supposed to be 12mm. Thus I bought the metric step bit and away I went. I should have ask some of those guys first I suppose. The Matt Johnson "How to build a pixel matrix" video is where I got the idea and process for drilling the pipe for my house outline. Although I don't think he specifically mentions it....the brass colored step bit he has on his press I believe is 1/2". That's my experience....for what it is worth.
Hmm yes. I can't get inches here but 1/2 should be about 12,7mm. Maybe a 13mm metal drill should do the job better than a stepping but? Dunno if 13mm get too big or not.
Edit:
I see I can find 12.5mm and 13mm. Is the 1/2 just too big or small (since 1/2 is 12.7mm I have to go with one that is 0.2mm smaller or one that is 0.3mm larger).
Was thinking to use a drill bit like this: http://www.biltema.no/no/Verktoy/Skjareverktoy/Metallbor/Hurtigstalbor-HSS-2000016864/ it say it can be used for metall and plastic.
Last edited:
I just realized why there is such a variance. Is it my imagination, or is the "collar" of the pixel the only thing that is 12mm? If so, the body is dependent on how much pressure was put into the mold for each casting.
For me it seems like it's not the same between batches. I just measured with a caliper and the holders go out to 13,2mm but on its thinnest it's 10mm, so for me it will fit perfectly with a 12mm front hole and 13-13,5mm back hole. That would make the pixel lock in place with its holder.
EButler8361
New member
The 12.5mm bit may work out good. Hard to say. Whichever option you choose I would just verify that you can get the pixel inserted like you want it using a reasonable amount of effort before drilling thousands of holes like I did and realizing its way too tight.
As MrGrumpy suggested, if you are going to used a standard or fixed diamter bit like that, I would highly recommend clamping the PVC before you start drilling the holes. Any variation from perfect 90 degree entry could cause the bit to grab and either screw the hole up or screw your hand up...or maybe both. I've had a few CG1500 boxes jerked out of my hand trying the drill them with a standard bit and thinking my other hand was strong enough to hold it. Me thought wrong.
As MrGrumpy suggested, if you are going to used a standard or fixed diamter bit like that, I would highly recommend clamping the PVC before you start drilling the holes. Any variation from perfect 90 degree entry could cause the bit to grab and either screw the hole up or screw your hand up...or maybe both. I've had a few CG1500 boxes jerked out of my hand trying the drill them with a standard bit and thinking my other hand was strong enough to hold it. Me thought wrong.