Adding and Using Beat Tracks: Difference between revisions
No edit summary |
|||
| Line 52: | Line 52: | ||
====Beat Track from Filters==== | ====Beat Track from Filters==== | ||
---- | ---- | ||
Section needs to be completed. | Section needs to be completed. | ||
Filling in squares for beat track. | |||
This is a very powerful feature of HLS and one that can come in handy when setting up beat tracks. | |||
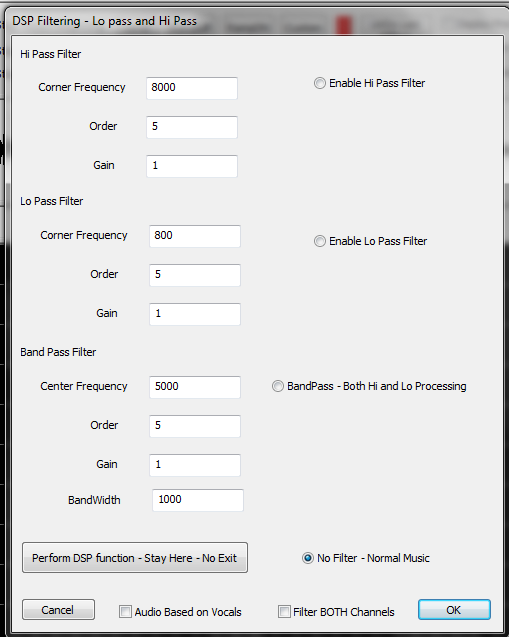
[[File:DSP-Filtering.png]]<br /><br /> | |||
*'''Hi Pass Filter:''' This filter will filter the audio to only show the portions that are in higher frequencies, such as a female vocal or high (in pitch, not volume) notes. | |||
**Wikipedia: [http://en.wikipedia.org/wiki/High-pass_filter High Pass Filter] | |||
*'''Lo Pass Filter:''' This filter will filter the audio to only show the portions that are in lower frequencies, such as bass drum and other low (in pitch, not volume) notes. | |||
**Wikipedia: [http://en.wikipedia.org/wiki/Low-pass_filter Low Pass Filter] | |||
*'''Band Pass filter:''' This filters on BOTH high and low frequencies. The ''Frequency'' value is the "desired" frequency. A band pass filter will filter OUT both the high and low frequencies that are further away from that frequency. | |||
**Wikipedia: [http://en.wikipedia.org/wiki/Band-pass_filter Band Pass Filter] | |||
<br /> | <br /> | ||
'''Common Frequencies:''' | |||
*''200 Hz and below:'' The bass of the mix. The bottom end of the sound. | |||
*''200 – 400 Hz:'' The body of the low end instruments. | |||
*''400 Hz – 1 kHz:'' The low mid/mid area of the mix. The body of guitars and vocals reside here. | |||
*''1 – 3 kHz:'' Snare drums and kicks start in this range and extend almost to 4 kHz. | |||
*''4 – 8 kHz:'' High-mids, the top end of most drums, guitars, and organs. Also the body of cymbals is in this range, bottoming out in 3 kHz range. | |||
*''8 – 10 kHz:'' Cymbals mostly live here. You’ll also find the top end of vocals here. | |||
*Summarized from: [http://abovegroundmagazine.com/columns/pro-logic/10/26/understanding-sound-frequency-a-guide-to-hz-and-khz/ abovegroundmagazine.com] | |||
<br /> | |||
'''Visual chart of instruments and frequency ranges: [http://www.independentrecording.net/irn/resources/freqchart/main_display.htm frequency chart] | |||
'''Video''' | |||
*Watch this [http://www.youtube.com/watch?v=aOwrz-P5Bf0#t=3m22s video] uploaded by Joe Hinkle. (Note: This video link starts at the 3:22 mark, where discussion of the DSP filtering begins.) | |||
<br /><br /> | |||
====Cleaning up a Beat Track==== | ====Cleaning up a Beat Track==== | ||
Revision as of 21:17, 1 February 2013
This is based on version 11V.
Introduction
A Beat Track is a "channel" which is not actually assigned to any output. It's only purpose is to have markers in the sequence which have been set at points where a beat or some other repetitive musical component is found in a song. A beat track helps easily sequence movements between lighting channels so that the movements fall at appropriate musical points. An example would be an arch that moves from one end to another between two beat marks.
HLS supports creating beat tracks in a couple of ways. One way is to manually press a button or click a mouse while a song is playing to set the beat. Another way would be to apply a filter to the audio and then manually "turn on" the beat track at points identified through the filter.
Add Beat Track Channels

First, channels must be added so you can use them as beat tracks.
- Open the Channel Manager (Manage Channels -> Manage Raw Channels)
- Since we are going to look at three different ways to create a beat track, go ahead and Add 3 channels named "Beat".
- Keep the Universe as 0 since these channels will not be associated with real output.
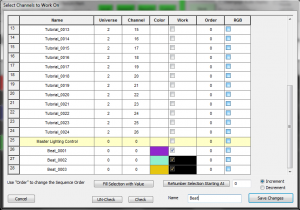
- Use the color Selector to set colors for your beat tracks (see Figure 5-5).
- When done, select Save Changes.
Setting Display Group for Beat Track

- Next, assign all of the beat tracks into their own Display Group.
- Create a Display Group named "Beat" and add all three channels (See Figure 5-6).
- Set the "Beat" display group as the group to work with.
Beat Track From Clicks
Creating a Beat Track from Clicks is one of the easiest ways to create a Beat Track. Clicks must be quick and not everything will line up perfectly, but it can give reasonably good results.

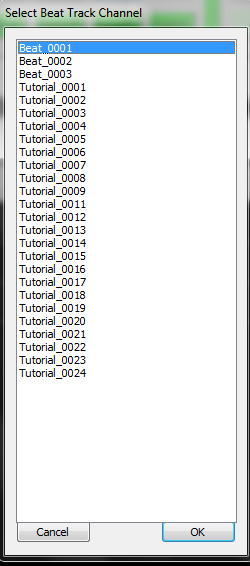
- Activate the Beat Track by clicking Manage Channels -> Select a Beat Track Channel.
- Select the Beat Track you want to use and click OK (See Figure 5-7).

- Check the box Beat Track Active to let HLS know that you are planning to record clicks for a beat track (see Figure 5-8).
- Press the Play / Pause button to play the song.
- Press the CTRL key or the Left Mouse' button at each beat in the song.

- When the song is complete, there will be two grid cells filled in at every click received. Your beat track has been created. (See Figure 5-9)
Beat Track from Filters
Section needs to be completed.
Filling in squares for beat track.
This is a very powerful feature of HLS and one that can come in handy when setting up beat tracks.
- Hi Pass Filter: This filter will filter the audio to only show the portions that are in higher frequencies, such as a female vocal or high (in pitch, not volume) notes.
- Wikipedia: High Pass Filter
- Lo Pass Filter: This filter will filter the audio to only show the portions that are in lower frequencies, such as bass drum and other low (in pitch, not volume) notes.
- Wikipedia: Low Pass Filter
- Band Pass filter: This filters on BOTH high and low frequencies. The Frequency value is the "desired" frequency. A band pass filter will filter OUT both the high and low frequencies that are further away from that frequency.
- Wikipedia: Band Pass Filter
Common Frequencies:
- 200 Hz and below: The bass of the mix. The bottom end of the sound.
- 200 – 400 Hz: The body of the low end instruments.
- 400 Hz – 1 kHz: The low mid/mid area of the mix. The body of guitars and vocals reside here.
- 1 – 3 kHz: Snare drums and kicks start in this range and extend almost to 4 kHz.
- 4 – 8 kHz: High-mids, the top end of most drums, guitars, and organs. Also the body of cymbals is in this range, bottoming out in 3 kHz range.
- 8 – 10 kHz: Cymbals mostly live here. You’ll also find the top end of vocals here.
- Summarized from: abovegroundmagazine.com
Visual chart of instruments and frequency ranges: frequency chart
Video
- Watch this video uploaded by Joe Hinkle. (Note: This video link starts at the 3:22 mark, where discussion of the DSP filtering begins.)
Cleaning up a Beat Track
Whether manually clicking or using filters, some of the beat track marks may be slightly off from where you want them. You can slow a song down and use the oscillioscope to "cleanup" the marks.
- To move a mark left or right, Click on the FIRST grid-square, release the mouse button, and then move it using the mouse and dragging.
- When the timing mark is placed where you want it, click on it again (or press escape) to exit selection mode.
Setting Beat Track as a Sticky Channel
You can set a single beat track or multiple tracks (up to three) to remain "stuck" to the top of the sequencing window by setting Sticky Channels.
