Creating a Display Preview
Back to: HLS User Manual and Reference Guide
This tutorial is based on version 11V.
Preparing Channels for Preview
- Ensure that channels are properly added to the sequence, rgb channels are identified, and colors are setup in the Channel Manager.
- See Setting up HLS Channels for more detailed instructions.
- See Setting up HLS Channels for more detailed instructions.
- Assigning Channels to Preview Groups and Preview Numbers:
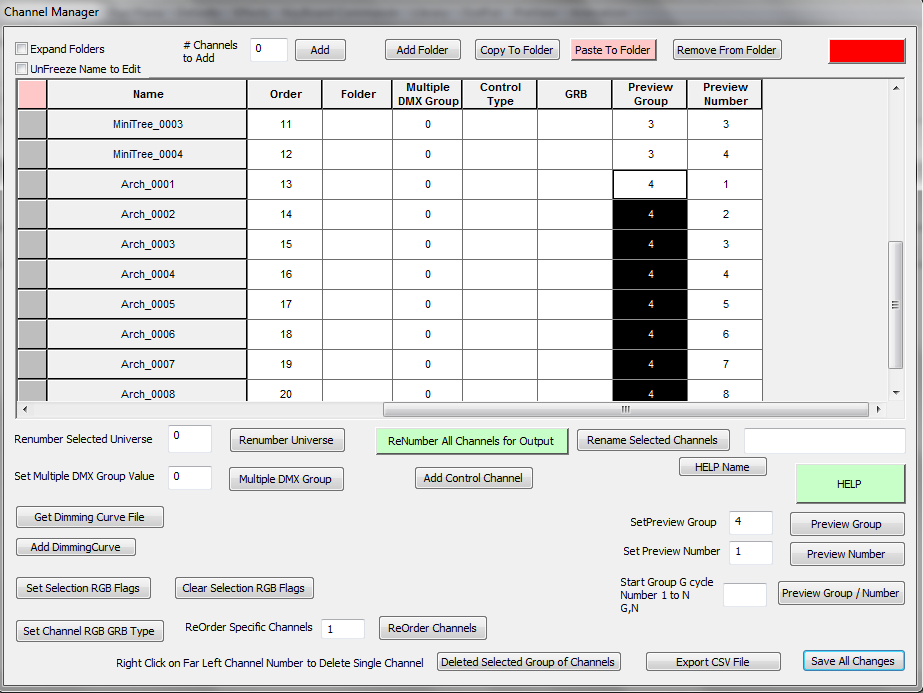
- Open the Channel Manager. The last two columns in the channel listing are Preview Group and Preview Number. These two numbers allow you to form multiple Preview Objects, such as MegaTree, RoofLine, Window, Arch, etc. and assign a pair of numbers (Group and Number) to them. They can range from 1-1000. Anything set as 0 will not be displayed.
- Preview Group: This number groups channels together into one Preview Object. For example, an arch can have 8 segments with each segment assigned to Preview Group 3.
- Preview Number: This corresponds to each channel in a Preview Group.
- Assign Preview Groups and Preview Numbers for each of your channels. (This can be done manually by left-clicking into the fields and entering numbers, but there are ways to do it quicker.)
- Using the left mouse button, click in the first item of a Preview Object and select down the channel cells until reaching the last channel of the object.
- In the Set PreviewGroup field, enter the Preview Group value and click Preview Group button. This will set that value for all items in the Preview Object.
- To set the PreviewNumber values from 1 to the highest selected cell, make sure Set PreviewNumber is set to one, then click the Preview Number button.
- To set Preview Groups and Preview Numbers for large sets of channels that contain the same number of components (for example, pixels):
- Determine the number of components in the set of channels (for example, 42 pixels in a string, a total of 16 strings).
- Select all channels to be grouped.
- In the Start Group G cycle field, enter: 1,42. This would start with group 1, and number 42 components. Then, would move to group 2, etc, all the way to group 16, preview-number 42.
- Open the Channel Manager. The last two columns in the channel listing are Preview Group and Preview Number. These two numbers allow you to form multiple Preview Objects, such as MegaTree, RoofLine, Window, Arch, etc. and assign a pair of numbers (Group and Number) to them. They can range from 1-1000. Anything set as 0 will not be displayed.
- The image shows an example of an arch with 8 segments that has been selected and then assigned a Preview Group and Preview Numbers. It is assigned Preview Group 4 since the previous display element (a mini tree) was assigned group 3. Groups do not have to be in sequential order.
Assign Channels to a Display Group
- To be able to display, draw, and preview channels, they must be assigned to a display group.
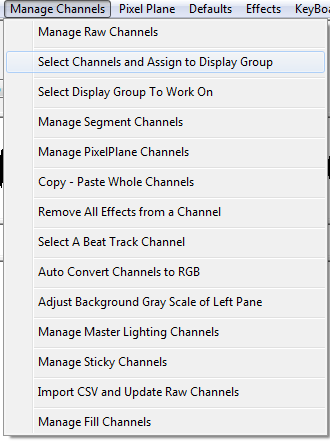
- Click Manage Channels, then select Select Channels and Assign to Display Group.
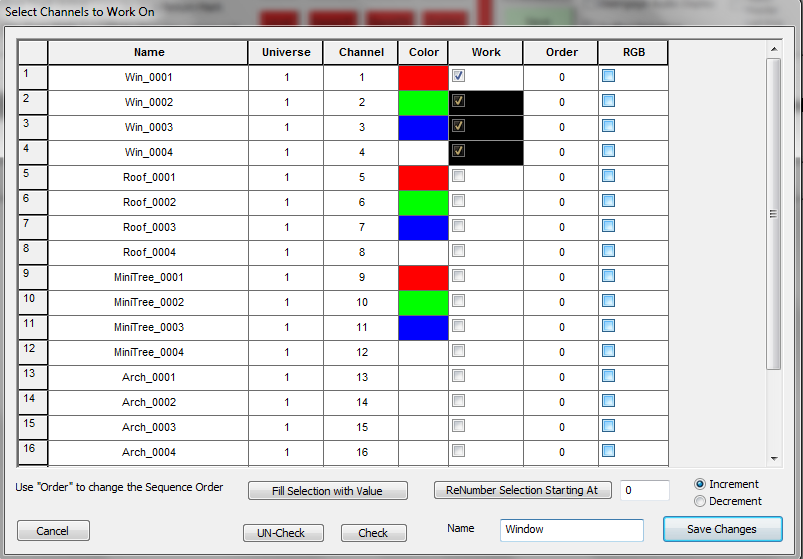
- Left-click into the Work column and select the first channel to be added to a Display Group. Then, Click and drag, highlighting all cells to be part of the Display Group.
- Check the cells selected by clicking Check.
- Add a Name for the Display Group, then press Save Changes.
- In the picture example, a Display Group named "Window" is being created for the four highlighted elements that outline a window.
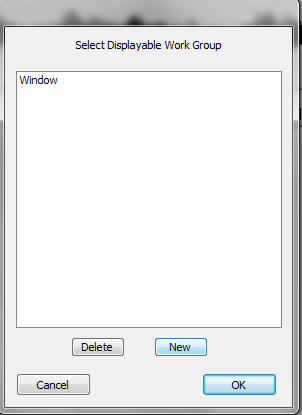
- Continue creating Display Groups for all elements. When adding additional Display Groups, a window will prompt to either edit or create a new Group. Click "New" to continue creating groups.
Creating the Preview Window
- Warnings and Limitations:
- All images in the Preview must be in bitmap format (extension of .bmp). Windows paint will allow conversion of files into this format.
- Image resolution cannot be larger than your screen. Doing so could lead to you not being able to access the commands as the image would cover your entire screen.
- When editing a new preview, immediately move the Edit Preview Toolbar to a bottom corner of your screen. This will help prevent the preview window from covering the toolbar once it has been re-sized.
- Tip: If your Toolbar does become hidden behind a preview window, press 'Z' to restore it.
- The Preview window cannot be resized during editing. Once it is set, it is set. However, it can be resized when viewing lights in a sequence.
- Preparing a Background Image:
- Open your house image in an image editing program (MS Paint will be sufficient. Gimp[1] is another choice).
- In MSPaint, you can click Properties to determine the size of your image. You can use "resize" to change the size.
- Once the image has been resized, save it as a bmp file in HLS/Backgrounds.
- Tip: If you save the image as filenameWWWxHHH.bmp, where WWW is the width in pixels and HHH is the height in pixels, it will make it easier to remember the aspect when importing into HLS.
- Editing a new Preview:
- Select Preview on the menu bar, then select Edit New Preview.
- Move the Edit Preview Toolbar to the bottom corner of your screen.
- On the Edit Preview Toolbar, select Set Resolution.
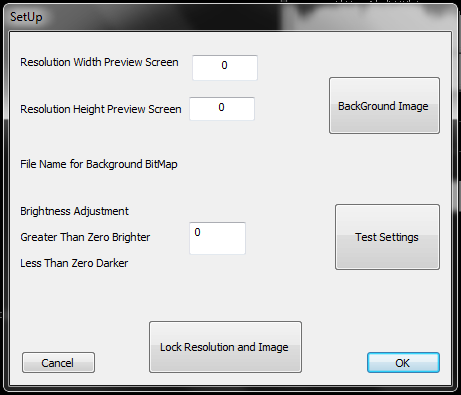
- This will open the Setup window, as shown:
- Using the Setup Window:
- Set the resolution width value to your display image.
- Set the resolution height value to your display image.
- Click the Background Image button and select your display image.
- Adjust brightness, if desired (negative numbers make it darker).
- Test settings when you make changes.
- Once satisfied, select Lock Resolution and Image to finalize display preview. A warning will open asking for confirmation. Click Yes.
- On the Edit Preview Toolbar, select Pick Preview.
- Select New, and name your Display Preview.
- Once done, select Save and close Preview Toolbar. You will be asked to confirm. Click Yes.
- Managing Multiple Previews:
- More than one Preview can be setup.
- To choose the one you want, simply click Preview -> Edit New Preview -> Pick Preview -> Select your choice, and click OK.
- You can then draw and manipulate the selected preview file.
Placing channels onto the Preview window
- With HLS, you draw onto the display window first, then assign channels/groups to the drawing.
- Some keyboard and mouse commands are fairly standard across various drawing components:
- Z - If preview window covers toolbar, pressing Z should bring the toolbar back into focus.
- ESC - Aborts the current action.
- BACKSPACE - This functions as an Undo, stepping one step backwards with each press.
- SPACE - This completes the drawing operation once your object has been defined.
- Left-click on canvas - This begins drawing a segment and ends drawing a segment.
- Right-click on canvas - This begins drawing a segment at the exact point previously stopped.
- When drawing elements, the "active" type of drawing being done will be in green, while all others are in red. In the example picture, "Line" is green because it has been selected.
- To Move display objects, left-click the move square for the object, then drag it in the display window.
Drawing Line Objects
- Line objects could be: roof lines, window frames, doorways, or any other display object composed of straight lines.
- Select the Line button on the Preview Toolbar to begin drawing a line item.
- Left-Click the beginning point.
- Move the mouse to the ending point, or the point where the line needs to turn.
- Press the left mouse again to complete the line segment.
- To draw an additional line starting at that exact stopping point, right-click and move to the next stopping point.
- Left-click the mouse to stop drawing that segment.
- Continue until complete. BACKSPACE will step back in the drawing.
- Once completed, press SPACEBAR to complete the line drawing.
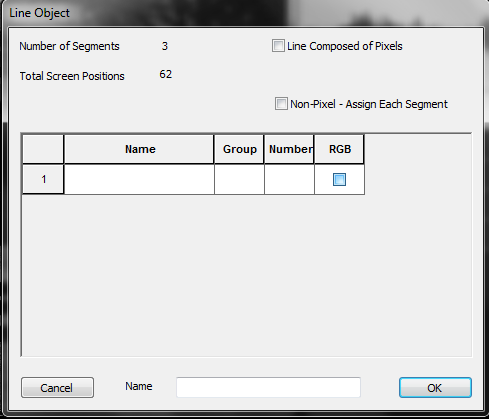
- A Line Object window will open with statistics about the drawing.
- For Standard Christmas Lights:
- If each line segment is it's own channel, select the "Non-Pixel - Assign Each Segment" box. Otherwise, do not check any boxes.
- Click in the Name field to select the appropriate channel(s) for the line and any relevant segments.
- Assign a name to the Preview Object.
- Click OK, OK to complete the channel assignment.
- For Pixels:
- Select "Line Composed of Pixels" and enter number of pixels in the line.
- Click in the Name field to select the pixels for the line.
- Select the first pixel and click OK.
- Assign a name to the Preview Object.
- Click OK, OK to complete channel assignment.
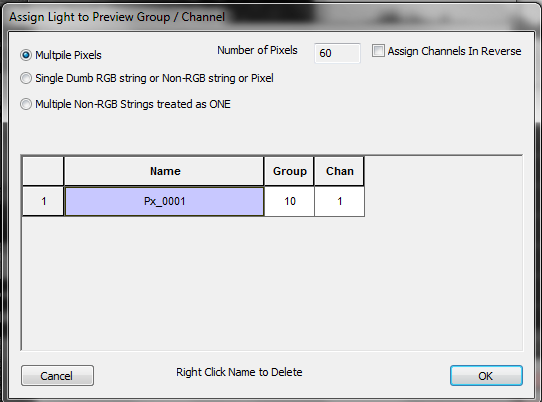
- Note: "Assign Channels in Reverse" is used if your pixels are running from right to left (for example, if power is distributed from the center).
- Video Tutorial [2]
Drawing Triangle Objects
- Triangle objects could consist of mini-trees, flood lights, or other objects.
- Select the Triangle button on the Preview Toolbar to begin drawing a triangle object.
- Left-Click the beginning point.
- Move the mouse to the second point and left-click. HLS will automatically complete the triangle shape.
- BACKSPACE will step back in the drawing.
- Once completed, press SPACEBAR to complete the triangle drawing.
- A Triangle Object window will open with statistics about the drawing.
- For Standard Christmas Lights:
- Click in the Name field to select the appropriate channel for the triangle.
- Assign a name for the Preview Object.
- Click OK, OK to complete the channel assignment.
- For Pixels:
- Select "Triangle Composed of Pixels" and enter number of pixels in the field.
- Click in the Name field to select the pixels for the triangle.
- Select the first pixel and click OK.
- Assign a name for the Preview Object.
- Click OK, OK to complete channel assignment.
Drawing Arch Objects
- Arch objects can consist of a strand of pixels or regular light segments.
- Select the Arch button on the Preview Toolbar to begin drawing an arch object.
- Left-click to begin drawing and left-click to end drawing.
- Once complete, press SPACEBAR to finish.
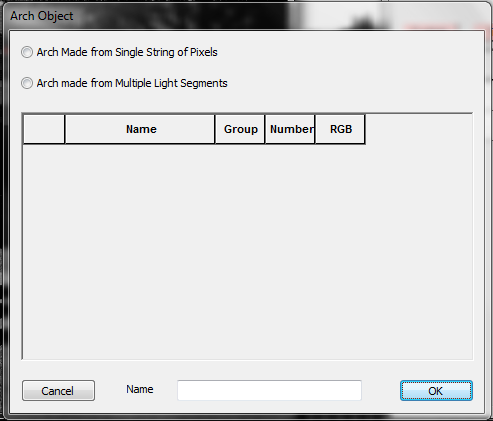
- An Arch Object window will open giving a choice to use a single string of pixels or multiple light segments.
- For Multiple Light Segments:
- Select "Arch made from Multiple Line Segments".
- In the box that appears, enter the number of segments contained in the arch.
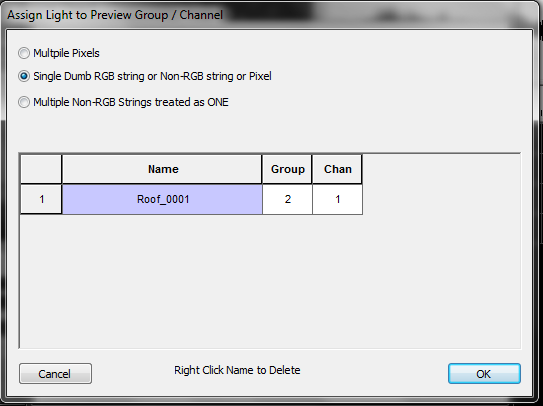
- Click each name field in the table to chose the channels that make up the arch.
- Generally, you should chose "Single Dumb RGB string or Non-RGB string or Pixel".
- Click in the name field and select the appropriate channel.
- Click Ok. Continue doing this for all arch segments.
- Assign a name for the Arch Object.
- Click OK, OK to complete the channel assignment.
- For Pixels:
- Select "Arch made from a single string of pixels" and enter number of pixels in the field.
- Click in the Name field to select the pixels for the arch.
- Select the first pixel and click OK.
- Assign a name for the Arch Object.
- Click OK, OK to complete channel assignment.
- Video Tutorial for Arches[3]
Drawing MegaTree Objects
- A MegaTree can be composed of single color strings, mega-strings, dumb rgb strings, or pixel strings. The orientation can vary from up and down to make a pie shape, up and over, run from bottom to top, run from top to bottom, etc. It's important to understand how HLS can represent mega-trees when planning the physical display.
- HLS will always draw a megaTree as a 360° tree. The orientation will always start with the first strand at the 9 o'clock position and work in a Counter Clockwise direction. The strings must run in one direction: bottom-top or top-bottom. Default is Bottom to top. To go the other direction, select "Run in reverse" when assigning channels.
- Drawing a MegaTree:
- Open the Preview and load or create a Preview window.
- Select Tree from the menu and left click to start drawing. Left-click again to end drawing.
- Press SPACEBAR to complete drawing tree.
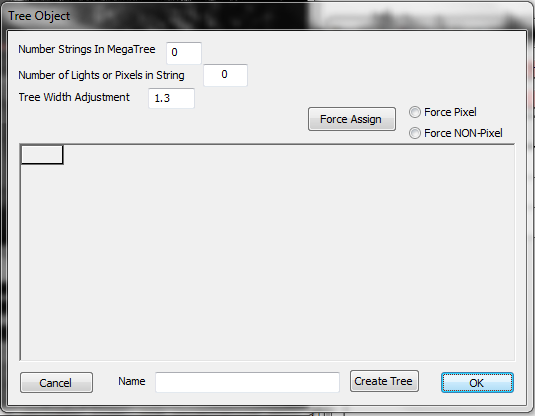
- The Tree Object window will appear.
- Single Color megaTree:
- Once tree is drawn, enter data into the Tree Object window to assign channels to the tree.
- Enter number of strings, and number of bulbs in each string.
- At the bottom of the window, name the tree, and click Create Tree.
- Select the first position on the tree and select the first string. Click OK.
- Select "Force Non-Pixel", and press "Force Assign". This will assign each additional string to the next position on the tree (As long as they are all in sequential groups).
- Click OK, OK to save.
- Pixel MegaTree:
- Before drawing tree, begin by setting up pixel strings on a Pixel Plane.
- Once tree is drawn, enter data into the Tree Object window to assign channels to the tree.
- Enter number of strings, and number of pixels in each string.
- At the bottom of the window, name the tree, and click Create Tree.
- Select the first position on the tree and select the first node on the first string. Click OK.
- Select "Force Pixel", and press "Force Assign". This will update all other points on the tree to reflect the strings previously setup.
- It is at this time to select "Run in reverse" if your strings go from top to bottom.
- Click OK, OK to save.
- How to handle trees that are 180°, 270°, etc.:
- HLS always makes a tree 360° To use a different angle, you must set the strings that are unwanted to not be displayed. You do this by assigning their Preview Group to 0. Then, do not assign physical channels to them. This allows other tree angles to work both in the preview and the physical display.
- HLS always makes a tree 360° To use a different angle, you must set the strings that are unwanted to not be displayed. You do this by assigning their Preview Group to 0. Then, do not assign physical channels to them. This allows other tree angles to work both in the preview and the physical display.
- Video Tutorial [4]
Drawing Custom Objects
- Custom objects are free-form drawings that can take on any shape. Some examples would include candy canes, snowflakes, custom light objects, etc.
- Drawing a Custom Object:
- Open the Preview and load or create a Preview window.
- Select Custom from the menu and left click to start drawing. Left-click again to end drawing.
- Press SPACEBAR to complete drawing.
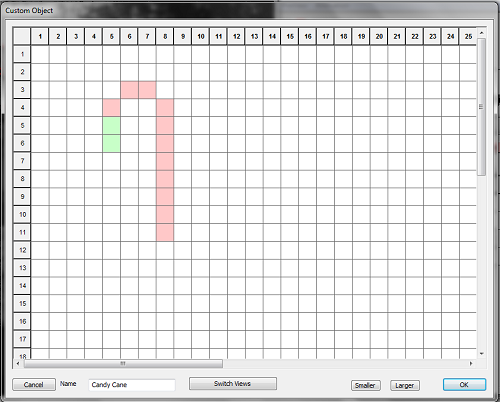
- The Custom Object window will appear.
- Drawing and Assigning Channels to Custom Objects:
- Begin drawing the object in the window. Left-clicks fill in a square. Left-click again to remove.
- Right-click a square to assign a channel.
- An unassigned square will be red; a square with an assigned channel will be green.
- Name the custom object and hit OK.
Drawing Mega-strings as one display object
- Setting up "mega-strings" as a single display item:
- Mega-strings are up to four strands of single-color lights that operate as one, such as a window outlined in R,G,B,W).
- Assign colors as normal. Place all colors into the same Preview Group and assign Preview Numbers.
- Select Manage Channels -> Set Display Group to Work On, then select your mega-string display group and select OPEN.
- This will open the channels in the sequence window.
- Open Preview
- Draw Object as described in previous sections.
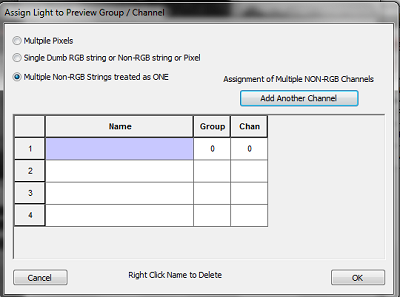
- Once you press SPACEBAR, Assign lights to the preview, as seen in above picture.
- Select "Multiple Non-RGB Strings treated as ONE".
- Press "Add Another Channel" until you have the number of channels for your megastring (maximum 4).
- Assign the channels to the preview.
- Joe's video on mega-strings: [5]
How to "Draw Once, Use Everywhere"
- The value of the Preview is truly realized by setting it up once, then using it for all of your sequences. You can do this through the Display Groups.
- Always have ONE display group per element that is never duplicated elsewhere. The number goes to 5000, so feel free to space it out if needed.
- When opening the preview, simply "Pick Preview" to select a preview you have already set up.
Stepping Through a Sequence with Display Preview
- It is possible to step through a sequence using the display preview frame by frame.
- Tip: To use these commands, the main window GRID must have "window focus", not the preview window. So, the preview window stays visible on top, but you click the main window to give it "focus".
- On the top menu, select Preview->Select Preview Control File and select the preview file you want to use.
- Check "Sigle Step" and "Display Preview" checkboxes.
- Use the Right Mouse on the Ruler to set your RED marker.
- With the GRID in focus (NOT the Preview Screen):
- ZERO key will start the Preview Time line at the RED Mark.
- NINE key will advance the time tic by one.
- EIGHT key will decrement the time tic by one.
Next: Adding a Beat Track
