Creating and Using PixelPlanes:
Creating and Using PixelPlanes
Creating a PixelPlane
What is a PixelPlane?
A PixelPlane is a grouping of pixels into a single channel that can be sequenced with complex effects on a macro level. By using PixelPlanes, HLS is able to completely remove the low-level complexity and allows the user to treat a large amount of channels as if they are one. Anyone sequencing with lots of pixels, using external programs like nutcracker, or looking for additional ways to "handle" pixels would benefit from this feature of HLS.
VIDEO: Joe describes a PixelPlane and creating a PixelPlane in his HLS 2013 Intro video
How to Create a PixelPlane
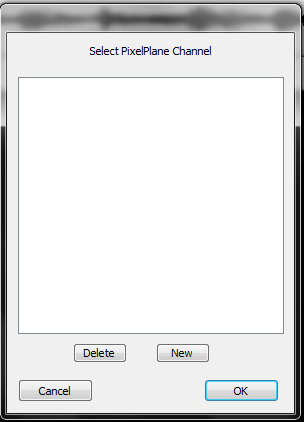
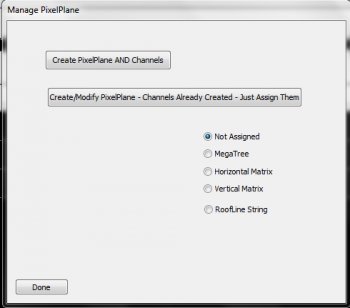
- First, open the PixelPlane Manager (Manage Channels -> Manage PixelPlane Channels).
- In the Select PixelPlane Channel window, press the NEW button to create a new PixelPlane (See Figure 6-1).
- The Manage PixelPlane window will open (See Figure 6-2). Click Create PixelPlane AND Channels.
- Note: In the past, PixelPlane Channels were first created in the regular Channel Manager. They are now created here. If you have already created channels (in the old way), or are importing from another file and want to convert channels to a pixel plane, select Create/Modify and select your channels manually and then save the changes.
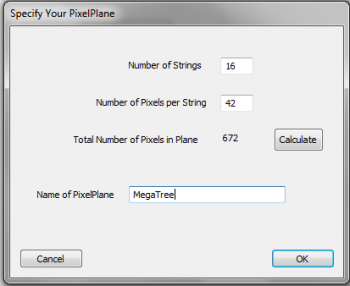
- The Specify Your PixelPlane window will open (See Figure 6-3).
- Enter the number of strings in your PixelPlane, the number of pixels per string, and then press the calculate button. (In the example used, 16 strings of 42 pixels were entered, which equals 16*42=672. Note that this is the number of PIXELS, not the number of CHANNELS.)
- Name your PixelPlane and click OK.
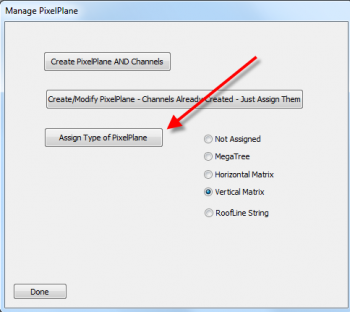
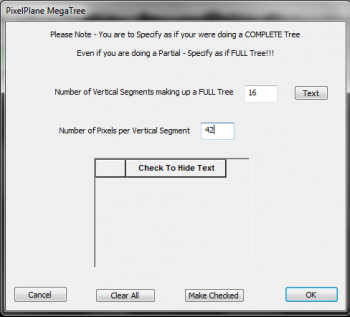
- Once you have created/named your pixelplane, a new button will appear to assign your pixels to a PixelPlane object (see Figure 6-4).
- If you select Vertical Matrix, a dialog box will open confirming you have assigned your pixels to a Vertical Matrix PixelPlane object.
- If you select MegaTree, a window will open for you to complete some information to help HLS understand your tree setup (see Figure 6-4b).
- Note: Currently, only "Mega Tree" and "Vertical Matrix" are supported.
- Press Done to close the window. Your PixelPlane has now been created.
Assigning Channels/Universe to PixelPlane
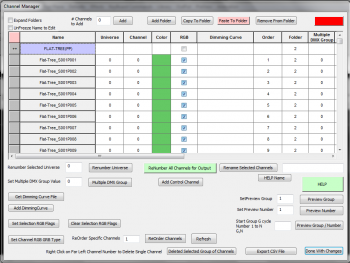
- To assign OUTPUT Universe and Channels to your PixelPlane object, go to the channel manager (Manage Channels -> Manage Raw Channels). (See Figure 6-5)
- When adding your PixelPlane, HLS will automatically create a Folder and place all of the related pixels into that folder. To open or collapse the folder contents, simply click on the folder name.
- Note: HLS PixelPlanes will already have an assigned "color," which is Green. This is just a representation color for PixelPlanes, and does not reflect an actual output color.
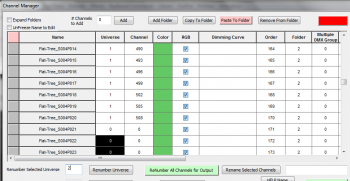
- By default, HLS will not assign DMX universes or output channels to your PixelPlane.
- FIRST, ensure your pixels are in the correct order.
- Highlight the first 170 HLS PixelPlane channels of your object and assign the DMX Universe Number by entering the number and selecting Renumber Selected Universe.
- Tip: Remember that Pixels contain 3 physical channels in each (R,G,B). A DMX universe can contain 512 channels. No single pixel can be split across a universe (unless using Multiple DMX), so only 510 can be used in a single universe. 510/3 = 170. Therefore, after every 170 pixels, you must use a new universe number.
- When done with Universe assignment, click Renumber Channels for Output to complete the channel assignment process.
- In the example of Figure 6-6, the first 170 HLS channels have been assigned to DMX Universe 1. For demonstration purposes, the Renumber all channels for output button was pressed, which then assigned that DMX Universe to physical channels. The next 170 pixels are now highlighted and ready to be assigned to DMX Universe 2.
Displaying a PixelPlane in the Sequencer Window
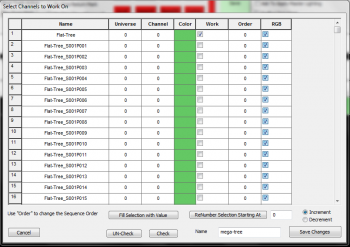

- Just like with any HLS channels, you must assign the PixelPlane to a Display Group to be able to work on it.
- Click Manage Channels -> Select Channels and Assign to Display Group. Click NEW to create a new group.
- Note: Do not add the actual pixel channels to the display group. ONLY add the one PixelPlane channel. (See Figure 6-7)
- Then, set the Display Group to the PixelPlane group to begin working on it (Manage Channels -> Select Display Group to Work on). It will show as a single channel. (See Figure 6-8)
- Note: Review Configuring Display Groups for more detailed instructions.
Sequencing Effects on a PixelPlane
Like any RGB channel, PixelPlane channels can have effects placed on them. You can do basic effects, such as Level, Ramp Up, and Ramp down. you can also do custom effects to the entire PixelPlane. These effects will globally change the entire pixel object.
As an example, you could add a ramp UP effect to a PixelPlane MegaTree. This would cause the entire tree to fade up from 0-100.
However, simple effects and even custom effects on an entire pixel object cannot fully utilize the power that can come with using the built-in PixelPlane Editor, which can generate a customizable library of effects. HLS also supports dropping in effects from third party applications, such as effects built with Nutcracker.
The PixelPlane Editor
Current as of Version 12Z.
Introduction to the PixelPlane Editor
The PixelPlane Editor was introduced in Version 12A of HLS. This Editor allows the user to apply a variety of complex and customizable effects to an entire pre-defined PixelPlane object. This document will cover how to use the PixelPlane Editor and apply effects in a sequence. There are sub-pages to address how to apply effects to various PixelPlane objects. First, you must create the PixelPlane before adding these effects.
Activating the PixelPlane Editor
To activate the PixelPlane Editor, you must Right-Click in the grid cell of the PixelPlane you are editing.
- Tip: You don't have to have the exact grid cell you want to start the effect in, but you probably want to be around the right area. You can adjust the starting cell and the length of the effect later.
- When you right-click, select Add HLS Custom PixelPlane Effect from the menu that opens.
- This will open the PixelPlane Editor.
Window Layout and Explanations
Figure 6-9 is the layout of the PixelPlane Editor when editing a MegaTree pixel object. Description of the highlighted areas and what they mean follows. These will each be explained in detail further in this document.
- Assigned Effects: The areas at the top highlighted in Purple show the PixelPlane effects that have been created for the PixelPlane. The current effect being added or modified appears green. Any other PixelPlane effects will appear in blue while in PixelPlane Editor.
- Animation window: The large, black area highlighted in blue is the animation window where the effect you are working on will appear. This will give you a good idea as to what your effect will look like live. Toggle the Animate the Effect checkbox to turn this on and off.
- Effect Category: The pull-down selection menu highlighted in blue (and that reads "Spiral") is where you select from the categories of effects that HLS has built-in for MegaTrees.
- Frame Count shows the frames that the sequencer will generate for your effect.
- Assign Channels to Pixels: Use this to tell HLS how your pixels are arranged on your MegaTree.
- Single Step: Step through the effect one frame at a time.
- Reset: Reset the animation/effect back to frame 1.
- Select Beat Track: Assign a beat track to be used with other beat track features of the editor.
- Enable Beat Track: Check this to turn on the beat track features.
- Effect Customization: The section highlighted in Yellow is used to customize the selected MegaTree effect. Each type of effect has it's own customization options, which will change based on which effect is chosen.
- Color Selection: The area highlighted in Red is used to select the colors used with the effect. A few or several colors can be used.
- Select Existing Effect to Use: This button is to open an effect that you have previously created in the editor.
- Random Color: Use random colors with the effect.
- Text: The area highlighted in Orange controls text generation.
- Beat Track: Lock Rotation and Flash Pixels at Beat Track are used to tie the effect into the previously assigned beat track.
- Create/Replace Effect: Pressing this button will create the effect. If you have not entered a new name, your previously named effect will be overwritten.
- Name of this Effect: The name associated with the effect.
Using Colors with Effects
Color for effects can be one of two types:
- Solid colors
- Color Shifts from one color to another along the color wheel.
- These two types can be used
The Solid Colors are the six blocks of colors along the top row. These can be changed by left-clicking a color. A Color Picker window will open allowing you the ability to change the color. When the radio button next to these colors is selected, you will be using that solid color.
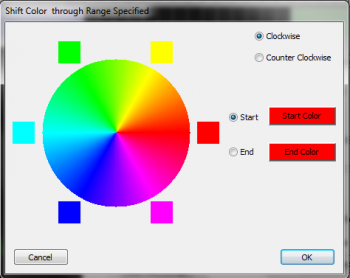
The Color Shift colors are the sets of color blocks along the second and last rows. These can be changed by left-clicking the first color block. A color wheel will open (See Figure 6-11). Choose the starting color and the ending color by selecting one of the squares along the wheel. In the effect, this will cause a "color shift" from the start color to the end color, all along the color wheel. You can even choose the same start and end color to shift the entire spectrum of color. Select clockwise or counter-clockwise to set the direction to move along the color wheel.
The checkbox at the bottom of each column tell HLS whether you want that color active. You can have a total of six active colors or color shifts.
The Color Shift slider tells HLS whether you want the color shift to slide through the PixelPlane object. If this is set at 0, the colors will remain stationary. If you move it up, the colors will begin sliding through the object.
The Random Color checkbox will apply the effect with random color assignment.
Using a Beat Track with a PixelPlane
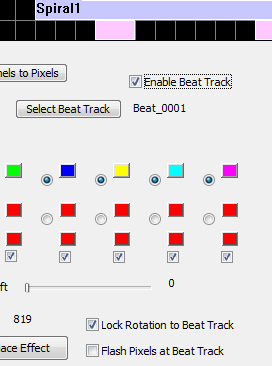
The power of the built-in HLS PixelPlane Editor is truly revealed when syncing the generated effects with the sequence music. There are two types of synchronization:
- Syncing a rotation with a beat track or pre-determined mark.
- Syncing a flashing effect with a beat track or pre-determined mark.
Syncing Rotation or Flash:
- Click the Select Beat Track button and choose a beat track or other reference track.
- Click Enable Beat Track to display the beat track along with your PixelPlane effect.
- At this point, you can adjust the start and end points of your effect to fit alongside beats if you desire.
- Select Lock Rotation to Beat Track or Flash Pixels at Beat Track to sync up effect with track.
- Click Create/Replace Effect to generate the sequence data.
- Click Done to exit the editor.
Assigning Channels to Pixels
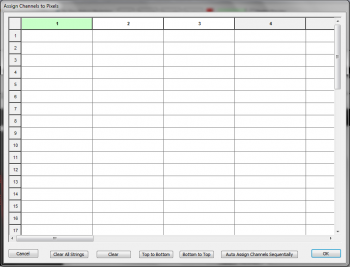
- HLS needs to understand how your pixels are arranged on your PixelPlane object to be able to correctly assign pixels to positions. To do this, HLS has an Assign Channels to Pixels button in the PixelPlane Editor.
- Click the Assign Channels to Pixels button from the PixelPlane Editor.
- Figure 6-13 will appear.
- This grid contains the layout of your PixelPlane object. The Columns represent the strands of pixels, and the rows represent the pixels in each strand. This is defined when you setup your PixelPlane object.
- Note: Notice that the first column is green. Left-click on the first column header to select it. You must do this before any channel assignment can take place.
- The buttons at the bottom serve specific purposes:
- Cancel: Cancels the Pixel Assignment window.
- Clear All Strings: Clears any previously set strand assignment.
- Clear: Clears a specific string.
- Top to Bottom: Means your strings are arranged with the first pixel at top and last pixel at bottom.
- Bottom to Top: Means your strings are arranged with the first pixel at bottom and last pixel at top.
- Auto Assign Channels Sequentially: Once the first string is assigned, this will complete the rest of the string assignment.
- OK: Save changes and close.
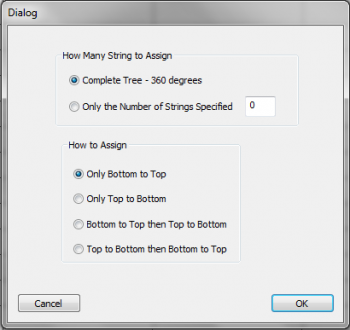
Auto Assign Channels Sequentially:
- To Auto Assign Channels, first, make sure the header for string 1 is selected (it will be green).
- Click Auto Assign Channels Sequentially.
- Figure 6-14 will appear.
- Choose whether to complete the whole tree, or, if using less than a full tree, fill in the number of strings you will be using.
- Choose how your pixels will be physically arranged on the object.
- Click OK.
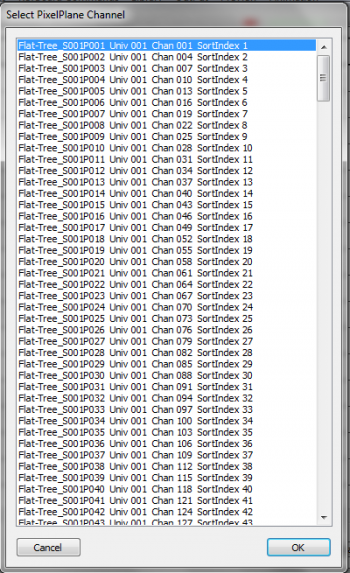
- Figure 6-15 will appear. Select the First String, First Pixel.
- Click OK.
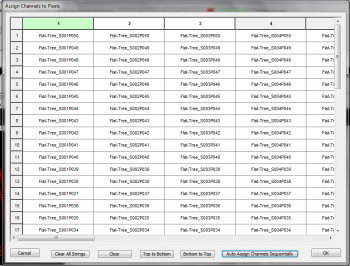
- The Channel Assignment grid will once again appear (See Figure 6-16).
- Channels will now be auto-assigned based on your settings.
- Click OK to complete assignment.
- Tip: HLS will remember this assignment for any additional PixelPlane effects that you generate in the sequence.
Naming the PixelPlane Effect
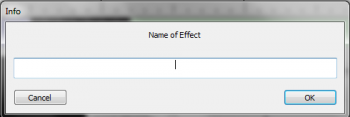
- PixelPlane effects must be named before they can be generated into a sequence.
- To name your PixelPlane effect, click the Name of This Effect button.
- Figure 6-17 will appear.
- Type in the name of your effect and hit OK. The assigned name will update to the new name.
- Note: When you add an additional effect, it will automatically be set for the last assigned name. You must change the assigned name if you do not want your saved effect being overwritten in the editor.
Generating the PixelPlane Effect
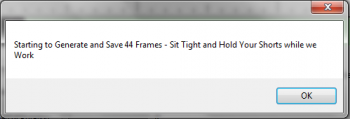
- An effect will not be created until you click the Create/Replace Effect button.
- When you click that button, HLS will begin to generate the frames needed to place the effect into the sequence.
- Figure 6-18 will appear. Depending on the number of frames to generate (see the frame count for your effect), this may take time to complete.
- As the frames are generated, the animation window should update.
- When complete, press DONE to exit the PixelPlane Editor.
Modifying PixelPlane Effects
Modifying Effect Content:
- To modify an existing PixelPlane effect, right-click on the effect and chose, Modify This Effect.
- This will open the PixelPlane Editor.
- From the editor, you can change any of the effect settings that were previously created.
- When complete, click the Create/Replace Effect button to re-generate the edited effect.
- Click Done and OK to close the editor window.
Moving/Resizing PixelPlane Effects:
- Unlike regular channel effects, you can only move or resize PixelPlane effects created with the editor while the editor is open for that effect.
- To move or resize the effect, right-click on the effect and chose, Modify This Effect.
- From the editor, you can click on the first cell and drag to move the start point.
- You can click on the last cell to shrink or expand the pixel effect.
- When complete, click the Create/Replace Effect button to generate the needed frames for the new length of the effect.
- Click Done and OK to close the editor window.
Re-Using a PixelPlane Effect
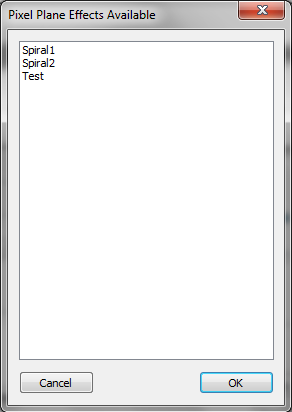
- To re-use a previously created PixelPlane effect, Right-Click in the sequencer window on the PixelPlane channel and choose Add HLS Custom PixelPlane Effect.
- Figure 6-19 will appear with a list of all previously saved PixelPlane effects.
- Select the effect you want and click OK.
- Make any needed adjustments, then click Create/Replace Effect to generate the frames into the sequence.
PixelPlane Objects with Predefined Effects
HLS has a set of predefined effects for some PixelPlane objects:
The PixelPlane Editor: Creating Effects
Introduction
The PixelPlane Editor has a number of effects that can be created for various PixelPlane Objects. This page contains all of the possible effects and explanations of how to use them.
For explanation purposes, the effects are categorized in four groups:
- Whole Object Effects: Generate effects that light the entire (or almost entire) PixelPlane Object.
- Particle Effects: Effects composed of drawn particles which can be manipulated on the PixelPlane Object.
- Text Effects: Scrolling text on the PixelPlane Object.
- Image Effects: Generate images displayed on the PixelPlane Object.
Some of the effects are not usable for every PixelPlane Object. Each effect contains a listing of the Objects that it can be applied to.
Whole Object Effects
Bars (Horizontal)
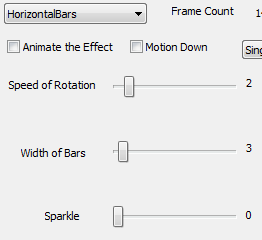
A Horizontal Bar effect creates horizontal bars that slide up or down the PixelPlane Object.
- Use With: MegaTree, Vertical Matrix.
Options to Customize a Horizontal Bar Effect:
- Motion Down: Move bars down instead of up.
- Speed of Rotation: How fast should the bars move up/down (lower numbers mean faster).
- Width of Bars: How wide the bars should be. This will also determine the number of bars that appear on the object.
- Sparkle: Add random sparkling pixels to the effect.
Bars (Vertical)
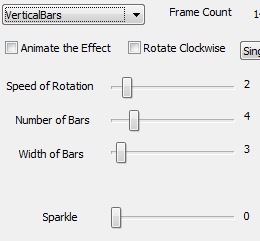
A Vertical Bar effect creates vertical bars that move across or around the PixelPlane Object.
- Use With: MegaTree, Vertical Matrix.
Options to Customize a Vertical Bar Effect:
- Rotate Clockwise: change rotation direction.
- Speed of Rotation: How fast should the bars move (lower numbers mean faster).
- Number of Bars: The number of bars to move vertically. Each additional bar will add a new color (max 6). Additional bars after that will repeat the color additions.
- Width of Bars: How wide the bars should be.
- Sparkle: Add random sparkling pixels to the effect.
Diagonal
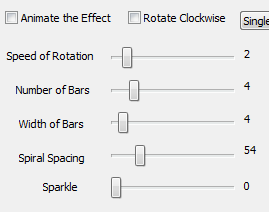
A Diagonal effect creates diagonal stripes that move across the PixelPlane Object.
- Use With: Vertical Matrix.
The Options to customize the Diagonal Effect:
- Rotate Clockwise: change rotation direction.
- Speed of Rotation: How fast should the Diagonal lines slide.
- Number of Bars: The number of bars on the diagonal. Each additional bar will add a new color (max 6). Additional bars after that will repeat the color additions.
- Width of Bars: How wide the bars should be.
- Diagonal: Angle of diagonal lines.
- Sparkle: Add random sparkling pixels to the effect.
Particle Effects
Fireworks
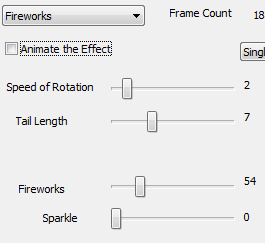
A Firework effect creates fireworks that streak down the PixelPlane Object. These are exactly the same as meteors, except when sparkle is applied. When it is applied, it will randomly "explode" the firework.
- Use With: MegaTree, Vertical Matrix.
Options to Customize a Firework Effect:
- Speed of Rotation: How fast should fireworks fall (lower numbers mean faster).
- Tail Length: Length of the tail of the firework.
- Fireworks: Firework density.
- Sparkle: Add random sparkling to the head of the firework. Unlike Meteor, Fireworks sparkles "explode" the head of the meteor.
Meteors
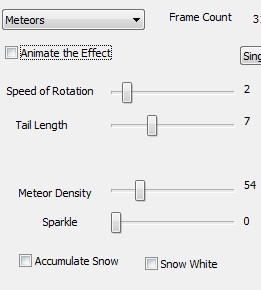
A Meteors effect creates random meteors that streak down the PixelPlane Object.
- Use With: MegaTree, Vertical Matrix.
Options to Customize a Meteor Effect:
- Speed of Rotation: How fast should the meteors fall (lower numbers mean faster).
- Tail Length: Length of the tail on the meteor.
- Meteor Density: How dense the "meteor field" should be.
- Sparkle: Add random sparkling pixels to the head of the meteor. Only the head will sparkle.
Snow
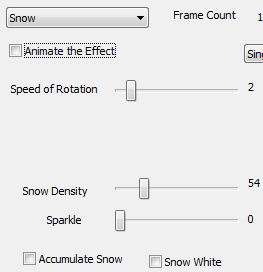
A Snow effect creates random snowing of randomly colored pixels on the PixelPlane Object.
- Use With: MegaTree, Vertical Matrix.
Options to Customize a Snow Effect:
- Speed of Rotation: How fast should the snow fall (lower numbers mean faster).
- Snow Density: How dense the snowfall should be.
- Sparkle: Effects how many snowflakes are white. To have all white snow, turn it up very high.
- Accumulate Snow: As snow falls, have it accumulate at the bottom of the tree.
- Snow White: Sets all accumulated snow as white, no matter what color it was when falling.
Text Effects
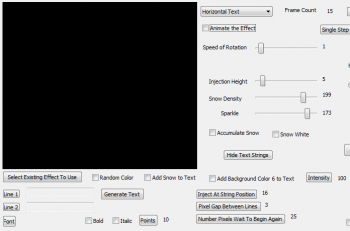
A Horizontal or Vertical text effect displays text that moves across the PixelPlane Object either horizontally or vertically.
- Use With: MegaTree, Vertical Matrix.
Options to Customize a Horizontal or Vertical Text Effect:
- Click Line 1 to enter text to display.
- Click Line 2 if you wish to enter a second line of text.
- Click Font to assign a font and size to the text display.
- Special note on Text with a MegaTree: Strings are oriented with string 1 in the 9 o'clock position. The numbering goes in a COUNTER-clockwise direction. Therefore, the FRONT of the tree will start at the 9 o'clock position and end at the 3 o'clock position. So, you want the "injection position" to be the END of the FRONT of the tree, and HIDE the back strings. Therefore, you will inject at your 3 o'clock position. So, for a 32 string tree, inject at string 16 and high 17-32. This will start text at the right end of the tree and run it "clockwise" towards the 9 o'clock position, String 1.
- Special note on Text with a Vertical Matrix: Strings are oriented with string 1 in the left-most position. So, you most likely want the "injection position" to be at the right-most string position, so that the text will start at the right of the matrix and run to the left across the matrix.
- Inject at String Position: This sets the first string for the text to begin drawing on.
- Pixel Gap between lines: This sets the amount of "dead pixels" between the two lines of text.
- Number Pixels Wait to Begin Again: Amount of "dead pixels" to scroll before the text appears again.
- Speed of rotation: How fast the text will move on the PixelPlane Object.
- Injection Height: This sets the height of where the text will display.
- Snow Density: This controls the amount of snow to appear with your text. (Must Check "Add Snow to Text")
- Sparkle: This adds a sparkle effect to the text.
- Add background color 6 to text: This will add the 6th color as background behind the text. The intensity field controls how bright that color is displayed.
- Note: You must click the Generate Text button before it will display in the animation window. Any changes made to text REQUIRE the generate text button to be pressed again.
Hide Text Strings:
- This allows you to turn off certain strings in a PixelPlane Object, such as the back of a MegaTree for text generation.
- Click the button and then check which channels are on the back of the tree. That will keep the text only showing on the front strings.
Image Effects
Animated GIFs
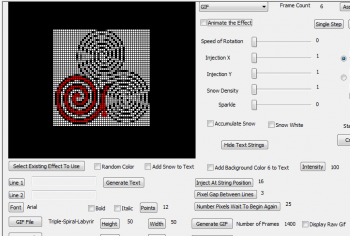
A GIF effect generates an animated GIF file that is displayed on the PixelPlane Object.
- Use With: MegaTree, Vertical Matrix.
Options to Customize a GIF Effect:
- Speed of Rotation: How fast the GIF should move between frames.
- Injection X, Y: Coordinates of where you want the image to be generated (Top-left would be 1,1).
- Sparkle: Add random sparkling to the GIF.
Selecting the GIF:
- Click the GIF File button and open your desired GIF file.
- Click the Height and Width buttons to let HLS know the dimensions to use when drawing the file on the PixelPlane Object.
- Click the Generate GIF button to complete setting up the file. Any changes to the file will require pressing the Generate GIF button again.
- HLS will output the number of animation frames included in the GIF file.
- Display Raw GIF will display the actual animated GIF file rather than the generated animation as it will appear in your PixelPlane Object.
Bitmap (Horizontal/Vertical)
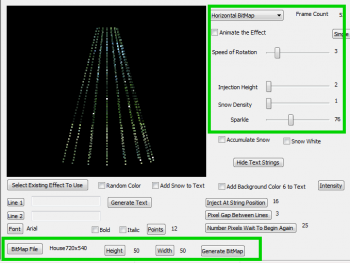
A Horizontal or Vertical Bitmap effect generates a bitmap file that scrolls across the PixelPlane Object horizontally or vertically.
- Use With: MegaTree, Vertical Matrix.
Options to Customize a Bitmap Effect:
- Speed of Rotation: How fast the bitmap should rotate horizontally or slide vertically.
- Injection Height: What height (in pixels) to start the bitmap.
- Sparkle: Add random sparkling to the bitmap.
Selecting the Bitmap:
- Click the Bitmap File button and open your desired bitmap file.
- Click the Height and Width buttons to let HLS know the dimensions to use when drawing the file on the PixelPlane Object.
- Click the Generate Bitmap button to complete setting up the file. Any changes to the file will require pressing the Generate Bitmap button again.
Using Nutcracker with a PixelPlane
Introduction
Nutcracker is a pixel effect building system developed by Sean Meighan which is cross-platform with a number of sequencers, including HLS. In February 2013, Nutcracker 3.0 was released, which moved from a web-based application to a software-based version in conjunction with xLights. The use of nutcracker is beyond the scope of this document, but you can read more at the following links:
- Download Nutcracker, view tutorials, etc.
- DIYC Wiki Documentation on Nutcracker
- DIYC Subforum on Nutcracker
Nutcracker Setup for HLS
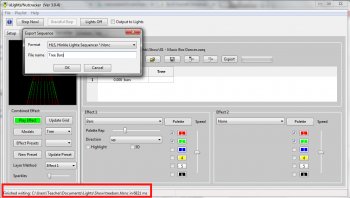
- When you configure Nutcracker, you should consider setting up the Pixel objects with the same configuration as your physical objects (ie, pixel count, strands, etc). HLS will utilize Nutcracker effects built for objects with different characteristics, but you will get more desired results from matching up configurations.
- Nutcracker exports to hlsnc files. Basically, once you have created your effect, click Export in nutcracker, choose HLS, name your effect, and click OK.
- Tip: Notice where Nutcracker is saving the export file by looking at the bottom of the window (see Figure 6-28 red highlight).
- This folder is set by clicking File -> Select Show Folder in Nutcracker/xLights.
Dropping a Nutcracker Effect Onto a PixelPlane
- Set the active display group to the one containing the PixelPlane you wish to drop the Nutcracker effect onto.
- Right click on the cell you wish to start the external effect, then select Add External PixelPlane Effect.
- A file dialog box will open. Navigate to the file exported by Nutcracker, select it, and click Open.
- The effect will be inserted into your sequence with the length that was created in the Nutcracker program.
- Note: If there are any previously created effects that occur before the nutcracker insert would end, HLS will stop the nutcracker effect early and butt it up to the next effect.
Using Start/Stop Markers for Adding Nutcracker Effects

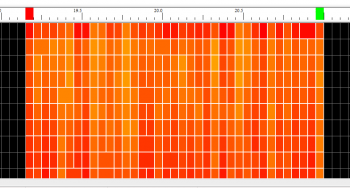
- This method is used to add nutcracker effects to pixels or RGB channels that may not be in a formalized PixelPlane object.
- First, set the display group to be the channels you wish to add the effect to.
- Set start and end marks, which tell HLS how many cells to fill with the effect (see Figure 6-29).
- Right-click to set the start mark (red), and CTRL-Right-Click to set the end mark (green).
- Click Pixel Plane -> Drop External Pixel Plane Effect Onto RGB Channels.
- HLS will give a couple prompts about making sure your settings are correct. Then, select your Nutcracker export file and click Open.
- You will be prompted to make sure Start and Stop marks are set properly. Since you have already done this, click Yes.
- The effect will now be dropped onto the active channels within the start and stop marks (see Figure 6-30).
Adjusting the Size of a Nutcracker Effect
- Use good planning when creating your effects in nutcracker so that they are as long as you may need. It is easy to shorten the effect, but not lengthen it (without adjusting speed).
- Make your pixelplane channel with the nutcracker effect active.
- Just like any other effect, click the last cell in the effect and moving it in or out to shorten/lengthen.
Note: Once you reach the length of the effect data, it will no longer stretch.
- Just like any other effect, you can move its starting point by clicking the first cell and moving it.
Adjusting Speed of a Nutcracker Effect
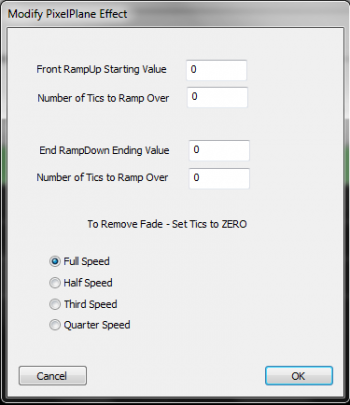
- Sometimes, the nutcracker effect may move at a speed that may be too fast or slow for your sequence.
- To adjust the speed, right-click on the effect and select Modify this Effect (see Figure 6-31).
- You can add ramp values if you wish to start from one intensity level, bring the effect up, then bring the effect down.
- Ex.: To ramp up from 10% to 100% over a 5 cell time, set ramp up to 10, and tics to 5.
- Speed can be adjusted by selecting one of the speed choices.
- Tip: A slower speed means that the effect can now be lengthened to last a longer period of time.
- Once done, click OK.
Fill Channels
Fill Channels are designed to work with custom effects, such as the Pixel Plane. A Fill channel is a channel that "fills in" the background of pixel plane effects. This allows the opportunity to add background fill without messing up the complex effects that you have created. When a Fill Channel is activated, it will ONLY turn on when your PixelPlane effect is displaying. And it will ONLY light the OFF pixels.
VIDEO: Joe describes Fill Channels in his 2013 Intro video
Setting up a Fill Channel:
- Open the Fill Channel Manager: Manage Channels -> Manage Fill Channels
- Click New and assign a channel to function as a fill channel.
- Add the fill channel and your PixelPlane channel to the same display group.
- Add background effects to the fill channel. These can be different colors, fades, etc.
Engaging a Fill Channel:
- A Fill Channel must be engaged for it to show up.
- In the main window, click Ask to Apply Master Lighting.
- When you hit PLAY, the Master Lighting window will open. You don't need to check anything. Just click OK.
- Your fill channel will now be active and will display when PixelPlane effects are playing.
Video:
PixelPlane Transitions Using Lighting Channels
Transitions between PixelPlane effects by fading out one effect and fading in another, will add a clean and professional look to your musical sequence. HLS can apply fades to complex sequence components by using Submaster Lighting Channels.

- Follow the steps in Submaster Lighting Channels to setup a new Submaster Lighting Channel and to Associate it with your PixelPlane channels.
- Note: You will have to highlight and check all of the pixelplane object channels directly. The PixelPlane group channel will not appear in the lighting manager channel selection window.
- Add your PixelPlane object and the lighting channel to the same Display Group.
- Add a Ramp Up at the beginning of the effect and a Ramp Down at the end of the effect.
- Figure 6-32 shows two PixelPlane effects. There is a Ramp Up into the first effect, a Ramp Down at the end, and a Ramp Up to the next effect.
- Ensure the lighting channel is active to turn the ramps on.
- Note: Submaster Lighting Channels will ONLY affect grid cells where the lighting channel effect value is greater than zero. In other words, if there is no effect on the lighting channel, the associated channels will run their effects normally. They will only be affected by the lighting channel in those cells where you have applied effects to the lighting channel. (As in the figure above, where there is no effect on the lighting channel between ramps, the effects run normally.
Drawing a PixelPlane in the Display Preview
Note: Be sure to read the section on Creating a Display Preview to get an understanding of how Display Previews work and how to set it up. While this will cover the steps for a PixelPlane, it is assumed that you have an understanding of the basics.
Assigning Your PixelPlane Object to a Preview Group:
- Open the Channel Manager (Manage Channels -> Manage Raw Channels).
- Open your PixelPlane object by clicking its folder.
- Highlight all of the PixelPlane channels.
- In the Preview Group/Number bulk renaming field, enter your starting group, followed by a comma, followed by the number of pixels in each string.
- Example: A MegaTree with 16 strands of 50 pixels each would be entered as 1,50. This would number each string to its own display group.
- Click Done with Changes.
Drawing the PixelPlane Object:
- Open your Preview (Preview -> Edit New Preview). Then, select Pick Preview and select your preview file and click Ok.
- In the Preview Toolbar, click the button that represents your PixelPlane object.
- Draw the object in the window and press Spacebar.
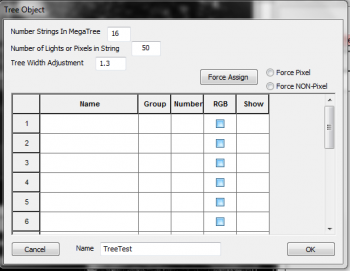
- Figure 6-33 will appear.
- Enter the number of Strings in your object.
- Enter the number of lights or pixels in each string.
- Enter a name for the object.
- Click the create button.
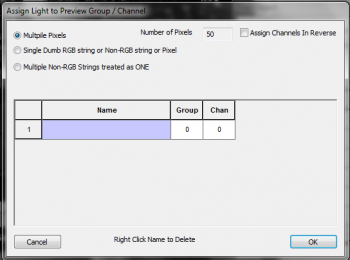
- Now you must assign your pixel strings to the appropriate preview strings.
- Click in the name field of string 1.
- Figure 6-34 will appear.
- Select Multiple Pixels
- The Number of Pixels field will automatically be filled.
- Click "Assign Channels in Reverse" IF your strings run in reverse.
- Click in the blue name field.
- In the window that opens, select the first string, first pixel.
- Click OK to close the Assign Light window.
- In the Object window, Select Force Pixel and then click Force Assign.
- Click YES to the dialog box.
- This will load all additional pixels and strings.
- To verify correct loading, you can now left-click in the show box to see the string light up in the visualizer window.
- Click SAVE to save the preview.
- Close the preview.
- Note: Follow directions in Creating a Display Preview to set a display preview as active and view your sequence while running it.