Drawing a PixelPlane in the Display Preview: Difference between revisions
Jump to navigation
Jump to search
No edit summary |
No edit summary |
||
| (5 intermediate revisions by 2 users not shown) | |||
| Line 1: | Line 1: | ||
'''Note:''' Be sure to read the section on [[Creating a Display Preview]] to get an understanding of how Display Previews work and how to set it up. While this will cover the steps for a PixelPlane, it is assumed that you have an understanding of the basics. | '''Note:''' Be sure to read the section on [[Creating a Display Preview]] to get an understanding of how Display Previews work and how to set it up. While this will cover the steps for a PixelPlane, it is assumed that you have an understanding of the basics. | ||
| Line 18: | Line 17: | ||
*Draw the object in the window and press Spacebar. | *Draw the object in the window and press Spacebar. | ||
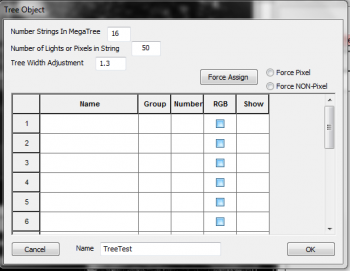
[[File:HLS_PixelPlane_Preview.png|thumb|Figure 6- | [[File:HLS_PixelPlane_Preview.png|350px|thumb|Figure 6-33]] | ||
*Figure 6- | *Figure 6-33 will appear. | ||
*Enter the number of Strings in your object. | *Enter the number of Strings in your object. | ||
*Enter the number of lights or pixels in each string. | *Enter the number of lights or pixels in each string. | ||
| Line 26: | Line 25: | ||
<br clear=all> | <br clear=all> | ||
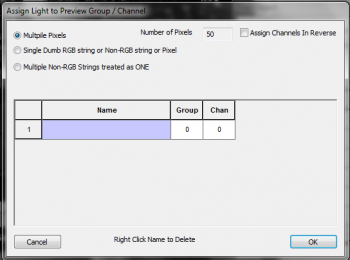
[[File:HLS_PixelPlane_Preview_AssignLights.png|thumb|Figure 6- | [[File:HLS_PixelPlane_Preview_AssignLights.png|350px|thumb|Figure 6-34]] | ||
*Now you must assign your pixel strings to the appropriate preview strings. | *Now you must assign your pixel strings to the appropriate preview strings. | ||
*Click in the name field of string 1. | *Click in the name field of string 1. | ||
*Figure 6- | *Figure 6-34 will appear. | ||
*Select Multiple Pixels | *Select Multiple Pixels | ||
*The Number of Pixels field will automatically be filled. | *The Number of Pixels field will automatically be filled. | ||
| Line 47: | Line 46: | ||
*'''Note:''' Follow directions in [[Creating a Display Preview]] to set a display preview as active and view your sequence while running it. | *'''Note:''' Follow directions in [[Creating a Display Preview]] to set a display preview as active and view your sequence while running it. | ||
<noinclude> | |||
{| class="wikitable" | |||
! colspan="3"| [[HLS User Manual and Reference Guide]] | |||
|- | |||
! align="center"|Previous Page | |||
! align="center"|Current Chapter | |||
! align="center"|Next Page | |||
|- | |||
| align="center" | [[PixelPlane Transitions Using Lighting Channels]] | |||
| align="center" | [[HLS User Manual and Reference Guide#Creating_and_Using_PixelPlanes | Chapter 6: Creating and Using PixelPlanes]] | |||
| align="center" | [[HLS User Manual and Reference Guide#Facial_Animation | Chapter 7: Facial Animation]] | |||
|} | |||
<br /> | |||
[[Category:HLS User Manual]] | |||
</noinclude> | |||
Latest revision as of 04:31, 24 March 2013
Note: Be sure to read the section on Creating a Display Preview to get an understanding of how Display Previews work and how to set it up. While this will cover the steps for a PixelPlane, it is assumed that you have an understanding of the basics.
Assigning Your PixelPlane Object to a Preview Group:
- Open the Channel Manager (Manage Channels -> Manage Raw Channels).
- Open your PixelPlane object by clicking its folder.
- Highlight all of the PixelPlane channels.
- In the Preview Group/Number bulk renaming field, enter your starting group, followed by a comma, followed by the number of pixels in each string.
- Example: A MegaTree with 16 strands of 50 pixels each would be entered as 1,50. This would number each string to its own display group.
- Click Done with Changes.
Drawing the PixelPlane Object:
- Open your Preview (Preview -> Edit New Preview). Then, select Pick Preview and select your preview file and click Ok.
- In the Preview Toolbar, click the button that represents your PixelPlane object.
- Draw the object in the window and press Spacebar.

- Figure 6-33 will appear.
- Enter the number of Strings in your object.
- Enter the number of lights or pixels in each string.
- Enter a name for the object.
- Click the create button.

- Now you must assign your pixel strings to the appropriate preview strings.
- Click in the name field of string 1.
- Figure 6-34 will appear.
- Select Multiple Pixels
- The Number of Pixels field will automatically be filled.
- Click "Assign Channels in Reverse" IF your strings run in reverse.
- Click in the blue name field.
- In the window that opens, select the first string, first pixel.
- Click OK to close the Assign Light window.
- In the Object window, Select Force Pixel and then click Force Assign.
- Click YES to the dialog box.
- This will load all additional pixels and strings.
- To verify correct loading, you can now left-click in the show box to see the string light up in the visualizer window.
- Click SAVE to save the preview.
- Close the preview.
- Note: Follow directions in Creating a Display Preview to set a display preview as active and view your sequence while running it.
| HLS User Manual and Reference Guide | ||
|---|---|---|
| Previous Page | Current Chapter | Next Page |
| PixelPlane Transitions Using Lighting Channels | Chapter 6: Creating and Using PixelPlanes | Chapter 7: Facial Animation |