StarBurst

Introduction
A pixel StarBurst added to your display adds a lot of possibilities for effects. You can use any of the Nutcracker effects built in to xLights, Vixen 3 and soon other sequencing software to easily add exciting movement to this prop. With the addition of a lighted post, you can create an effect that looks like a firework being shot into the air and exploding.
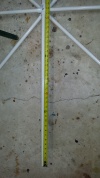
The pixel starburst we're going to make has 8 spokes that are 32" long. Each of the spokes has 22 pixels on it for a total of 176 individually controlled light points. This demonstration will show it connected to an E682 by SanDevices, but it could just as easily be controlled by any of the pixel controllers out there.
Check out a video of the StarBurst in action: StarBurst Video
If you have questions, this thread on DIYC is a good place to start. You can also PM me on DIYC. My user-name is derekbackus.
Materials Required
Below are the parts required to make a StarBurst. If you're making more than one, just multiply the quantity by two. Where possible, I've linked the BOM to outside sources to help with understanding what all the pieces look.
   - Qty. 2: 1/2" PVC Cross
   - Qty. 3: 1/2" 10' PVC Pipes
   - Qty. 1: 2.5" #10 Machine Screw
   - Qty. 1: #10 Nut
   - Qty. 1: 1.5" Screw (any screw will do)
   - Qty. 2: Pixel Strips (30 pcs/meter 30 ICs/meter)
   - Qty. 1: Waterproof Pixel Power Connector
   - Qty. 1: Tube Clear Silicon Caulk
   - PVC Glue (Clear Recommended)
   - 20ga Blue, Brown & White Wire (you can use whatever colors you want)
   - Zip-Ties
   - Blue Tape (not required, but helpful)
Tools Required:
   - Saw to cut PVC
   - Scissors
   - Wire Cutters/Strippers
   - Soldering Iron
   - Solder
Build Notes
   - This is now I make my starburst. It is not the only way and it is not the right way, it is just my way and it worked great for me.
   - Use at your own risk.
   - I would suggesting making all of your wires at least 1" longer than mine. Better to be long than short.
   - Get high-quality zip-ties. The ones I used were brittle and I know at least a few will break every year till they are all replaced.
   - I used wire colors based on the waterproof leads I have. You can use whatever color you want.
   - The colors I used on the leads may or may not be "standard". I have standardized on blue for +V, brown for ground and yellow for data.
PVC Frame
The PVC frame is straight-forward and easy to build. You can make yours any size you want, you'll just have to adjust your measurements here and in the following sections to account for the size difference.

1. Cut 8 PVC pipe lengths to 32".

2. Glue them into the 2 PVC crosses to make two 4 way crosses that are about 66"-68" across. 3. Drill a hole through the middle of each of the PVC crosses using a .201 or #7 drill bit -- anything close will do.

4. Attach the crosses together with the 2.5" #10 machine screw. Use washers on either side if you like. 5. Align the spokes evenly with a protractor or by measuring the outside tips of the spokes to make them even.

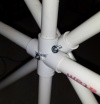
6. On the back of the frame, drill a starter hole for a screw so that it will hold tightly to the hub. This screw will keep the frame nicely positioned so the two frames will not turn. Take a look at the picture. I'm having trouble explaining this in words.
That's it, your frame is completed.
Pixel Strip Background
For those of you familiar with pixel strips, skip this section. I'm going to try to explain how pixel strips work and how they can be modified.
Pixel Strips: Pixel strips come in various shapes and configurations. The ones I have used are 2811 and 2812 pixel strips. Each of these has three wires that supply the needed power and data to the pixels. Pixels are hooked up to power (with the pixels I used, 5V), ground and data. The power is always on -- meaning the pixels are always receiving power. The data line is driven by a pixel controller that tells each of the lights on the strip when to turn on and at what brightness they should be when turned on.

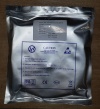
When you receive your pixels from your supplier, they will usually be in an anti-static bag.

The label of the pixel strips I used. These are 2812 pixels, but I've also used 2811 and don't know the difference. I'm sure there is a great, technical explanation, but I don't care -- they both work the same and do the same thing.

Once you open the bag, you'll see the pixel strips are wound up on a roll.

Here's where it gets interesting. If you look at this picture, you'll notice copper "pads" between each pixel. You can cut these strips right across the middle of these pads anywhere on the strip. If you want a strip that is 10 pixels long, just cut away -- make sure the power is off first, though. You'll also notice there are arrows. This is the direction of the data. Pixels are sent data and each pixel "consumes" a packet of the data. It then sends the rest of the data (minus the packet it consumed) on to the next pixel. If you wire these backwards, the pixel won't be able to send data on. Make sure your data flows in the direction of the arrows.

All the pixel strips I've received come pre-wired. I've never used the existing wires. Notice they use silicone in the end to waterproof the strip. We'll do the same thing when we cut ours and re-wire them.

I've used 3-wire waterproof connectors that are available from numerous vendors. You can use 3 or more wire connectors on yours -- 4 wire connectors are also common.

You'll notice once you cut the connector wires, the wires are colored. Pick three and use them every time. I use blue for +V, brown for ground and yellow for data.

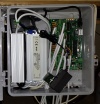
This is my E682 pixel controller. A bit of a mess, but there really isn't much going on in there. There is a connection for your ethernet neetwork, a connector for input power, and connectors for pixel strips. You need a pixel controller of some type to drive pixel strips.
Pixel Strip Assembly

1. Cut the power wires. I suggesting cutting them 1" LONGER than mine. When I put my starburst together, it worked, but was very tight. 1a. Strip about 1/4"-3/8" off the end of each of the power wires. It is easier to do it all now instead of when you are working.

2. Prepare the data wires. Again, I suggest cutting them 1" longer than mine. 2a. Strip a small bit off each end of the data wire and tin them so they are ready to solder to the pixel strips. You only want to strip about 1/8". About the size of the pad on the pixel strips.
3. Count out the number of pixels you want in your spoke and ADD ONE. We want the silicone outer strip to overlap both ends of our pixel strip so we're going to cut it one pixel long, pull it back and cut off one of the pixels. Take a look at the picture. See the red line. Cut (I use scissors) along this line through the silicone and the strip. Leave 1/2 of the copper pad on each side of the strip.
4. Ok, back to the input side of the pixel strip. See the black line in the picture. Cut the pixel strip on this line.
