E1.31 (Streaming-ACN) Protocol
Disclaimers
The standard disclaimers pertaining to the information contained on this wiki page are listed here.
What is Streaming-ACN (E1.31)?
ACN is a suite of protocols (via Ethernet) that is the industry standard for lighting and control. ESTA, the creator of the standard, ratified a subset of this protocol for "lightweight" devices which is called sACN (E1.31). This lightweight version allows microcontroller based lighting equipment to communicate via ethernet, without all the overhead of the full ACN protocol. In an effort push early adoption ETC provided the protocol information (code and draft specification) at no charge.
A ratified/offical copy of the standard can be found here for free.
Protocol Description
The simplest way to think about E1.31 is that it is a way to transport a large number of lighting control channels over a traditional ethernet network connection. E1.31 transports those channels in "Universes", which is a collection of up to 512 channels together. E.131 is ethernet based and is the data sent via UDP. The two accepted transport methods are multicast and unicast, the most common implementation is multicast. When using multicast all the controller needs to do is subscribe to the multicast address for the universe that you want to receive data from.
Unicast vs. Multicast
Most E1.31 software and hardware can be set up to communicate via the 2 transport methods: Unicast and Multicast
Unicast
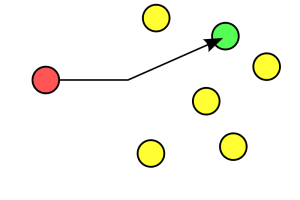
Unicast is a method of sending data across a network where two devices, the control PC and the lighting controller, are directly connected (or thru a network switch or router) and the channel control information meant for that specific controller is only sent to that controller. Unicast is a point to point protocol and only the lighting channel information is only switched or routed to the device with the matching IP address. In this case, the same IP address (commonly 192.168.1.206) that is used to access the web configuration page is the same address the the lighting control information is sent to. You must have unique IP address in each controller. Using Unicast the data packets are sent directly to the device instead of being broadcast across the entire subnet.
Multicast
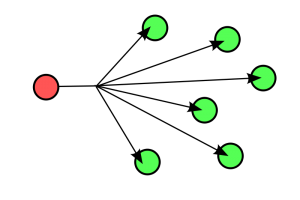
Multicast is a method to send data across a network where a sender, typically a PC, broadcasts the data to all devices connected to the network subnet and the information about the channels are sent to all controllers connected to the network and every other device on the network. Multicast is a point to multipoint broadcast where the controllers need to listen to and only respond to information they are configured to use. Your PC sequencing software or streaming tool sends multicast packets with an address of 239.255.<UHB>.<ULB> where UHB is the Universe high byte and LHB is the Universe low byte. As an example, the address for universe '1' would be 239.255.0.1. This is why using multicast addressing can be simpler to configure since this address is always the same for any device using that universe. Depending on the device and the number of universes of data sent it can swamp the device and possibly end up causing a loss of data. Note however that this is not an issue for most networks until you get into the dozens of universes so it's not an issue for most users. With Multicast you must also have a unique IP address for each controller so that you can access its webpage that allows configuration. The data is received on multicast IP address not on the configuration IP address.
Advantages of Unicast vs. Multicast
- Unicast
- Allows more channels of data to controllers and bridges (commonly 12 Universes vs. 7 Universes for Multicast)
- Channels can only be sent to one controller per Universe
- Multicast
- Allows less channels of data to controllers and bridges (commonly 7 Universes vs. 12 for Unicast)
- Simpler network configuration since controllers don't need data address information
- Channels can be mirrored on multiple controllers since the same Universe can be used by multiple controllers.
Understanding Universes
E1.31 transports lighting information in "Universes", which is a collection of up to 512 channels together. In order for this to work with a Pixel Controller or E1.31 bridge you must setup the output driver in your sequencing software. You can chose any universe number from 1-63999 and assign it to a block of channels in your sequencing software. While a Universe can contain up to 512 channels, it does not have to, and can be any number between 1-512 channels. If you are using the E68x series (E680, E681, E682, E6804) of pixel controllers, you can only use 510 channels maximum per universe. If you are using more then one universe of channels in your sequencing software, then you must setup each of the multiple universes in your sequencing software and also map them to the appropriate channels in your sequence. You only need to install one output plugin in the sequencing software and add all of the universe mapings into that one output plugin. Once you have setup your sequencing software E1.31 output plugin, you must then go and setup your Pixel Controller or E1.31 bridge to map those universes of channels to the appropriate output connector.
E1.31 Network Layout
Since E1.31 transmits its data information using ethernet, normal home networking configurations can be used to connect your E1.31 gear together.
Direct Connection PC to Device
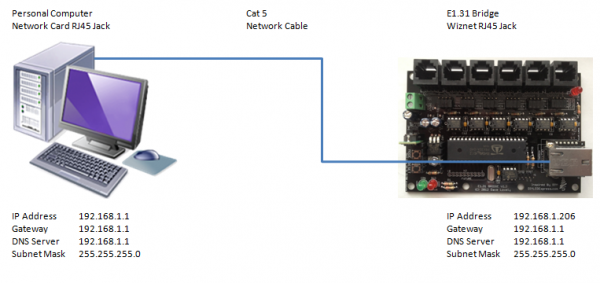
It is possible to use a single ethernet cable to connect a E1.31 controller or bridge directly to a PC without other networking gear. E1.31 uses ether net connections (RJ45 cables). To connect directly, it is necessary to put the PC and the E1.31 on the same IP subnet, ie: that they both have an address that has the same first three IP address settings like: 192.168.1.x or 192.168.0.x By default many of the E1.31 devices come with a default address of 192.168.1.206.
For assistance setting the IP address in a PC:
Use of Switch or Router to Connect PC and Multiple Devices
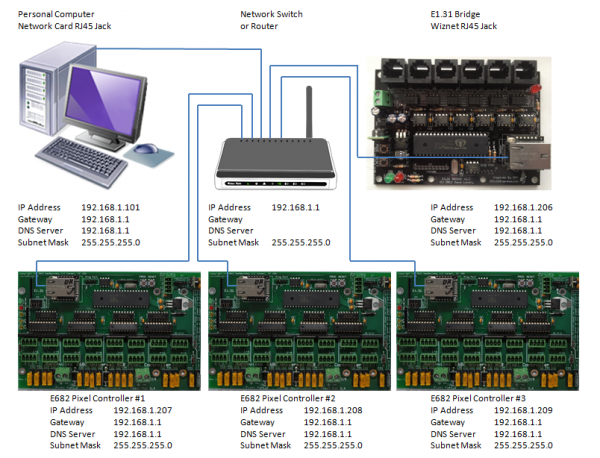
It is also possible to connect an E1.31 controller or bridge to an existing home network by plugging the device into a low cost ethernet switch or router. This configuration also allows multiple E1.31 controllers or bridges to be controlled by one main PC. It is also possible to use multiple PCs to send data to the controllers over the network. It is necessary to put the PC and all of the E1.31 devices on the same IP subnet, ie: that they both have an address that has the same first three IP address settings like: 192.168.1.x or 192.168.0.x By default many of the E1.31 devices come with a default address of 192.168.1.206. If you are using multiple E1.31 devices, it is necessary that you change the default IP address of the additional units to another address other than 192.168.1.206 so that you can access the configuration page of all of the E1.31 devices.
Common E1.31 Devices
The use of E.131 has increased dramatically in recent years and new devices are coming on the market daily. The two most common devices used in Christmas lighting displays are Pixel Controllers and Protocol Bridges.
E1.31 Pixel Controllers
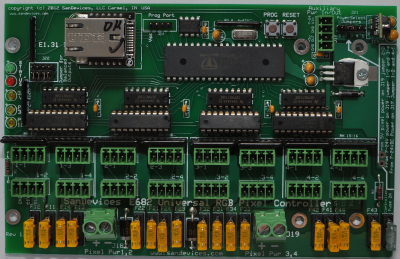
Using an E1.31 output driver software, the light control software on the PC sends the lighting sequence data out to the controllers that are connected to the PC thru ordinary ethernet connections such as a router or switch. The controllers listen for the light control data addressed to them and then control the lights that are connected to it. The controllers can be setup for either Unicast or Multicast data thru their webpage based configuration screens. Common E1.31 Pixel controllers are:
- E680, E681, E682 or E6804 by Sandevices
- AlphaPix 4, AlphaPix 16 by HolidayCoro.com
- Falcon F16V2 by PixelController.com (Falcon Christmas)
- ECG-PIXAD8, ECG-P12R and the ECG-P2 by J1SYS
E1.31 Protocol Bridges
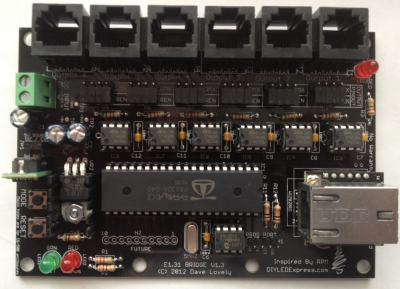
Another common usage of E1.31 is an E1.31 Bridge. An E1.31 bridge bridge is a device that allows your PC to communicate with a large number of Renard or DMX controllers using regular Ethernet network connections. It replaces multiple DMX or RS485 dongles with one configurable device that can be mounted in an enclosure in the yard and only requires one Ethernet Cat5 cable (or WIFI) back to your PC or home network. It allows up to 6 DMX universes or Renard networks to be easily controlled from your sequencing software with a minimum amount of wire from your show PC to your controllers. The bridge works with all Renard, DMX and LOR (using DMX) controllers. A common E1.31 Bridge is:
- 6 Port E1.31 Bridge by DIYLEDEXPRESS.
- ECG-DR4 and the ECG-D4 by J1SYS.
- AlphaPix 4 (1 port), AlphaPix 16 (3 ports) by HolidayCoro.com
Using E1.31 in your Light Display
Using E1.31 in your lighting display is similar to using Renard, DMX or LOR to move the lighting information around your display. E1.31 is a communications protocol that uses Ethernet data connections. Getting started includes the following steps:
- Develop a lighting sequence in the sequencing software of your choice. In this step, you create channels in the sequence and assign lighting commands to the channels. When using pixels, you actually use 3 channels (R,G,B) for each pixel.
- Example, configure the sequence for 200 pixels, which is 600 channels.
- Install the proper network wiring connections for your PC and controller.
- Next you must install and configure the E1.31 output plugin for your specific sequencing software. After you have installed the software, you need to map the channel numbers in your sequence to Universes. This basically takes the channel output from the sequencing software and sends it out over E1.31 in collections of channels (Universes).
- Example: Vixen channels 1-510 would map to Universe 1 channels 1-510 and Vixen channels 511-600 would map to Universe 2 channels 1-90.
- Next you must install and configure your E1.31 Device for your setup. This includes setting the communications type (Multicast or Unicast), setting an IP address for the web interface of the unit, setting pixel type and setting all of the pixel configuration information for a pixel controller, or setting network output type for E1.31 bridges.
- Example: set controller up for multicast with the web page at IP address 192.168.1.207, configure cluster 1 for 4 strings of 25 WS2811 pixels and cluster 2 for 2 strings of 50 WS2801 pixels.
- You then need to map the output channels that come into the units via the Universes sent from the output plugin of the sequencing software to the physical outputs of the E1.31 device you are using.
- Example: Universe 1 channels 1-300 (Vixen channels 1-300) go to cluster 1 with 4 strings of 25 pixels each (300 channels), and universe 1 channels 301-510 and universe 2 channels 1-90 (Vixen channel 301-600) go to cluster 2 with 2 strings of 50 pixels each (300 channels).
- Now you can test your sequence.
Configuring Sequencing Software to use E1.31 Output
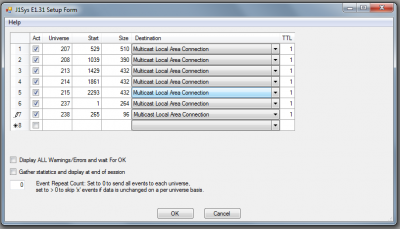
In order for your light sequencing sotware to communicate via E1.31 protocol, the software needs to have the output configuration setup done in the software. This varies from software package to software package. The basic concept is that you map the output channels from your sequence into collections of channels called "Universes". Each universe can map up to 512 Channels. You must choose a Universe Number, Sequence Channel to Start the Universe at, Multicast or Unicast transport and Number of channels in the Universe. With high channel count systems it is common to have multiple universes used to transport the lighting data to the Pixel Controller or E1.31 Bridge.
IMPORTANT: Remember that E682 lighting controllers only use up to 510 channels per universe, not the full 512 channels per universe when you setup your software to talk to your controllers
Using E1.31 with Vixen
How to setup and use Vixen 2.1,2.5 and 3.0 with E1.31
Using E1.31 with LOR S3/S4
You must have an Advanced ShowTime Software Suite S4 license from Lightorama to use the E1.31 interface.
How to setup E1.31 on LOR S3 Advanced pdf file
Initial setup for E1.31 if you do NOT have an LOR RS485 USB adapter
Video on how to setup and use LOR S3.5 with E1.31
Using E1.31 with HLS
Using E1.31 with LightShowPro (LSP)
Setting up E1.31 in LSP
Setup Video
Using E.131 with Nutcracker (xlights) and DA_E131
Download Nutcracker here
Nutcracker (starts about 15:00 in the video)
How to test E1.31 Controllers using xLights (video)
How to test E1.31 Controllers using DA_E131 Utlity (video)
Example of Sequencer Channel Mapping of E1.31 Output
One of the more confusing aspects of setting up your E1.31 system is the concept of mapping your channels from your sequencing software to universes, then mapping it to your pixel outputs on your pixel controller. Here is an example:
- Using Multicast
- 400 Pixels
- = 1200 (3x400) total channels
- Using an E682 Pixel Controller
- 2 strings of 100 Pixels in Cluster 1
- 4 strings of 50 Pixels in Cluster 2
First you must create your 1200 channels in your software of choice (Vixen, HLS, Nutcracker, Xlights, LSP, LOR, etc...)
Output Plugin Channel Mapping
Next you must setup your E1.31 Output Plugin. In this example, you need 1200 channels mapped. Since the E682 can only use 510 channels per universe, you need just over 2 universes to map all of the channels. (510 + 510 + 180 = 1200)
- You map the first 510 channels of the data you want to send to your E682 in Universe 1 (in this case sequence channels 1-510).
- You map the second 510 channels of data you want to send to your E682 in Universe 2(in this case sequence channels 511-1020).
- You map the remaining 180 channels of the data you want sent to your E682 in Universe 3 (in this case sequence channels 1021-1200)
Your output plugin will look something like this:
![]()
E682 Pixel Controller Channel Mapping to Output Connectors
Next you must configure your E682 using the instructions from Sandevices. There are two major versions of the firmware available depending on when you purchased the unit and if you have upgraded the firmware in your controller:
- Version 2 software is the older command line interface software
- Version 4 is the newer drop down configuration software.
Next you must map the incoming E1.31 Universe data to the physical outputs to the Pixel strings. You must also map the Universe numbers (in this case 1-3) to the 7 (Multicast) or 12 (Unicast) slots available in the controller.
Cluster 1 Mapping
In this example you have 2 strings of 100 pixels in Cluster 1 (using connectors 1-1 and 1-2). You configure cluster 1 for 2 strings of 100 pixels using the E682 configuration webpage. That is a total of 200 pixels, or 600 channels (3x200). That requires slightly more than 1 universe of data.
- So you set the Start Universe as Universe 1 and the Start Channel (of the universe) to 1.
- The software will automatically calculate the End Universe and End Channel. In this case those values would be Universe 2 End Channel 90.
So the first cluster used 600 channels of data, 510 channels from Universe 1 and 90 from Universe 2. (510 + 90 = 600)
Cluster 2 Mapping
Next you have 4 strings of 50 pixels in Cluster 2 (using connectors 2-1, 2-2, 2-3, 2-4). You configure Cluster 2 for 4 strings of 50 pixels using the E682 configuration webpage. This is a total of 200 pixels, or 600 channels (3x4x50). That requires slightly more then 1 universe of data.
- Since you ended the first cluster off at Universe 2 Channel 90, the next available channel is Channel 91. So you set the Start Universe as Universe 2 and the Start Channel (of the universe) to 91.
- The software will automatically calculate the end Universe and End Channel. In this case those values would be End Universe 3 End Channel 180.
So the second cluster also used 600 channels of data, 420 channels of data from Universe 2 and 180 from Universe 3. (420 + 180 = 600)
So now you have mapped the first 600 channels from the sequencing software (Sequence channels 1-600) to the first Cluster with the 2 strings of 100 pixels. You have mapped the second 600 channels from the sequencing software (sequence channels 601-1200) to the second cluster with the 4 strings of 50 pixels.
Tools for Testing E1.31 Hardware and Connections
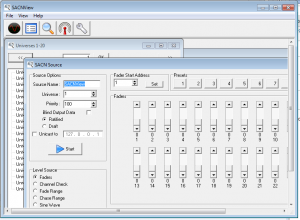
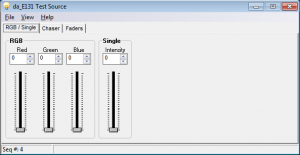
These free tools allow you to test E1.31 controllers simply without using sequencing software. They are good tools to use when troubleshooting a E.131 network setup. If you are having trouble setting up your network, this allows you to isolate if it is the output plugin in your sequencing software or some networking setup issue preventing your setup from working. It is also a simple way to run basic chases and colors to test your pixel strings.
More Information
Code Example and Draft Copy of Specification
Article: E1.31: An Offer You Can't Resist
Related Links
Pixel Wiring Colors
Controllers
Dumb RGB or Intelligent Pixels??
Things You Will Need To Get Started With Pixels
Power Supplies
Pixel Connectors
Choosing a Pixel Voltage: 5V vs 12V
Power Injection
Waterproofing Pixels
Null Pixels
Different Styles of Pixels
