The PixelPlane Editor: MegaTree: Difference between revisions
(→Spiral) |
|||
| Line 109: | Line 109: | ||
---- | ---- | ||
[[File:HLS_PixelPlaneEditor_MegaTree_SpiralControl.png|thumb|Figure 6- | [[File:HLS_PixelPlaneEditor_MegaTree_SpiralControl.png|thumb|Figure 6-12]] | ||
A '''Spiral''' effect creates the look of a spiral of lights twisting around the tree. | A '''Spiral''' effect creates the look of a spiral of lights twisting around the tree. | ||
| Line 123: | Line 123: | ||
! align="center"|Next Page | ! align="center"|Next Page | ||
|- | |- | ||
| align="center" | [[ | | align="center" | [[Creating a PixelPlane]] | ||
| align="center" | [[HLS User Manual and Reference Guide#The_PixelPlane | Chapter 6: The PixelPlane]] | | align="center" | [[HLS User Manual and Reference Guide#The_PixelPlane | Chapter 6: The PixelPlane]] | ||
| align="center" | [[Using Nutcracker with a PixelPlane]] | | align="center" | [[Using Nutcracker with a PixelPlane]] | ||
Revision as of 21:33, 5 February 2013
This is a HUGE work in progress.
Feel free to pitch in!
Current as of Version 12H.
Content still to be created
The following sections still need to be created.
- Effect Library:
- Spiral
- Vertical Bars
- Horizontal Bars
- Snow
- Meteors
- Fireworks
- Horizontal Text
- Vertical Text
- Using a Beat Track with Effects
- Assigning Channels to Pixels
- Naming the Effect
- Creating the Effect
- Moving/Resizing Effects
- Modifying an Effect
- Using a Previously Created Effect
Introduction to the PixelPlane Editor
The PixelPlane Editor was introduced in Version 12A of HLS. This Editor allows the user to apply a variety of complex and customizable effects to an entire pre-defined PixelPlane object. This document will cover applying these complex effects to a MegaTree pixel object. First, you must create the PixelPlane before adding these effects.
Activating the PixelPlane Editor
To activate the PixelPlane Editor, you must Right-Click in the grid cell of the PixelPlane you are editing.
- Tip: You don't have to have the exact grid cell you want to start the effect in, but you probably want to be around the right area. You can adjust the starting cell and the length of the effect later.
- When you right-click, select Add HLS Custom PixelPlane Effect from the menu that opens.
- This will open the PixelPlane Editor.
Window Layout and Explanations
Figure 6-9 is the layout of the PixelPlane Editor when editing a MegaTree pixel object. Description of the highlighted areas and what they mean follows. These will each be explained in detail further in this document.
- Assigned Effects: The areas at the top highlighted in Purple show the PixelPlane effects that have been created for the PixelPlane. The current effect being added or modified appears green. Any other PixelPlane effects will appear in blue while in PixelPlane Editor.
- Animation window: The large, black area highlighted in blue is the animation window where the effect you are working on will appear. This will give you a good idea as to what your effect will look like live. Toggle the Animate the Effect checkbox to turn this on and off.
- Effect Category: The pull-down selection menu highlighted in blue (and that reads "Spiral") is where you select from the categories of effects that HLS has built-in for MegaTrees.
- Frame Count shows the frames that the sequencer will generate for your effect.
- Assign Channels to Pixels: Use this to tell HLS how your pixels are arranged on your MegaTree.
- Single Step: Step through the effect one frame at a time.
- Reset: Reset the animation/effect back to frame 1.
- Select Beat Track: Assign a beat track to be used with other beat track features of the editor.
- Enable Beat Track: Check this to turn on the beat track features.
- Effect Customization: The section highlighted in Yellow is used to customize the selected MegaTree effect. Each type of effect has it's own customization options, which will change based on which effect is chosen.
- Color Selection: The area highlighted in Red is used to select the colors used with the effect. A few or several colors can be used.
- Select Existing Effect to Use: This button is to open an effect that you have previously created in the editor.
- Random Color: Use random colors with the effect.
- Text: The area highlighted in Orange controls text generation.
- Beat Track: Lock Rotation and Flash Pixels at Beat Track are used to tie the effect into the previously assigned beat track.
- Create/Replace Effect: Pressing this button will create the effect. If you have not entered a new name, your previously named effect will be overwritten.
- Name of this Effect: The name associated with the effect.
Using Colors with Effects
Color for effects can be one of two types:
- Solid colors
- Color Shifts from one color to another along the color wheel.
- These two types can be used
The Solid Colors are the six blocks of colors along the top row. These can be changed by left-clicking a color. A Color Picker window will open allowing you the ability to change the color. When the radio button next to these colors is selected, you will be using that solid color.

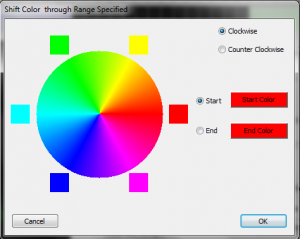
The Color Shift colors are the sets of color blocks along the second and last rows. These can be changed by left-clicking the first color block. A color wheel will open (See Figure 6-11). Choose the starting color and the ending color by selecting one of the squares along the wheel. In the effect, this will cause a "color shift" from the start color to the end color, all along the color wheel. You can even choose the same start and end color to shift the entire spectrum of color. Select clockwise or counter-clockwise to set the direction to move along the color wheel.
The checkbox at the bottom of each column tell HLS whether you want that color active. You can have a total of six active colors or color shifts.
The Color Shift slider tells HLS whether you want the color shift to "shift" up the tree. If this is set at 0, the colors will stay in the same position. If you slide it up, the colors will begin shifting up the tree.
MegaTree Effect Library
HLS comes with a number of pre-configured effects which can be customized to fit your sequence. This section will fully explain the following effects:
Spiral

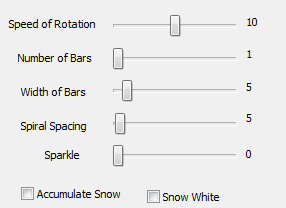
A Spiral effect creates the look of a spiral of lights twisting around the tree.
| HLS User Manual and Reference Guide | ||
|---|---|---|
| Previous Page | Current Chapter | Next Page |
| Creating a PixelPlane | Chapter 6: The PixelPlane | Using Nutcracker with a PixelPlane |