Sequencing Channels and Adding Effects:: Difference between revisions
No edit summary |
m OriginalHotrodder moved page Sequencing Channels and Adding Effects-PDF to Sequencing Channels and Adding Effects:: The "PDF" addition was not needed and was confusing. |
(No difference)
| |
Latest revision as of 03:25, 25 March 2013
Sequencing Channels and Adding Effects
Creating Basic Effects
Introduction to Sequencing in HLS
Sequencing in HLS works by adding effects to lighting channels at specific time intervals to coordinate the lights with a set peice of music. HLS is different than other sequencers in that it moves beyond the idea of controlling individual channels and individual moments in time. While that can still be done, HLS is most powerful in it's use of macro-level control.
- RGB channels can be controlled without concern with the color levels of each underlying channel.
- Pixels can be grouped into Pixel Planes where complex effects can be as simple as drag and drop without having to think about things on a channel level.
- With HLS, sequencing thousands of channels becomes quite manageable.
The Sequencing Window and Toolbar
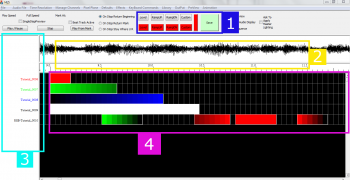
The HLS Sequencing Window has four basic components which are important when sequencing (See Figure 5-1).
1. The first component, highlighted in blue, is the toolbar for applying effects in a sequence.
- The top row of buttons are basic effects.
- The second row of colored buttons are the colors set for RGB channels.
2. The second component, highlighted in yellow, is the audio oscilloscope and the time bar, which shows where you are in the song.
3. The third component, highlighted in turquoise, is the listing of channels that are currently being viewed.
4. The fourth component, highlighted in purple, is the sequence grid, which contains the cells where effects are applied to channels.
Selection Mode in HLS
Applying effects to channels in HLS works differently than some other sequencing programs. When you click the left mouse button in the channel grid, the Selection Mode becomes active and will remain active until you click again or press the ESC key.
- TIP: Sometimes it may appear as if HLS is unresponsive or hung up. Most likely, you are in Selection Mode and HLS is waiting for a selection box to be completed. If things ever appear hung up or unresponsive, press ESC.
Basic Method to Create a Selection Box:
- Use the left mouse button and click in the left-most cell that the effect will be applied to.
- A dotted line will appear around the cell.
- Drag the mouse to the right (and down to apply to multiple channels).
- Click the left mouse button again when in the right-most cell that the effect will be applied to.
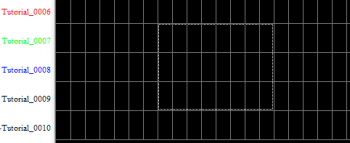
- All of the cells you have chosen will be surrounded by a dotted line. (See Figure 5-2).
- Note: If you are not happy with your selection, press ESC and draw the selection rectangle again.
Basic Effects
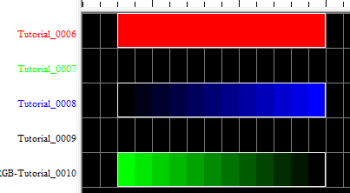
Level:
- Shortcut key: L
- Level effects are at the same intensity (default 100%) throughout the effect length.
- To add a Level effect, place a selection box around an area of cells.
- Press the L key or click the Level button on the menu bar.
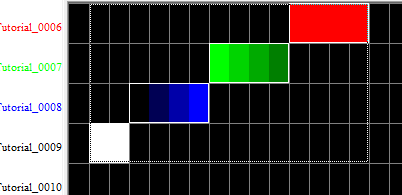
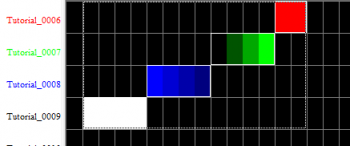
- See Figure 5-3, Channel Tutorial_0006.
Ramp Up:
- Shortcut key: U
- Ramp Up effects start at a low level intensity (default 0%) and move up to a higher level intensity (default 100%) throughout the effect length.
- To add a Ramp Up effect, place a selection box around an area of cells.
- Press the U key or click the Ramp Up button on the menu bar.
- See Figure 5-3, Channel Tutorial_0008.
Ramp Down:
- Shortcut key: D
- Ramp Down effects start at a high level intensity (default 100%) and move down to a lower level intensity (default 0%) throughout the effect length.
- To add a Ramp Down effect, place a selection box around an area of cells.
- Press the D key or click the Ramp Down button on the menu bar.
- See Figure 5-3, Channel Tutorial_0010.
Modifying Effects
Moving Effects:
- Moving an effect is to move it from one place in a sequence to another, such as moving it to start 1/2 second later than currently setup.
- Left-Click on the first cell of the effect to move.
- Move the mouse pointer to the new location.
- When satisfied with the change, left-click again.
Stretching and Shrinking Effects:
- Stretching an effect is to lengthen the time an effect will take place.
- Shrinking an effect is to shorten the time an effect will take place.
- Left-Click on the last cell of the effect to stretch or shrink.
- Move the mouse OUT from the starting cell to stretch or IN towards the starting cell to shrink.
- When satisfied with the change, left-click again.
Deleting Single Effects:
- Deleting an effect is removing the selected effect from the channel.
- Right-click on an effect and select Delete this Effect.
- Warning: No confirmation screen will appear.
Deleting an Area of Effects:
- Deleting an area of effects will remove all the effects inside a selection box.
- Use the left mouse button to click on the left most cell and drag right (and down, if applicable) to select the end of the area you wish to delete.
- Left-click again to finalize the selection box.
- Right-click and select Delete Selection.
- Warning: Always be sure you know what is contained in the Selection Box. Once it's gone, it's gone!
Copy/Paste Effects:
- This is copying and pasting of an effect from one area to another.
- Select the effect you wish to copy by CTRL + Left-Clicking the left-most cell to copy. (This lets HLS know that you are wanting to select cells rather than move the effect.)
- Move the mouse to the end of the effect to copy.
- Left-click to finalize the selection box.
- Right-Click and select Copy from Selection Box.
- Tip: Use the shortcuts CTRL+C to copy and CTRL+V to paste.
- Move the mouse to the desired location for the copied effect, and left-click to finalize the selection.
- Note: The selection box will retain the size and shape of the copied cells.
- Press CTRL+V or right-click and select Paste from Selection Box to paste the copied cells.
Modify Effect Attributes:
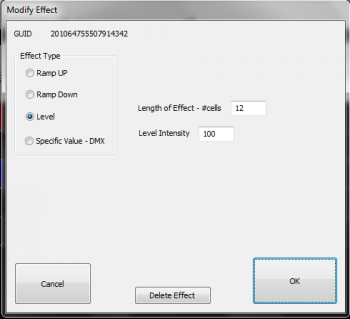
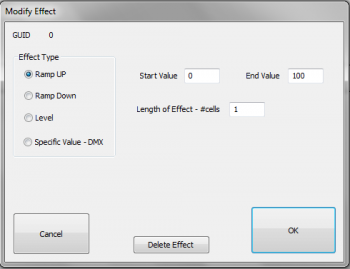
- Effects can be modified in length, type of effect, intensity, and deleted all from this window.
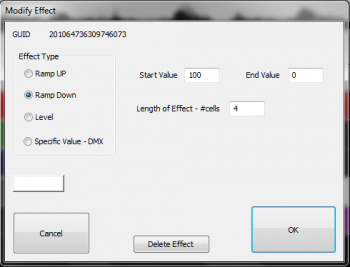
- Right-click an effect and select Modify This Effect. The Modify Effect window will appear (See Figure 5-4).
- Change the effect type using the radio buttons.
- If the effect is a ramp, you can adjust the beginning and ending intensities.
- If the effect is a level, you can adjust the overall intensity.
- You can assign specific DMX values to a channel, so values from 0-255 instead of percentages of 0-100.
- For all effects, you can adjust the number of cells.
- You can also delete the effect by clicking Delete.
Adding and Using Beat Tracks
Introduction
A Beat Track is a "channel" which is not actually assigned to any output. It's only purpose is to have markers in the sequence which have been set at points where a beat or some other repetitive musical component is found in a song. A beat track helps easily sequence movements between lighting channels so that the movements fall at appropriate musical points. An example would be an arch that moves from one end to another between two beat marks.
HLS supports creating beat tracks in a couple of ways. One way is to manually press a button or click a mouse while a song is playing to set the beat. Another way would be to apply a filter to the audio and then manually "turn on" the beat track at points identified through the filter.
Add Beat Track Channels

First, channels must be added so you can use them as beat tracks.
- Open the Channel Manager (Manage Channels -> Manage Raw Channels)
- Since we are going to look at three different ways to create a beat track, go ahead and Add 3 channels named "Beat".
- Keep the Universe as 0 since these channels will not be associated with real output.
- Use the color Selector to set colors for your beat tracks (see Figure 5-5).
- When done, select Save Changes.
Setting Display Group for Beat Track

- Next, assign all of the beat tracks into their own Display Group.
- Create a Display Group named "Beat" and add all three channels (See Figure 5-6).
- Set the "Beat" display group as the group to work with.
Beat Track From Clicks
Creating a Beat Track from Clicks is one of the easiest ways to create a Beat Track. Clicks must be quick and not everything will line up perfectly, but it can give reasonably good results.
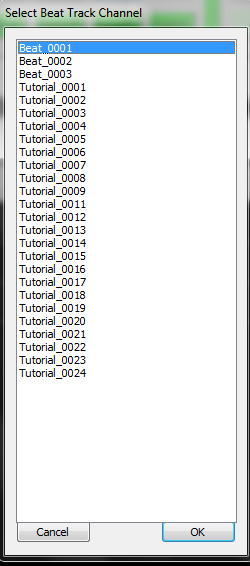
- Activate the Beat Track by clicking Manage Channels -> Select a Beat Track Channel.
- Select the Beat Track you want to use and click OK (See Figure 5-7).

- Check the box Beat Track Active to let HLS know that you are planning to record clicks for a beat track (see Figure 5-8).
- Press the Play / Pause button to play the song.
- Press the CTRL key or the Left Mouse button at each beat in the song.

- When the song is complete, there will be two grid cells filled in at every click received. Your beat track has been created. (See Figure 5-9)
Beat Track from Filters
This is a very powerful feature of HLS and one that can come in handy when setting up beat tracks. You get to this by clicking Audio File -> Apply Lo or Hi Pass Filter or Band Pass. The DSP Filtering window will open (See Figure 5-10).
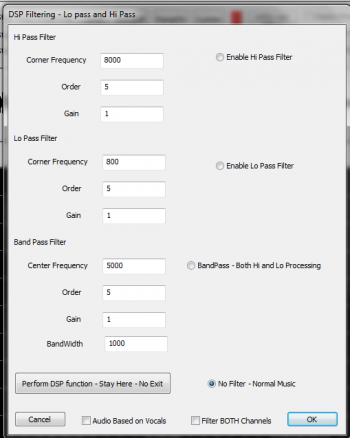
- Hi Pass Filter: This filter will filter the audio to only show the portions that are in higher frequencies, such as a female vocal or high (in pitch, not volume) notes.
- Wikipedia: High Pass Filter
- Lo Pass Filter: This filter will filter the audio to only show the portions that are in lower frequencies, such as bass drum and other low (in pitch, not volume) notes.
- Wikipedia: Low Pass Filter
- Band Pass filter: This filters on BOTH high and low frequencies. The Frequency value is the "desired" frequency. A band pass filter will filter OUT both the high and low frequencies that are further away from that frequency.
- Wikipedia: Band Pass Filter
Applying the Filter:


- Choose the filter you wish to use, enter the needed information, and click OK. You can also use the "Stay Here" option to apply the filter and continue working with the audio without closing the Filtering window. (See Figure 5-11a and 5-11b for an example of the audio before and after applying an 8 khz filter to attempt to isolate a cymbal sound.)

- Once the sound has been isolated, manually add effects where the sound is present. In the example, Beat Track 2 is being used to mark two cells with a Level effect at each cymbal sound (see Figure 5-12).
- Tip: To speed up this process, you may find that using the CLICK filter AFTER applying the DSP filter will allow you to click accurately with the sound you want isolated rather than manually drawing in the effects.
- Once finished with the filter, return the audio to normal by choosing Audio File -> Remove Filter.
Common Sound Frequencies:
- 200 Hz and below: The bass of the mix. The bottom end of the sound.
- 200 – 400 Hz: The body of the low end instruments.
- 400 Hz – 1 kHz: The low mid/mid area of the mix. The body of guitars and vocals reside here.
- 1 – 3 kHz: Snare drums and kicks start in this range and extend almost to 4 kHz.
- 4 – 8 kHz: High-mids, the top end of most drums, guitars, and organs. Also the body of cymbals is in this range, bottoming out in 3 kHz range.
- 8 – 10 kHz: Cymbals mostly live here. You’ll also find the top end of vocals here.
- Summarized from: abovegroundmagazine.com
Visual chart of instruments and frequency ranges: frequency chart
Video
- Watch this video uploaded by Joe Hinkle. (Note: This video link starts at the 3:22 mark, where discussion of the DSP filtering begins.)
Cleaning up a Beat Track
Whether manually clicking or using filters, some of the beat track marks may be slightly off from where you want them. You can slow a song down and use the oscillioscope to "cleanup" the marks.
- To move a mark left or right, Click on the FIRST grid-square, release the mouse button, and then move it using the mouse and dragging.
- When the timing mark is placed where you want it, click on it again (or press escape) to exit selection mode.
Setting Beat Track as a Sticky Channel
You can set a single beat track or multiple tracks (up to three) to remain "stuck" to the top of the sequencing window by setting Sticky Channels.
Setting Defaults for Effects
Choose the Defaults tab on top of HLS and select the item you would like to set defaults for. For this example, Ramp Up was selected. The screen shown in Figure 5-13 will appear. You can change any values you would like and they will be saved as the new default values for the current sequence.
Creating Chase Effects
A chase effect is an effect that spans multiple channels with a lighting effect that moves through those channels over a period of time. When it is set to lights, it creates an appearance of a "chase" through lighting channels. Chases can be created manually in HLS, or, through an Action menu to chase a group (the easy way).
Manual Chase
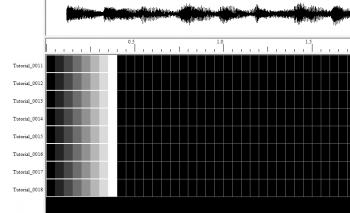
- For illustration, we will be adding a chase to eight channels. First, add the effect you want to chase to each of the eight channels. This can be level, ramp up, ramp down, or any other effect for a single channel. (See Figure 5-14 for an example where Ramp Up was chosen to run over 8 cells in each channel.)
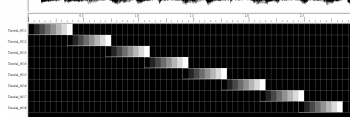
- Next, slide each channel effect to create the chase. This is done by clicking on the left-most cell on channel 2 first, then moving the mouse to the right. All channels in the effect will slide to the right. The same procedure is to be used for the rest of the channels. The results are shown in Figure 5-15.
Chase (The Easy Way)
- For illustration, we will be adding a chase to eight channels. First, add the effect you want to chase to each of the eight channels. This can be level, ramp up, ramp down, or any other effect for a single channel. (Look up to Figure 5-14 for an example where Ramp Up was chosen to run over 8 cells in each channel.)
- Next, select the cells in all eight channels that you want to chase. (Remember to CTRL-Left click the left-most cell to let HLS know you want to select instead of move.)
- Once the selection-box is complete, Right-click the group of cells and select Perform Action on Selected Group.
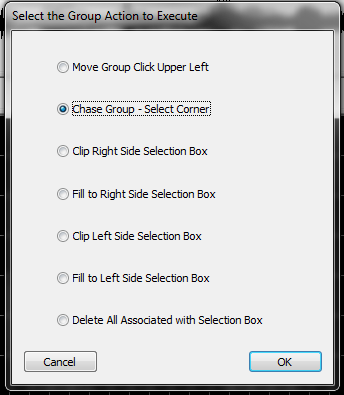
- In the menu that opens, select Chase Group and click OK (see Figure 5-16).
- Click in one of the corners and move the mouse to pull the channels apart into a chase formation.
- When satisfied with the result, left-click again and hit ESC (Look up to Figure 5-15 to see end result).
- Tip: BOTH methods can create the SAME end result. However, the built in chase function is much faster.
Video: Chase Effects
Mirroring Effects
Mirroring is taking an effect or group of effects,and flipping them horizontally or vertically.
The following image demonstrates the sample channels which will be used to mirror.
Horizontal Mirror:
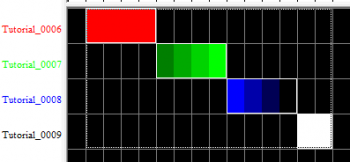
- Enter Selection mode and select the group of effects to mirror (See Figure 5-17).
- Note: Remember, to select effects, you must CTRL-left-click.
- Right-click on the group and press CTRL+H or select Flip Horizontal Selection Box (see Figure 5-18).
- Tip: If you create a selection box longer than the object to be flipped, HLS will flip and move it to the right-most cells.
Vertical Mirror:
- Enter Selection mode and select the group of effects to mirror.
- Note: Remember, to select effects, you must CTRL-left-click.
- Right-click on the group and press CTRL+M or select Flip Vertical Selection Box (see Figure 5-19).
- Tip: If you create a selection box taller than the object to be flipped, HLS will flip and move it to the furthest away cells.
Fill Effects
Fill Effects "fill in" empty space with effect that "extends" the pre-existing effect. You can fill from specific directions to achieve the effect you want.
- Note: Fill Effects and Fill Channels are NOT the same thing. Fill Channels are used in conjunction with custom effects or pixel plane effects to fill in areas where the custom effect or pixel plane effect are off. Fill Effects are used in the same channel with your other effects to "fill in" the gaps.
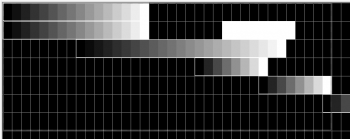
- Figure 5-20 shows various ramp ups applied to some channels. A selection box has been drawn around a number of the effects.
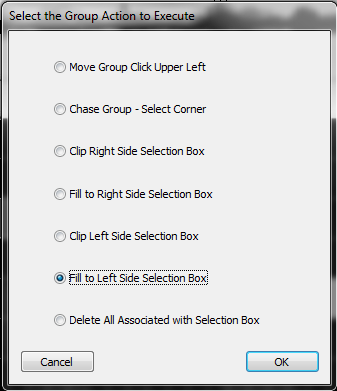
- Right-click inside the selection box and choose Perform action on selected group (See Figure 5-21).
- Click Fill to Left Side or Fill to Right Side, further explained below.

- Fill effects to the LEFT of the selection box will "stretch" all of the selected effects to the left until it reaches the left-most edge of the selection box. The empty spaces to the right will not be affected. See the result in figure 5-22.

- Fill effects to the RIGHT of the selection box will "stretch" all of the selected effects to the right until they reach the right-most edge of the selection box. The empty spaces to the left will not be affected. See the result in figure 5-23.
- Tip: Note that in the second row, the Fill to Right command picked up on the Right-most effect contained in the selection box to fill. If your selection box contains more than one effect in a row, it will always fill using the one closet to the "fill edge."
Submaster Lighting Channels
Template:Submaster Lighting Channels
Sequencing with RGB Channels
Introduction
RGB Channels are a special channel in HLS that consist of three output channels each. These would generally be used with RGB strings and display items, both "dumb" RGB and Pixels. However, they can also be used to reduce channel counts of "mega strings", or strings composed of three different color strands which are contained together in one.
RGB Channels in the Sequence Window
RGB Channels, when displayed in the sequence window, will place "RGB" in front of the HLS Channel name. This helps distinguish which HLS channels are RGB channels. When adding effects to RGB channels, HLS will use a white color by default. Once you have added white effects, you can right-click on the effects, choose Modify, and change the color by clicking the white-colored rectangle in the modify effect window (see Figure 5-26).
Managing Color when Adding Effects

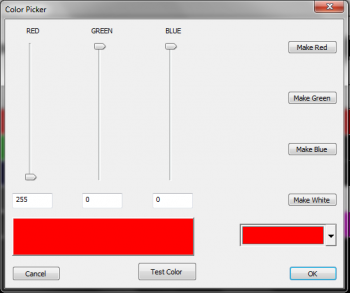
Effects for RGB channels work the same as effects for regular channels. The difference is the addition of the color variable. While the previous sub-section mentioned a way you can sequence all in white and add color later, HLS has built in tools to allow you to apply basic effects in the color desired.
In the HLS window, there are colored effect buttons for Level, Ramp Up, and Ramp Down. See Figure 5-27. When you first open a sequence, these are red. The rectangle to the right of the buttons can be pressed which will open the Color Picker (See Figure 5-28).
- Click and open the Color Picker.
- Select a color for the effect you wish to add.
- Click OK to close the Color Picker and activate chosen color.
- Select desired grid cells to apply the effect, then click the colored effect button.
- Tip: Once you have clicked the colored effect button, you can now use the Keyboard Shortcuts to add additional effects to RGB channels. These effects will now be added with the picked color.
The HLS Toolbar
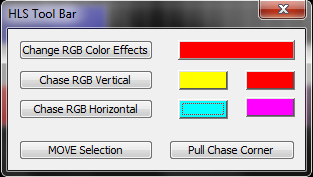
The HLS Toolbar is a floating toolbar that provides the use of several shortcuts when sequencing effects, including shortcuts that pertain to RGB channels. You can find out more about The HLS Toolbar and it's purposes.
- Change RGB Color Effects: Select RGB channel effects you wish to colorize. Click the large rectangle and select the desired color. Click the Change RGB Color Effects button and the selected effects will be changed to the desired color. Your effects and their values will remain the same.
- Chase RGB Vertical: Create a "color chase" on a vertical plane.
- Select multiple channels with pre-existing effects on a vertical plane.
- Click the first of the two color blocks in the row.
- Set beginning and ending colors for color wheel chase.
- Click Chase RGB Vertical button to chase through the colors on the wheel vertically through the selected channels.
- Chase RGB Horizontal: Create a "color chase" on a horizontal plane.
- Select multiple cells of a pre-existing effect on a horizontal plane.
- Click first of two color blocks in the row.
- Set beginning and ending colors for color wheel chase.
- Click Chase RGB Horizontal button to chase through the colors on the wheel horizontally through the selected grid cells.
Custom Effects
Introduction to Custom Effects
Custom Effects are a combination of multiple effects that can be applied to a sequence in a variety of ways. This creates a very custom yet clearly defined effect. This is one of the most powerful features of HLS. The first step is to create an effect template from defining an order of basic effects. Then, that template is applied to a selection box in a number of configurable ways to create the custom effect.
To create your first Custom Effect, click Effects -> Add a Custom Effect Group.
Building a Custom Effect Template
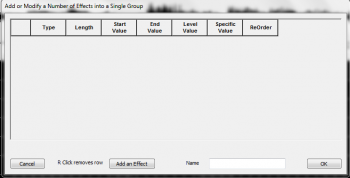
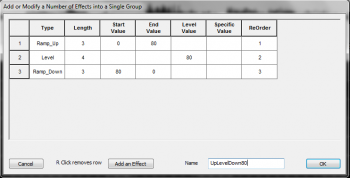
When you Add a Custom Effect Group, the Custom Effect window will open (see Figure 5-30).
- Click the Add an Effect button to add a row where you will enter your effect data.
- Column Definitions:
- Type: General type of effect (level, ramp up, ramp down, specific?)
- Length: the length of the effect in grid cells.
- Start Value: Intensity value at the start of the effect. (active for ramps only)
- End Value: Intensity value at the end of the effect. (active for ramps only)
- Level Value: Intensity value of a level effect. (active for level only)
- Specific Value: This sets a specific DMX value (0-255) rather than the normal behavior of percentage (0-100)
- Reorder: Used when reordering the effects that make up the custom effect.
- Continue adding effects until you have completed your custom effect.
- To remove an effect row, right-click on the left-most column (where the number appears).
- To Reorder effects, Change the numbers in the reorder column.
- Once you are satisfied with the components that make up your custom effect, type a name in the Name field and click OK (see Figure 5-31).
Placing a Custom Effect into a Sequence
Selecting Cells and the Custom Effect Template
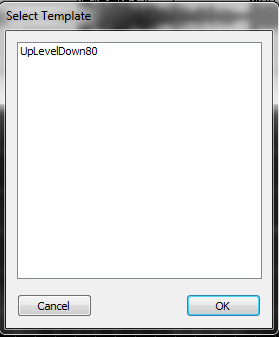
Now that you have built your custom effect, you can use it in a sequence.
- Select the grid cells and channels on which you wish to place the custom effect.
- Press the Custom button or C and a window will open for you to select the custom effect (see Figure 5-32).
- Select your effect and click OK. This will open the Execution of Effect window.
Executing the Custom Effect
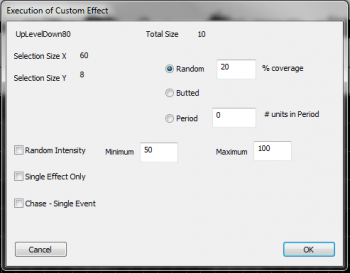
The Execution window (see Figure 5-33) is where you tell HLS very specifically how you want the custom effect applied. This is truly where the power and customization of HLS shines through.
The layout of the window contains basic information in the top left:
- The name of your custom effect template and it's size.
- Selection Size X/Y: This is the number of grid cells selected (X), and the number of channels (Y) that you will apply the effect to.
Modifying the pattern of how the effect is applied:
- Random Coverage: This will place the custom effect randomly throughout the selection box. The %Coverage lets HLS know what percentage of the cells contained in the selection box should be covered by the effect.
- Butted: This means the effects will be placed right next to each other. HLS will place your custom effect back-to-back in each selected channel all the way to the end of your selection.
- Period: This will apply your custom effect every defined period of cells. This period is the "wait time" before the next custom effect is applied. For example, a period of 4 would apply your custom effect, leave 4 grid cells blank, then reapply the effect, and so on.
Additional Modifiers:
- Random Intensity: This will apply your custom effect using a random intensity, from your custom low value to high value.
- Single Effect Only: This will apply your custom effect one time only, exactly as you defined it.
- Chase - Single Event: This will draw your custom effect one time, and chase it through the channels contained in your selection box.
RGB Channels and Custom Effects
- If you wish your custom effect to be a color other than white, use the color-specified custom button on the toolbar.
- Select the rectangle and choose the color you wish to use for the rgb channels. Click the color-coded custom button.
- Configure your Custom effect as described in the sections above.
- It will apply the custom effect in the color chosen.
Creating a Library of Group Effects
Introduction to the HLS Library
HLS contains a Library function, which allows the user to save group effects into a library file which can then be inserted into other places in the sequence or in other sequences. An example would be of saving an group of channel effects that create a wave of colors across a set of mini-trees. This wave could be reused in other places or sequences without having to be created from scratch. A library can contain multiple group effects. HLS can also contain multiple libraries, such as one for mini-trees, one for arches, etc.
- To view the Library, click Library -> Just View - See What's Available. When done, click Cancel to close the window.
Creating a New Library
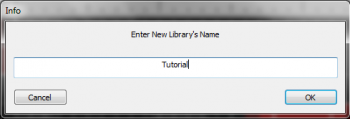
To begin, you must create a new library for HLS to store effects into. To do this, click Library -> Make New Library from the top menu bar. Type in a name for your new library and click OK (see Figure 5-34).
Saving Sequence Data to a Library
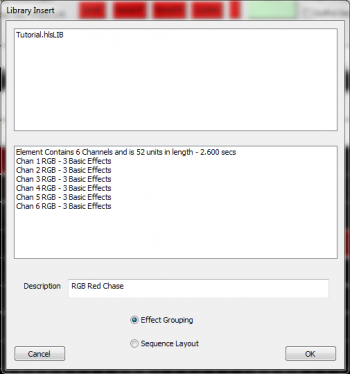
- Draw a selection box around the group of effects and channels that you would like to save to the Library.
- Click Library -> Add Effect Group to Library to assign the selected effects to a library (see Figure 5-35).
- Click on the name of the library you wish to save the group effect into. The bottom half of the window will show information about the effects being saved.
- Note: Make sure Effect Grouping is selected and not Sequence Layout.
- Name the group effect in the Description field and Click OK.
Inserting Saved Group Effects into a Sequence
- It is recommended to save your sequence before adding an effect.
- To insert a saved group effect, click Library -> Insert into Sequence an Effect From Library.
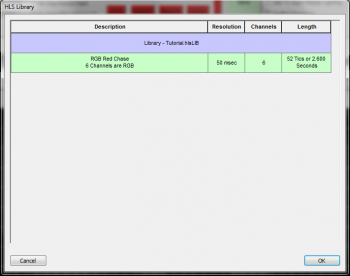
- In the Library window that opens, select the saved effect you wish to insert. It will become highlighted in green (see Figure 5-36). Click OK to continue.
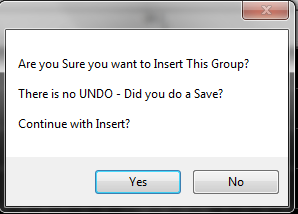
- After clicking OK, HLS will display a warning message (see Figure 5-37).
- To continue, click OK. Otherwise, cancel will abort the insertion of the group effect.
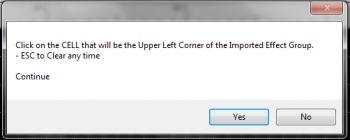
- HLS will display another window with instructions on how to tell HLS where you want the effect inserted (see Figure 5-38).
- Click Yes to continue.
- Left-click on the cell you wish to paste the group effect into. The effect will be pasted starting at that point.
- Once the effect has been inserted, you can then manipulate the individual effects as needed.
Removing a Library of Group Effects
- Currently, you cannot delete Group Effects or whole Libraries from within HLS.
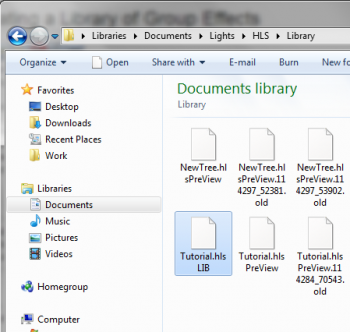
- A work-around to delete Libraries is to navigate using Windows Explorer to the folder that contains HLS.
- Navigate into the Library folder.
- Find the Library you wish to delete. It will have the .LIB extension and be named the same as the library inside HLS (see Figure 5-39).
- Select the file and delete it. HLS will now no longer contain that library or it's associated group effects.
Depreciated Library Functions
In the past, the Library function could be used to save Channel Layout for a sequence. This would allow you to reuse a sequence's channel setup, output setup, etc. with other sequences. This feature has been depreciated in favor of Using HLS Sequence Images.
